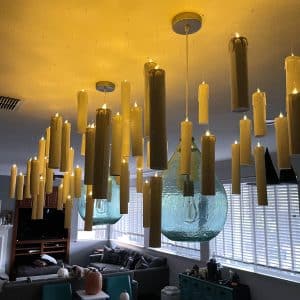
DIY Harry Potter Floating Candles
These DIY Harry Potter Floating Candles will transport you straight to Hogwarts! Perfect for your next Harry Potter party or Halloween decorating!
Equipment
- Dremel Tool or Drill with 1/16" Bit
- Hot Glue Gun
Ingredients
- Heavy Cardstock, cut into 5" x 5.5" - 5" x 8.5" pieces and 2" squares (one of each per candle)
- Flameless Tealight Candles
- Scissors
- Double-Sided Tape
- Glue
- Hot Glue Gun & Glue Sticks
- White or Cream Acrylic Paint
- Clear Fishing Line or Thread
Instructions
- Add a strip of double-sided tape to the length edge of the larger piece of cardstock. Place a tealight at each width end of the cardstock, and carefully holding them in place, roll up the cardboard into a tube, securing the edges at the double-stick tape. Remove the tealights.
- Add a generous amount of glue to one end of the paper cylinder, and place it on top of the 2" cardstock square. Use your fingers to smooth the glue (like caulking). Allow the glue to dry completely and then trim excess paper at the base.
- Using the hot glue gun, create "wax drips" down the cylinder to create the appearance of a dripping candle. Allow the glue to cool completely, and then paint the drips with acrylic paint.
- Drill a hole in the tip of each flameless tealight candle. Take your time and be cautious so that you don't damage the candle's functionality.
- Thread a length of fishing line through the hole and tie a secure knot to hold it in place. You will want to create different lengths of fishing line so that the candles will hang staggered from the ceiling. Once the fishing line is in position, place the tealight candles back in the paper candle tubes.
- Use hooks, push pins, thumb tacks, etc. to hang your candles from the ceiling or other overhead structure.