Halloween Macarons
These spooky macarons will look GREAT on any Halloween party table! Follow our easy, step-by-step guide to get the perfect Halloween treat!
Servings 30
Equipment
Ingredients
Macaron Shell Ingredients
- 105 gm Egg Whites
- 1/4 Tsp Cream of Tartar
- 105 gm Granulated Sugar
- 125 gm Almond Flour
- 113 gm Powdered Sugar
- Food Coloring Gel or Powder
- White Vinegar To Wipe Equipment
Nutella Buttercream Ingredients
- 4 Tbsp Unsalted Butter
- 1/2 Cup Nutella
- 2-4 Tbsp Heavy Cream
- 1 3/4 Cup Powdered Sugar
- 1 Pinch Salt
Decoration Ingredients
- 1/4 Cup White Melting Wafers
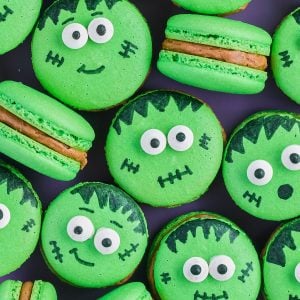
- Candy Sprinkle Eyes
- Edible Black Marker
Instructions
How To Make Halloween Macarons:
- Before starting this recipe, wipe down bowls, attachments, spatulas, and silicone mat with vinegar to eliminate any grease or residue. This is essential to help make sure your macarons come out correctly.
- Now, begin by sifting together the almond meal and powdered sugar into a medium-sized bowl. Set the almond flour mixture aside.
- Place egg whites and cream of tartar into the bowl of a stand mixer. Turn on the stand mixer on low speed and mix the egg whites using the whisk attachment for 1 – 2 minutes, until foamy.
- With the mixer running, slowly start to add the granulated sugar to the egg whites. Once all the sugar has been added, increase the stand mixer speed to medium speed and continue to mix until your meringue reaches stiff peaks. This takes around 5 – 6 minutes, but be sure to check it often to avoid over-mixing.
- Remove the mixing bowl from the mixer.
- To begin the macaronage stage, add half of the powdered sugar/almond meal mixture to the egg whites.
- With a large, flexible rubber spatula fold until combined. Then add the remaining mixture to the egg whites and fold in until incorporated.
- Once all the fine almond flour is added, begin adding the green gel food coloring. I added 7 drops to the batter to get color in the photos.
- *Note – You CAN add coloring during the meringue process too, but adding it during the macaronage process helps to get a deeper color.
- Continue mixing by scraping the batter against the sides of the bowl. The batter is done being mixed once the batter flows in ribbons off the spatula. You can test the batter for doneness by trying to make a figure 8 with the batter while it is falling off the spatula into the bowl. It’s considered done if the ribbon does not break. Be careful not to over-mix!
- Line an upside-down baking pan or cookie sheet with silicone baking mats, preferably ones with small circles like a macaron template.
- Fill a piping bag with the batter. Using a round tip, pipe the batter on the baking mat following the template on the mat. Once done piping, carefully rap or bang the baking tray on the countertop to get rid of any large air bubbles. Using a toothpick or scribe, pop any remaining air bubbles.
- Preheat your oven to 300 degrees.
- Allow your macarons to dry for 40 – 45 minutes until a skin forms. This may take longer depending on humidity.
- Bake each tray separately for 12-14 minutes. Remove from the oven and allow macarons to cool completely on the mat. Do not remove until completely cooled (about 15 – 20 minutes).
- While the macarons are baking, start preparing the Nutella buttercream.
- In a medium bowl, add the butter and mix for 1 minute until creamy.
- Add the Nutella to the butter and mix for another minute.
- Add two tablespoons of heavy cream, powdered sugar, and a pinch of salt to the bowl. Mix until well combined. Add 1 – 2 tablespoons of heavy cream if needed to get the desired consistency.
- If the buttercream seems too runny, add a couple of tablespoons of powdered sugar if needed.
- Put the filling in a piping bag.
- Before filling the macarons, match each up into pairs similar in size.
- Add the filling to a shell and then sandwich together.
- *Note – I recommend chilling the macarons for at least an hour in the refrigerator before decorating. Please note macarons need a full 24 hours in the refrigerator to mature, so you can even opt to decorate the next day.
- To decorate, melt the melting wafer in the microwave according to the directions on the package.
- Once the candy melts are fully melted, use a toothpick to apply a small amount of chocolate to the back of the candy sprinkle eye and then attach it to the top of the macaron.
- Once both eyes are placed on the macaron, use an edible marker to draw hair and facial features on the macaron.
- Once decorated be sure the filled macarons are fully matured (this takes about 24 hours from the time they are filled) and serve.
Notes
See our "Frequently Asked Questions" and "Recipe Notes & Tips" sections of this blog post for more helpful info on how to get the perfect macaron.