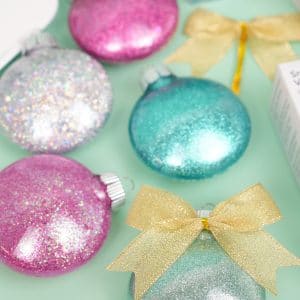
DIY Glitter Ornaments
Learn how to make DIY glitter ornaments + discover the very best glue to use (we tested 10!)! These glitter ornaments are SUPER easy to make, and they make a perfect gift idea, too!
Ingredients
- Clear Glass or Plastic Ornaments
- Adhesive of Choice, see further information in post
- Extra Fine or Ultra Fine Glitter
- Chunky Glitter, optional
- Small Plastic Cups
- Bow or Ribbon
Instructions
- In a small cup (I love these flexible tiny cups!), mix about 1 tablespoon of extra fine glitter with 1/2 teaspoon of chunky glitter. A little bit of chunky glitter goes a long way!
- Remove the top of the ornament. Gently pull on the hanger loop until the top pops free from the neck of the ornament.
- Squirt a generous amount of the adhesive inside of the ornament. Gently swirl the ornament around until the entire interior surface has been thoroughly coated.
- Turn the ornament upside down for a few minutes to allow all of the excess adhesive to drain out.
- Add the glitter to the inside of the ornament.If you’re using a blend of glitters, remember that the chunky glitter is heavier, so you’ll want to pour the glitter into the ornament slowly. Angling and gently turning your ornament, slowly pour in the glitter into the ornament to evenly distribute the chunky glitter.
- Use your thumb to cover the opening, and shake until the entire surface of the ornament is coated in glitter.
- Turn the ornament back over the glitter container and gently tap the exterior of the ornament with your fingertips to remove any excess glitter. Set the ornaments aside and allow them to dry completely.
- When the ornaments are completely dry, replace the ornament tops and add a ribbon or bow for the finishing touch.