
Here’s one from my archives that deserves a revisit!
My boys are NUTS over guitar picks…don’t ask me why! I decided to have them make their own special guitar picks instead of raiding their dad’s guitar case every five minutes (you’re welcome, Daddy!).
Here’s what you need:
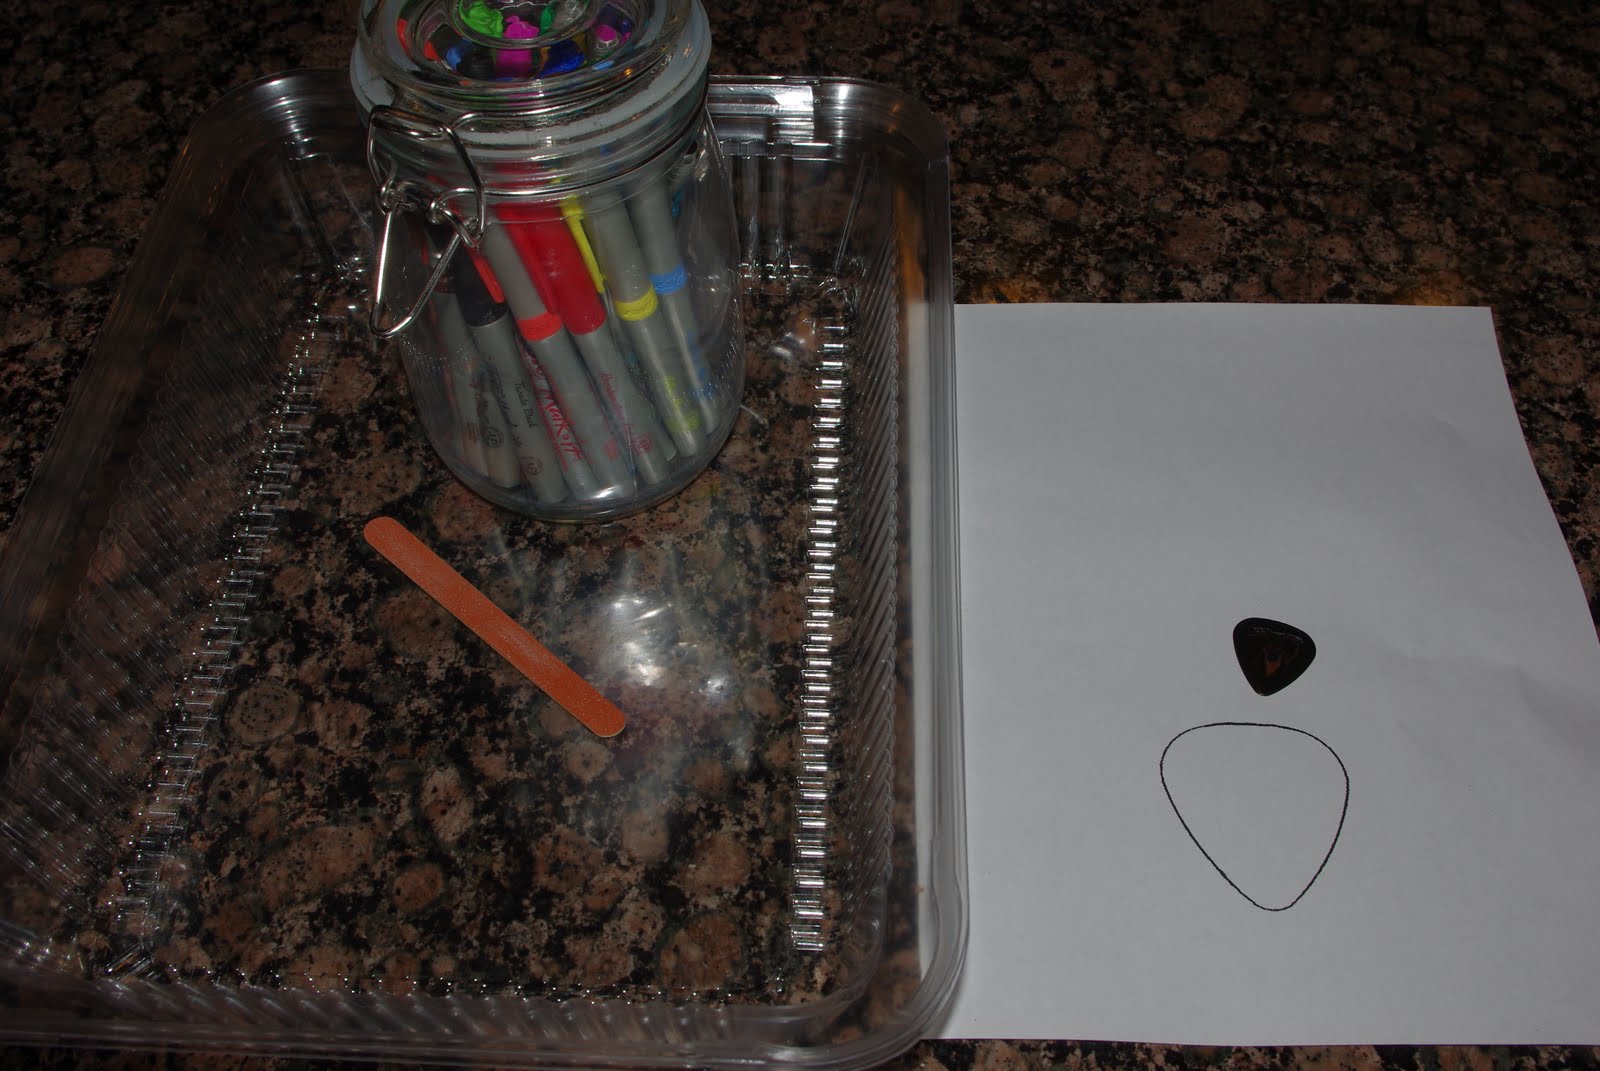
* Permanent Markers
* Foil
* Guitar Pick – trace the pick and enlarge about 250% to make a template
* #6 plastic – this can be found in many food packaging materials including clear takeout containers. Our came in the form of disposable cake pan lids that we purchased at the Dollar Tree.
* Optional: nail file or sandpaper
Cut your plastic into a flat sheet and trace over your guitar pick template. My kids were too impatient, but at this point you might want to lightly sand the side that you are going to draw on as it makes the marker adhere better (without sanding, the marker will likely start to scratch off after awhile unless you are also planning on using a sealer on it). Start coloring!

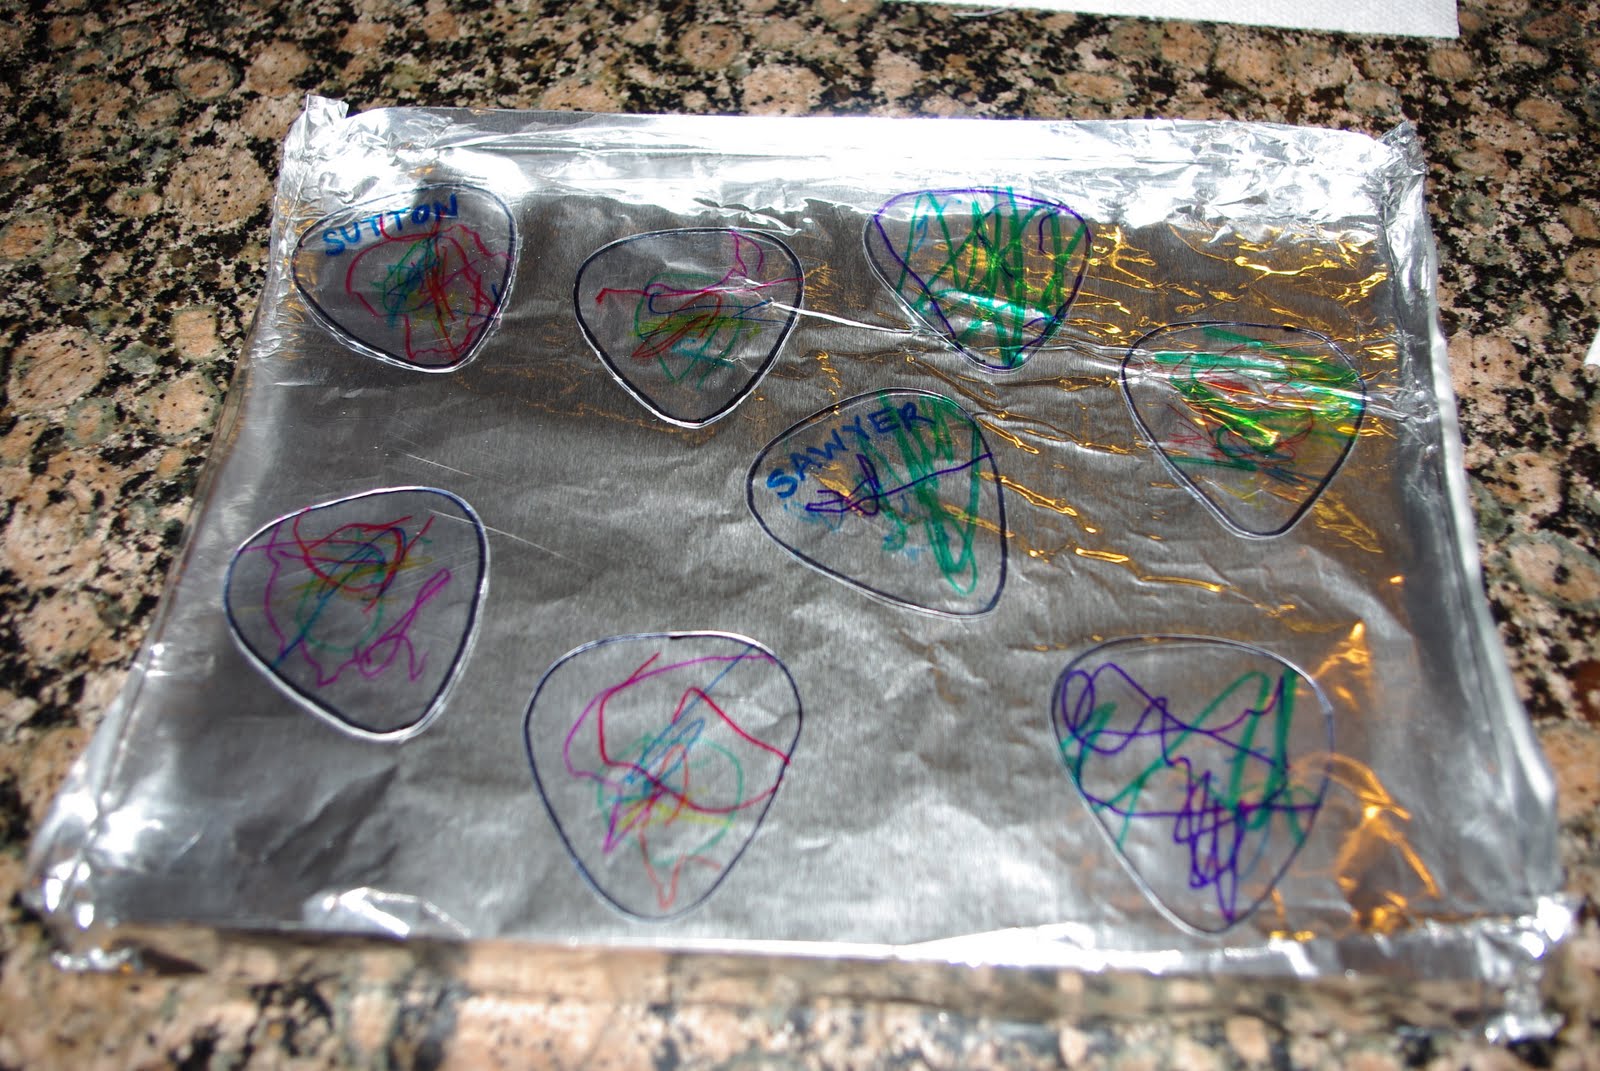
Preheat your oven to 325 degrees. Cut out your picks and place them on a “cookie sheet” crafted from foil. You can also use a regular cookie sheet lined with foil, but it makes the shrinking process take a little longer.
Place the picks into the oven, and after about a minute they will start to bubble, shrink and curl up. Don’t worry about the curling – they will flatten themselves out as the shrinking process finishes!
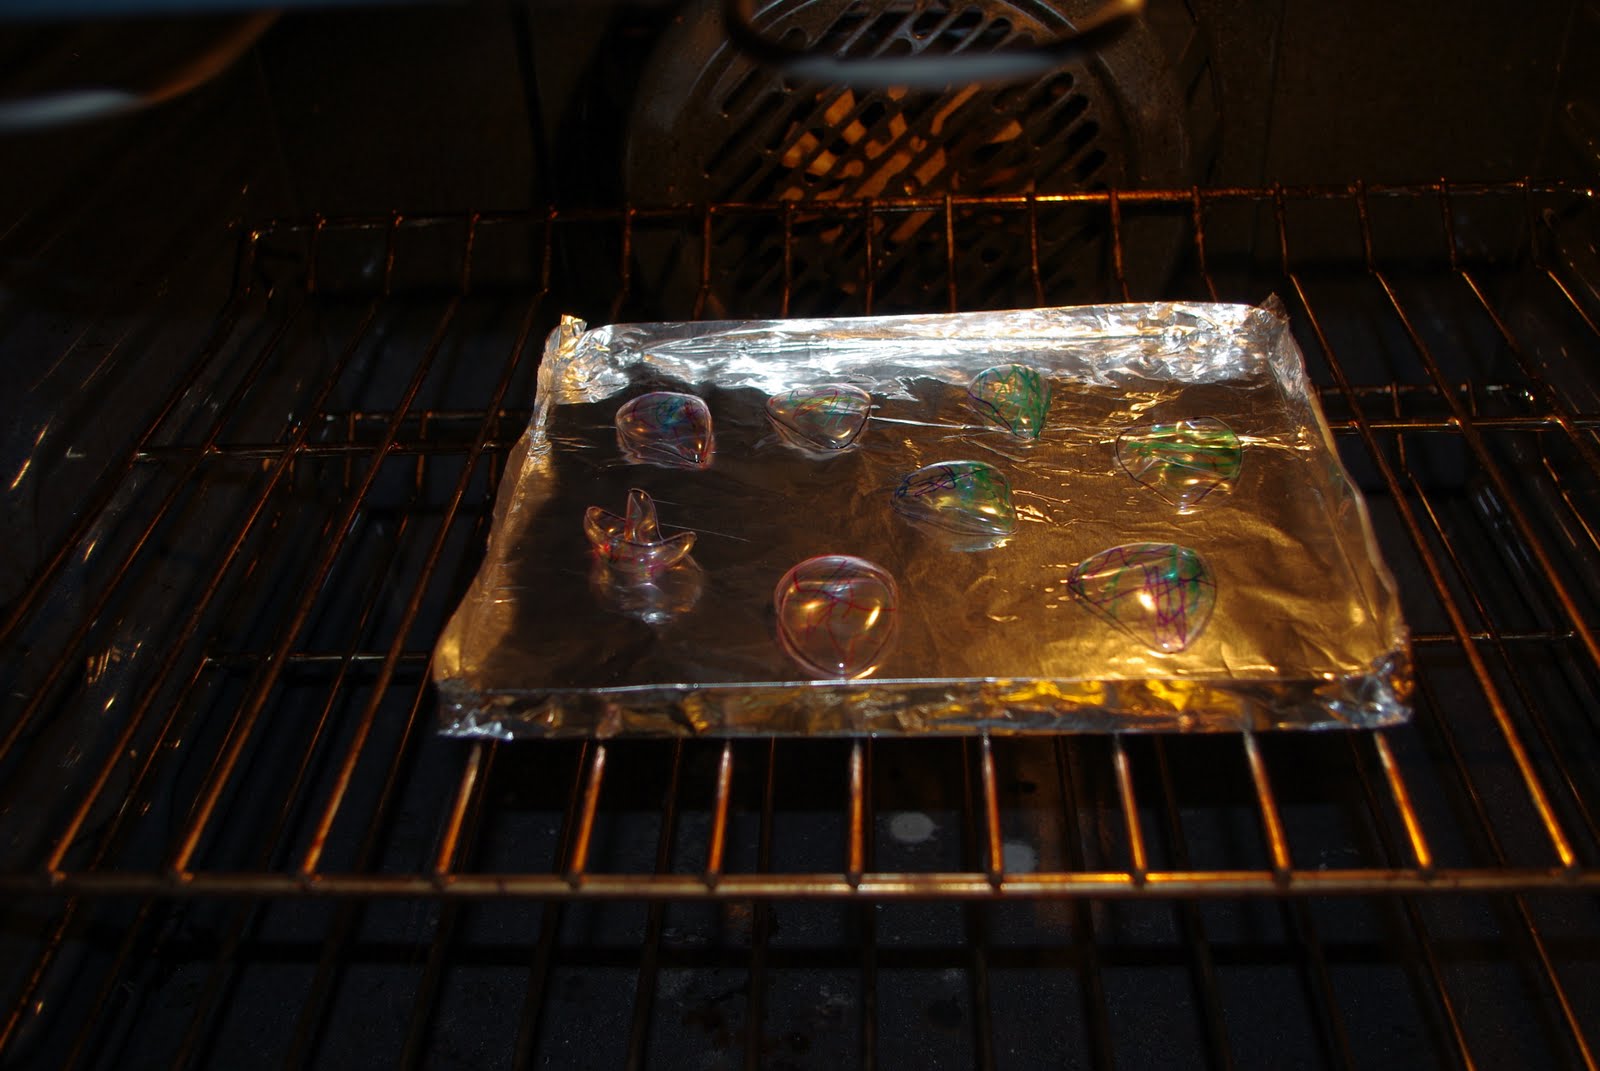
Carefully remove them from the oven – if you’re still concerned that they’re not perfectly flat, you can place something flat and heavy (we used a dictionary) on them while they cool, but you’ll have to work quickly as they cool very fast. I should mention that melting #6 plastic fumes are probably not the best thing for you to breathe in, I’m sure. If you’re just doing one quick batch like we did, you probably won’t even notice any fumes, but if you’re going to do a larger project, I would make sure the area is well ventilated.
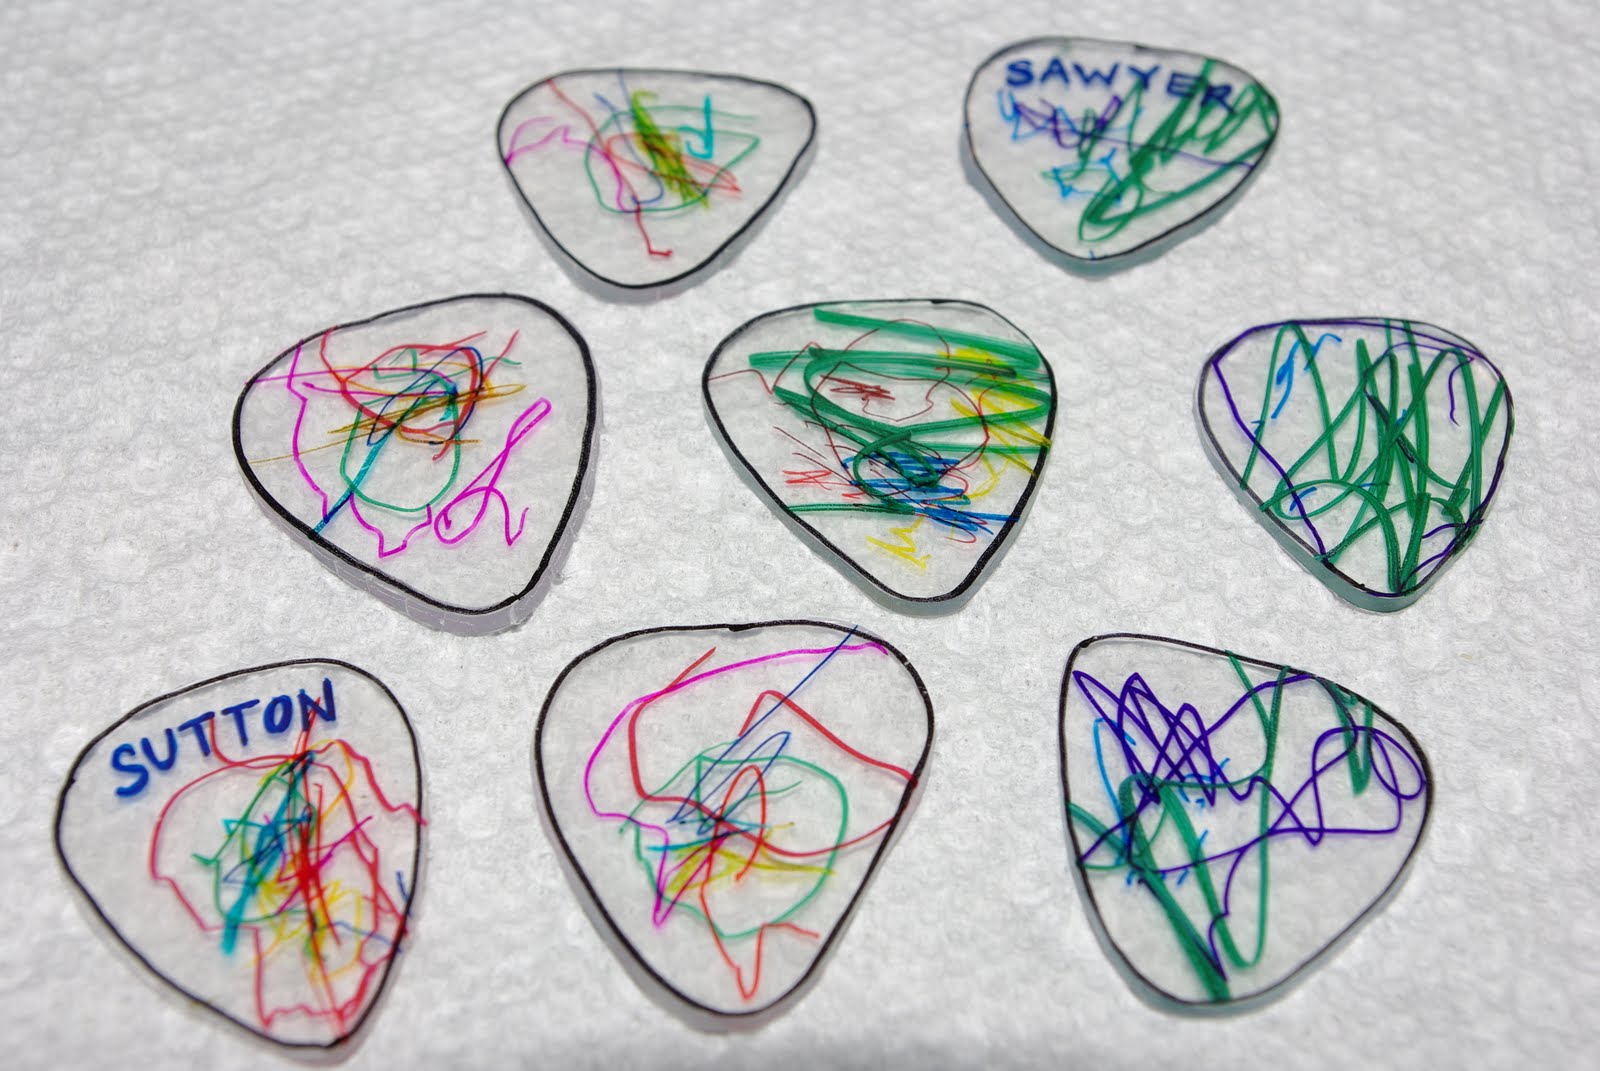
Get someone to test out your finished project – family jam session!


Heidi Kundin has captivated the hearts of millions with her colorful and inspiring approach to crafting, celebrations, and family fun. With over 15 years of experience, Happiness is Homemade has become a must-visit destination for those seeking quick and easy creative ideas and last-minute solutions. Heidi’s warm personality shines through her posts, inviting readers to join her on a creative journey that’s fun, rewarding, and achievable. Heidi is also the author of Homemade Bath Bombs & More and DIY Tie-Dye.
Im gonna try this
why do you have to put them in the oven at all and shrink them to normal size? Why do you not just cut out the normal size and leave it at that without the oven step? I’m not understanding why the oven is being used, what benefit is there to shrinking them?
The plastic is too thin and flexible as-is. Shrinking allows the plastic to thicken and become more stable in order to use it as a guitar pick.
Great . Thanks for sharing
I have trouble with them curling and staying curled. I read where you said to lay something heavy on them, like a book. They don’t stick to the book? Seems to me they’d be sticky! Correct me if I’m wrong, because I really want to try this again, I can see so many possibilities.
Ours didn’t stick, Penny, but you can always lay a sheet of parchment paper between the picks and the book if you’re worried about it! 🙂
Hi
I was just wondering would this work in a mini toaster oven instead of a full-blown oven do you think?
Hi Vivian, I think they’d work in a toaster oven. Just be sure to keep an eye on them because the shrinking happens very quickly. 🙂
How do I tell what number my plastic is? I have a bunch of clear egg cartons laying around and this would be the perfect use for the flat cover.
On the bottom of the containers there will be a triangle shaped recycling symbol, and the number is inside the triangle 🙂
Hi, I was just wondering if one is able to use these as actual guitar picks or if they end up too thin or brittle? Thanks!
Hi Jordan! You can absolutely use the finished picks with your guitar! They are actually a little thicker than true guitar picks, so no need to worry about them being thin or brittle. 🙂
what does diy mean
Do It Yourself 🙂
Thanks so much for this diy customized pick! My son loved doing it!
I tried it at 250% and they shrank down to the size of small buttons. Then I tried it at 900% and they were about the size of silver dollars. *sigh Okay, back to the Dollar Tree and I think I’ll try it at about 650% and hopefully it’ll work this time!
Has anyone tried this with Shrinky Dink plastic? If so, is 250% still the correct size, and how do they sound? Thanks.. great way to make custom picks!
Alexandria, are you sure that the plastic you’re using is #6 plastic? We’ve used #6 plastic as shrinky dinks dozens of times, and I’ve never had this issue. The plastic will curl and twist as it’s shrinking, but it always flattens itself back out when it’s finished. It should only take 2-3 minutes. It is possible to manipulate them and flatten them with a book or something heavy when they’re warm straight from the oven, but be careful because the plastic is very hot (and it cools very quickly, so you’ll have to work fast!).
I tried making these today for my husband as a stocking stuffer, the picks would shrivel up and stay that way. I tried leaving them in to up to five minutes. I’m not sure what I’m doing wrong.
There is a tool that will punch out a pick. You can use old credit cards, plastic (like what you used), etc. My daughter game me my punch for Mother’s day in May.
How did you enlarge the tracing?
I traced a standard guitar pick on to a piece of paper and then used my fax/copier to enlarge it 250%. You can also scan your tracing and enlarge it in the print dialog box (or enlarge it in a program such as Photoshop or Paint Shop). If you don’t have any of these options, just take your tracing down to a local copy shop and they’ll be happy to help you enlarge it!
Hi Kdai117, you’ll want to keep watching them while they’re in the oven. The entire shrinking process only takes about 2-3 minutes. They will initially curl up, but once they start to flatten themselves back out you’ll see that the shrinking has finished. Hope that helps! 🙂
How long do you leave them in the oven?
Although, I have to admit, this yellow checked background is a killer on the eyes! lol Other than that, I love your blog!
Very cool!!
What a great project. I stumbled across your blog some time ago. It looks like your oldest boys are about the same age as my son. Where in California are you? We are about an hour from Sacramento. -Tammy