
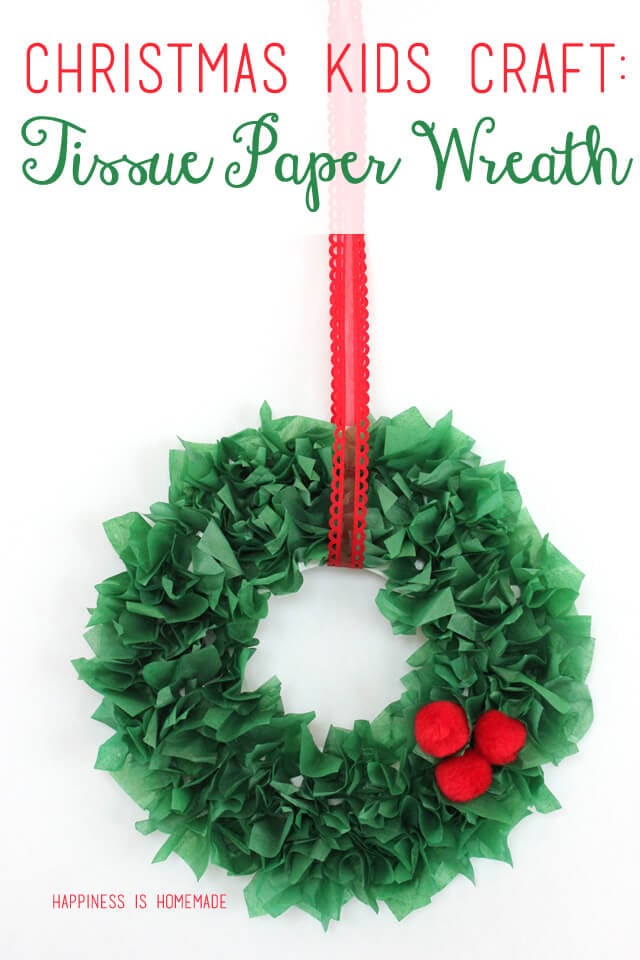
 The whole family will want to get in on the fun when it comes time to make these simple tissue paper wreaths! All it takes are a few basic supplies and a little bit of patience to create your own personalized Christmas wreath – add pom poms, sequins or glitter for a festive finishing touch! These wreaths are easy and inexpensive to make, and they make great homemade holiday gifts for the kids to give to Grandma!

You will need:
- Circular wreath form – cut from recycled cereal box or a paper plate
- Lots and LOTS of green tissue paper squares
- White glue
- Paint brush
- Pencil with eraser
- Embellishments – pom poms, sequins, etc. (optional)
- Ribbon or string for hanging
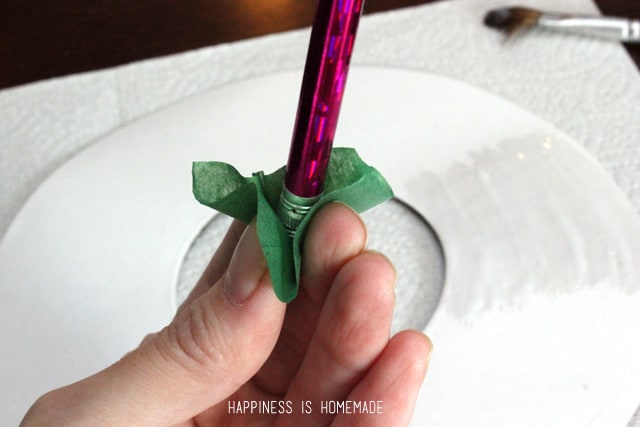
Use the paintbrush to spread a small amount of white glue on to a section of the wreath (work on about 1/6 of the wreath at a time). Use the eraser end of the pencil to shape each square of tissue paper as shown.
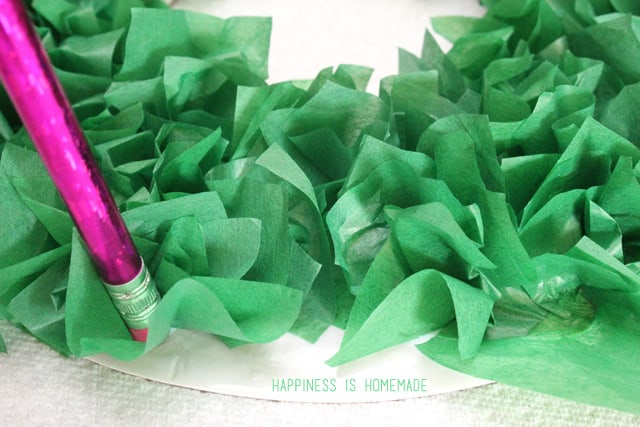
Use the eraser to help you place your tissue paper squares on to the wreath form, and continue to work section by section until the entire wreath form is full and covered.
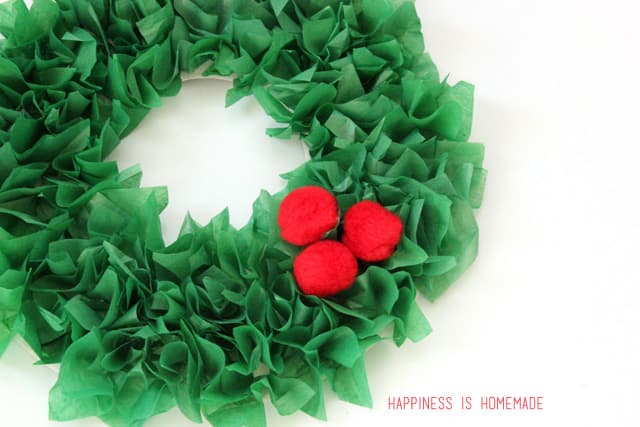
Add optional embellishments – pom poms make great holly berries, sequins and glitter add sparkle, and large buttons make nice “ornaments.”

Add a ribbon for hanging, and the wreath is ready to be displayed or gifted!


Heidi Kundin has captivated the hearts of millions with her colorful and inspiring approach to crafting, celebrations, and family fun. With over 15 years of experience, Happiness is Homemade has become a must-visit destination for those seeking quick and easy creative ideas and last-minute solutions. Heidi’s warm personality shines through her posts, inviting readers to join her on a creative journey that’s fun, rewarding, and achievable. Heidi is also the author of Homemade Bath Bombs & More and DIY Tie-Dye.
I have done this for two years the kids love making them and giving them to family
Adoro las manualidades! este find e semana haré la corona de papel tisú, me ha encantado la idea muchas gracias por compartir. Seguro que a mis peques les encanta hacerla. Felices fiestas!!
A brilliant activity! I love crafts and was more than happy to set up and help the kids with this beautiful festive piece. My son (7 years old) who has disabilities, fine motor skills not his strong point found working with the tissue paper and pencil difficult so opted for balls of tissue paper, resulting in a completely different look, but a fabulous look none the less! Has a look of Holly with red and white berries.
My daughter (9 years old) loved the suggested technique and we alternated the colors, two different greens, reds, greens again and then white, then repeating until the whole circle was filled. The wreath looks amazing, the green looking a lot like Holly, the red like Poinsettia, and white something like white Poinsettia or Cyclamen. Unbelievable how lovely they have turned out! We all realy enjoyed making them and the final result… Thank you.
This ways tons of fun! Me and my class did this and we only had twenty minutes and we did not finish it even the boys said NOOO MORE TIME and the teacher gave us more time!
This is a great thing to decorate my room with! I love how it looks in the pictures and can’t wait to make it! Thanks for the idea!
Can you tell me what size are the pom poms please?
Very usefu,l helped my 5 yrs old son, he was so happy to make a wreth for his school activity and also got applauded.
This was the BEST kids craft…EVER!! Thanks so much for sharing! We did this craft with seventeen 8 y/o boys, and they loved it!! It kept their attention, the product was lovely…thanks for a easy, successful class holiday party craft. We allowed about 20 minutes, and the timing was perfect. We used small paper dessert plates with a mug tracing as the cut-out for the center hole. Used Qtips to spread the glue. We also used a variety of holiday paper, which gave some different festive looks.
That sounds like a ton of fun! I’m so glad that you all enjoyed it! 🙂
So nice and yet so easy. Thanks for a great tutorial!!
I’m wondering what the size of the wreath circle is? I thought it was small, maybe from a 5 x 5 or smallar paper until I saw the picture of the pencil and glue bottle next to it. Thanks.
Our wreaths were about 8″
What size are the tissue paper squares?
They are approximately 2″ square.