
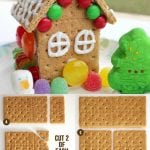
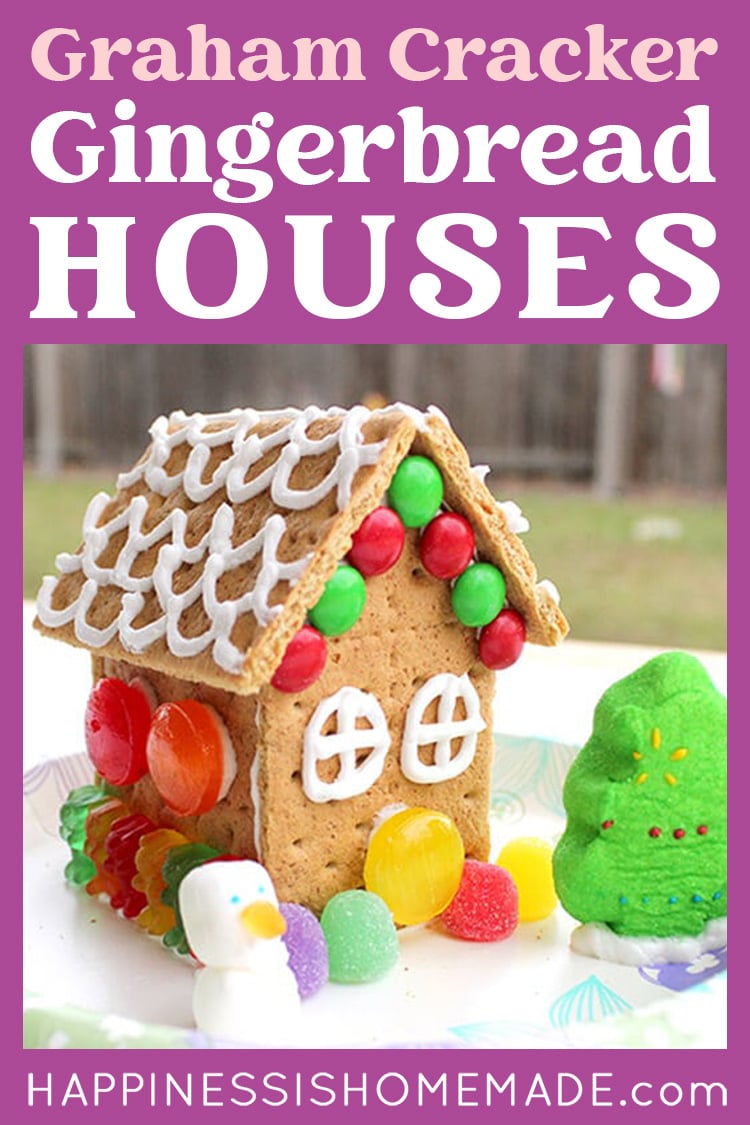
Decorating gingerbread houses is a fun holiday tradition, and now, it’s even easier with this simple step-by-step tutorial for How to Make Graham Cracker Gingerbread Houses – a quick and easy, fun activity that’s perfect for school parties, large groups, or at home with your family!
This post may contain affiliate links. I will receive a small commission from these sales at no additional cost to you!
Traditional gingerbread houses are a fun Christmas activity, but they’re a lot of work! Learn how to make an easier version using graham crackers instead!
Decorating gingerbread houses is more than just a fun holiday activity, it’s a wonderful way to bond, create, and indulge in the festive spirit of the season. I’ve been crafting graham cracker gingerbread houses with my family for over twelve years, making this one of our most cherished and favorite Christmas traditions.
This expanded tutorial will guide you through the process of making these delightful houses, perfect for school classrooms, large groups, or cozy family gatherings at home. Holiday baking and decorating is always more fun when you do it with friends!
You May Also Like:
Easy Graham Cracker Gingerbread Houses
Supplies & Ingredients:
Before you begin, it’s essential to gather all your materials.
What You’ll Need:
- Box of Graham Crackers: 5 full graham crackers per house, including roof pieces, side pieces, and a front and back piece.
- Royal Icing: Our improved recipe (details below) now includes meringue powder for better consistency.
- Base: Use a paper plate, cake board, or a piece of cardboard for a flat surface to build your gingerbread house.
- Cutting Tools: A bread knife or a serrated knife is ideal for shaping your graham crackers.
- Decorating Tools: A disposable piping bag or a simple plastic bag can be used to precisely apply the icing. Use different icing tips for unique decorations and finishes.
- Decorations: Assorted candy (we like gummy bears, mini candy canes, gumdrops, Skittles, peppermints, M&Ms, etc.), pretzel sticks, Craisins/dried fruit, nuts, mini marshmallows, etc.
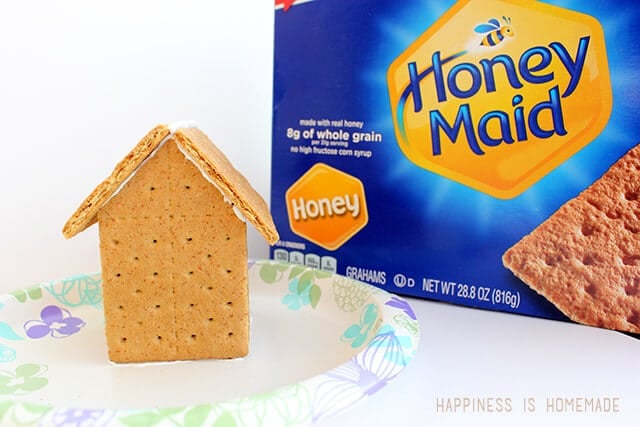
Heidi’s Pro Tip:
I allow my kids the creative freedom to decorate their graham cracker houses however they choose, so we only have one rule when it comes to making an awesome gingerbread house – always, always, ALWAYS use Honey Maid graham crackers! (Trust me on this one!) Honey Maid graham crackers are sturdier, flatter, and much easier to cut than any of the other competitors (not to mention they taste a lot better, too!).
Gingerbread House Instructions
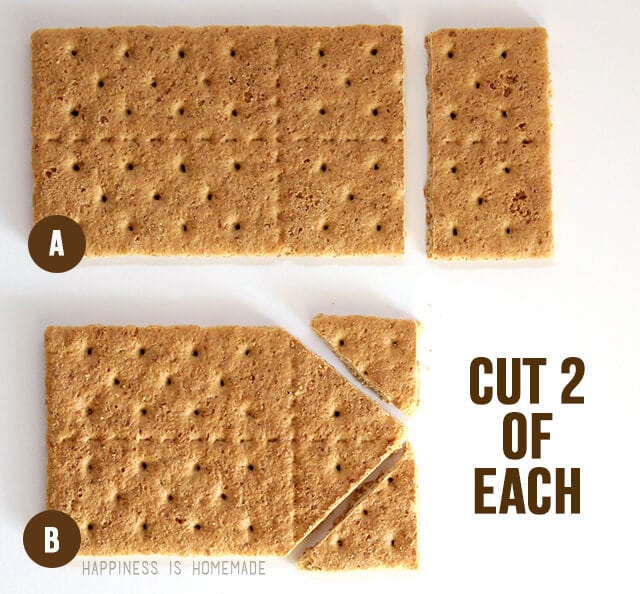
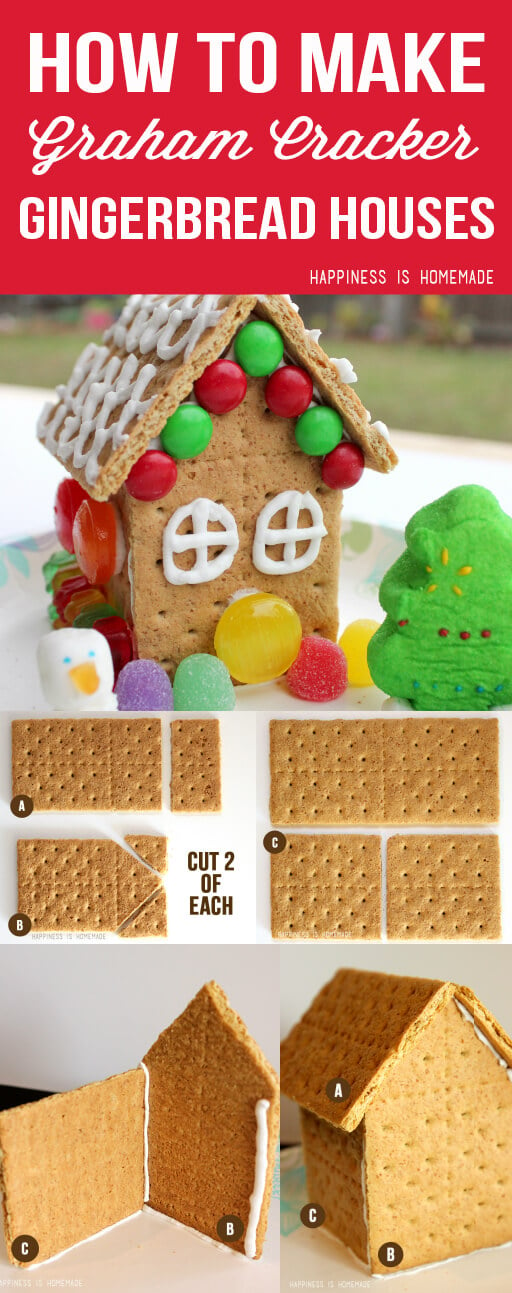
Preparing the Graham Crackers
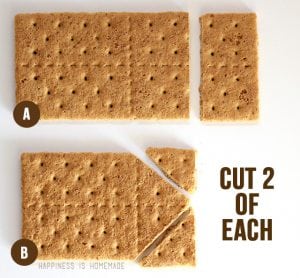
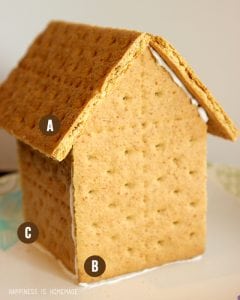
Use a serrated knife and a gentle sawing motion to cut four graham crackers into Shape A by removing 1/4 of the cracker. (Set the discarded edges and triangle shape cut pieces aside for snacking!)
Cut the corners off of two of the crackers (using the center lines as your guide) to create Shape B.
You will have two Shape A pieces (for the roof panels) and two Shape B pieces (for the front and back of the house).
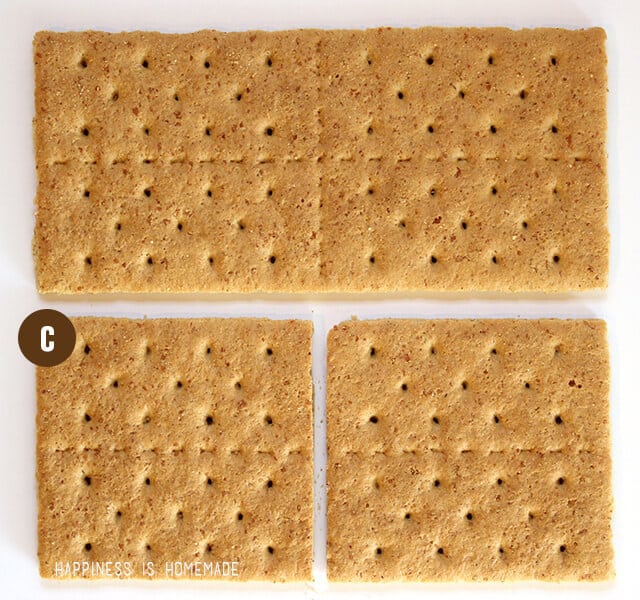
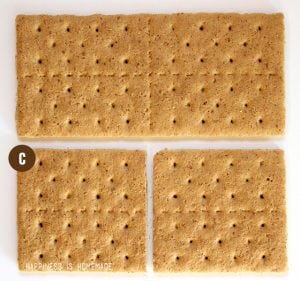
Cut another graham cracker in half to form two Shape C pieces (for the side walls). Now, you should have two square graham crackers to work with.
How to Make Royal Icing
Next, whip up a batch of simple royal icing using the ingredients and directions below:
- 3 cups Powdered Sugar
- 2 Egg Whites, at room temperature
- 1/4 tsp Cream of Tartar
- 1 tbsp Meringue Powder
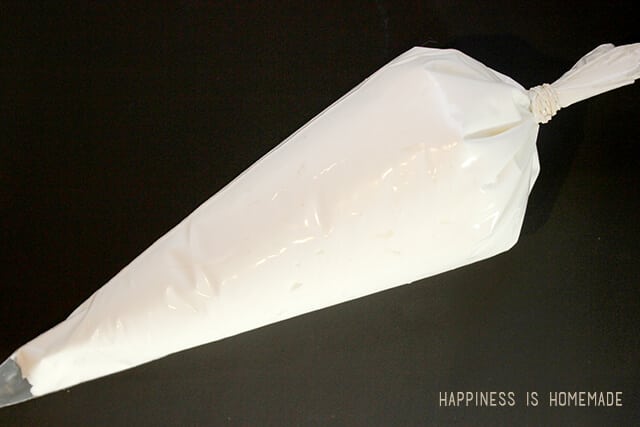
Whip the egg whites until frothy, add the other ingredients, and whip for 7-9 minutes until the volume has increased and the icing holds stiff peaks. Put your icing into a disposable piping bag.
You could also opt to use Royal Icing Mix, however, using our royal icing recipe ensures that your icing is the perfect consistency for both assembling and decorating your gingerbread houses.
HELPFUL HINTS:
You could also opt to use store-bought frosting in lieu of the royal icing; however, the hold will not be as strong. I do not recommend using this method if you are decorating the mini houses with younger kids who may not be able to be gentle with them.
If you are okay with the finished houses not being edible, you can also use a hot glue gun to adhere the pieces.

Assembling the Gingerbread House
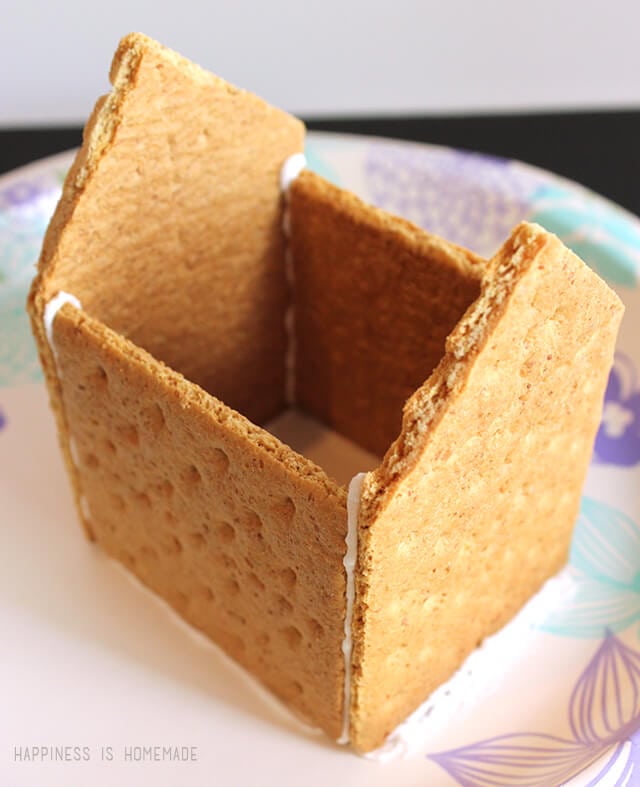
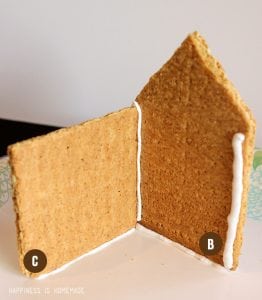
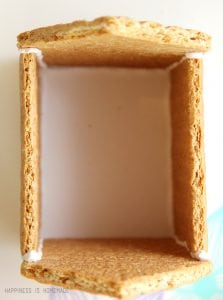
Assemble the first side wall (Shape C) and back wall (Shape B).
Pipe a thick line of royal icing along the bottom edge of Shape C and adhere it to your base (sturdy paper plate or cardboard).
Pipe two lines of icing along the inside of the long edges of Shape B as well as along the bottom. Attach Shape B to Shape C and the base.
Attaching the house to the base with icing makes the houses sturdier as well as MUCH easier for younger children to decorate – no worrying about them falling apart or tipping over!
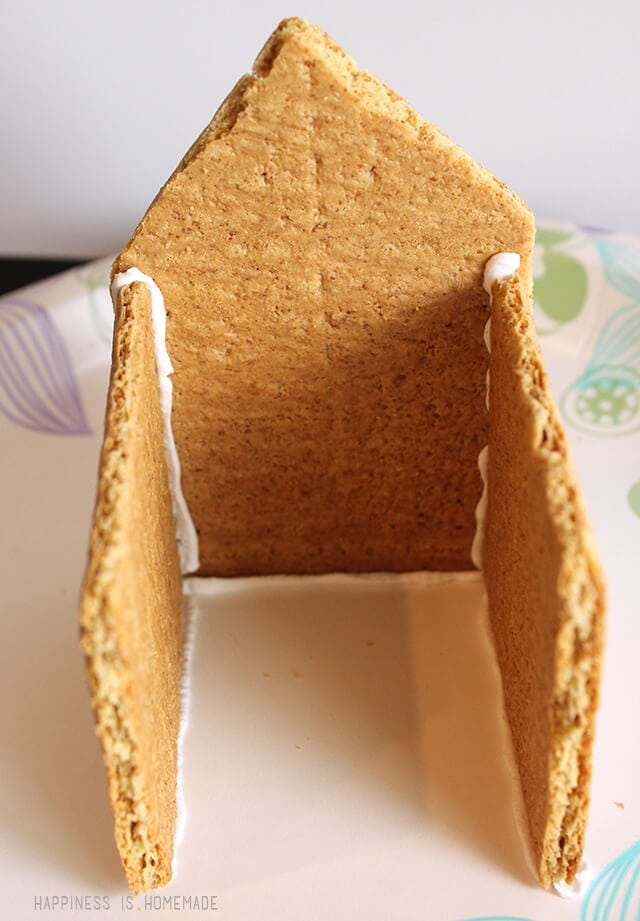
Repeat the process for the other two walls.
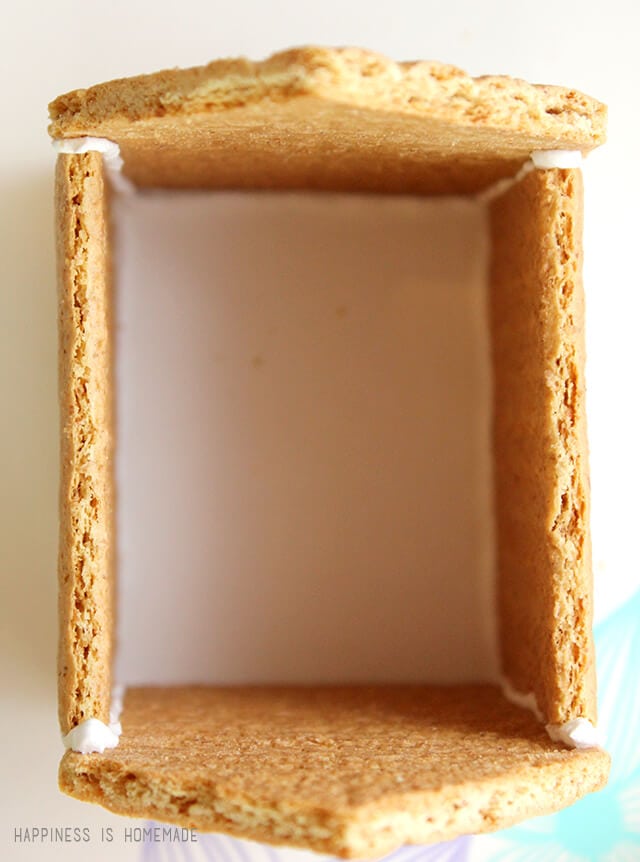
Make sure that everything is lined up properly, and give the sides of the house a gentle squeeze to ensure that everything will hold together.
Allow the icing to set up for 10-15 minutes before applying the roof. This will help ensure a really strong bond between all of the pieces and create a sturdy gingerbread house.
We typically decorate our gingerbread houses along with a group of friends or classmates, so I frequently will make anywhere from 10-30 of these graham cracker houses at a time. My preferred assembly process is to build all of the bases first (as shown), and then go back and add the roofs as the final step.

Add a thick ribbon of icing down the peaks of the house (Shape B), and add two of the Shape A pieces to create the roof.
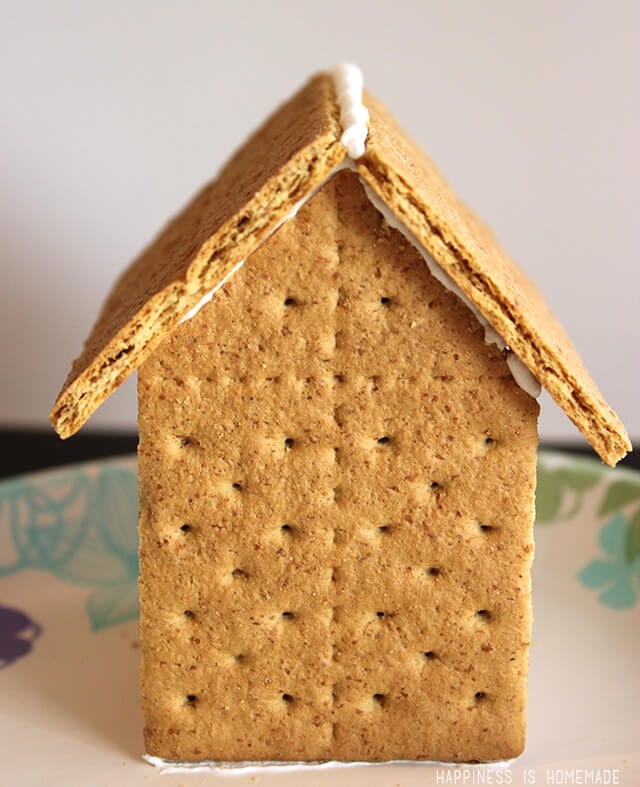
Add another line of icing along the peak of the roof to cover the seam between the two crackers and add strength and stability (plus, it looks pretty cute, too!). Allow the icing to set up for at least 30-60 minutes before decorating.
Heidi’s Pro Tip:
I like to build our gingerbread houses the night before our decorating party so that the icing has time to fully harden overnight. I especially recommend this option if you’re working with little kids. It’s far easier to prepare the cookie pieces in advance, and let them focus on the most enjoyable part – decorating!
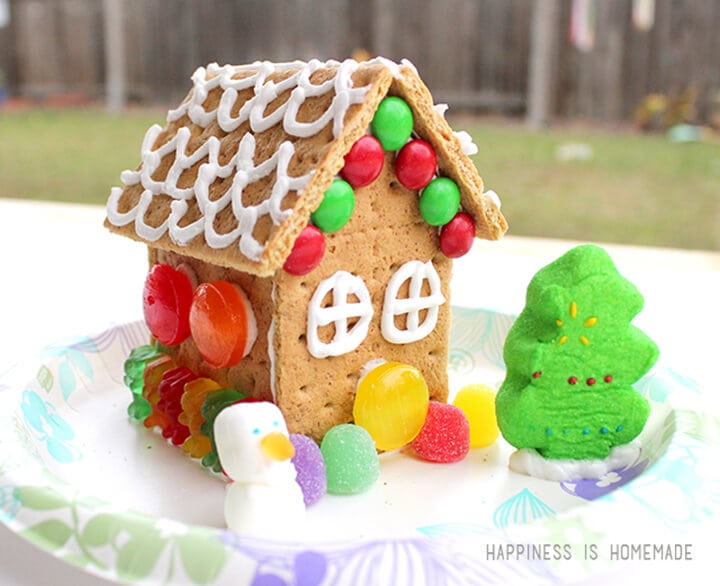
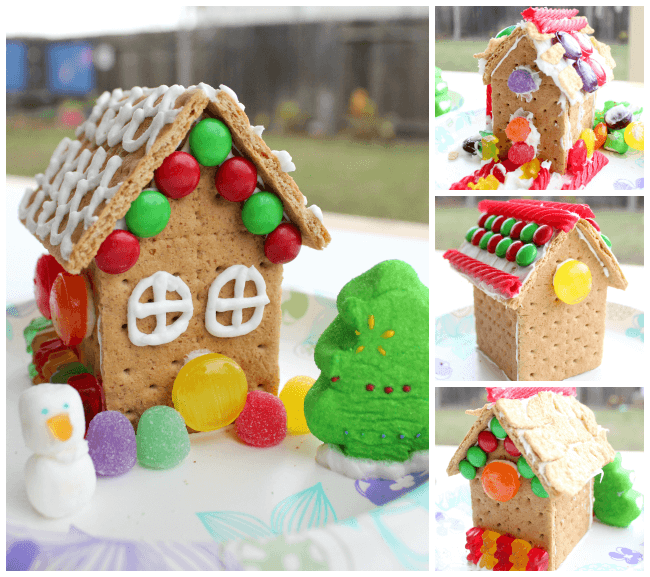
Decorating The Gingerbread House
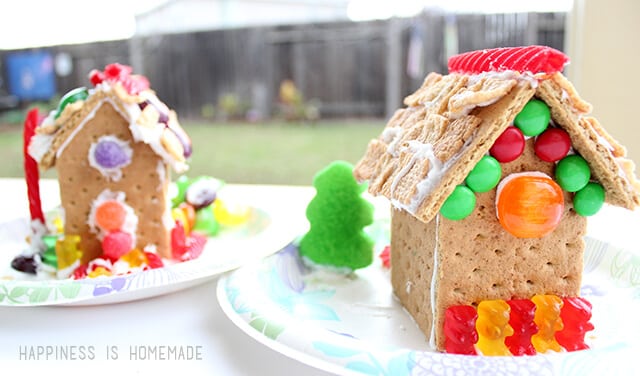
The decorations are the fun part of this process! It’s a great way to let your creativity flow!
Use a pastry bag to pipe royal icing onto your house and decorate it with your choice of candies. You can also use pre-made white frosting and a butter knife or plastic knife to add larger areas of “snow” to your house.
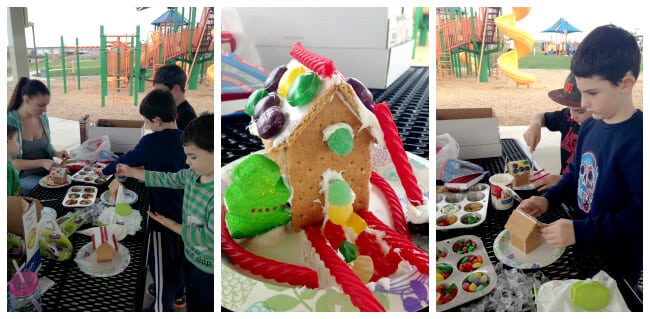
This year we decorated our graham cracker gingerbread houses with our homeschool group, and the boys had a ton of fun! Each family brought an assortment of different candies (SO much candy!) and decorations, so we had a fun variety of options that were different than our usual fare. We met at a local park and gave everyone muffin tins filled with the ingredients to decorate their pre-assembled houses.
The kids used red licorice, hard candies, gumdrops, gummy bears, butter mints, candy-coated chocolates, brown sugar cinnamon toast cereal, and marshmallow Christmas trees to decorate their houses, and they looked awesome! Great for adding a festive touch and creating a whimsical scene! I love seeing the variety of gingerbread house ideas that the kids come up with! SO much fun!
Heidi’s Pro Tip:
Keep a pack of baby wipes handy for cleaning sticky little hands during the decorating process!
Building graham cracker houses isn’t just about creating a festive decoration – it’s about spending quality time with loved ones, sharing laughter, making memories, and creating a new family tradition. Whether this is your first gingerbread house or you’ve been crafting them for a long time, each house tells a story and adds to the holiday spirit.
Each year, try adding something new to your gingerbread house-making process. Maybe it’s a new candy, a different icing technique, or a unique design pattern. Keep the tradition alive by continuously evolving and adding your personal touch.
Try This Fun Idea!
Place a piece of parchment paper on a cookie sheet, and slip a printed pattern underneath. Use the piping bag and royal icing to trace over the pattern pieces and create custom decorations for your graham cracker gingerbread house! Allow the icing to dry completely before transferring to the house.
Frequently Asked Questions

How To Store Pre-Assembled Graham Cracker Houses
If you’re not decorating your gingerbread houses right away, wrap them in plastic wrap and store them in an airtight container or dry location. They can be made a day in advance.
Once your gingerbread house has been decorated, it is best kept at room temperature in a cool, dry location. You may opt to add a coat of spray sealer to the gingerbread house so that it lasts longer and is less tempting to ants or other pests, but keep in mind that this sealer is TOXIC, and your gingerbread house will no longer be edible. I do not recommend using a sealer in homes with young children or pets who may be tempted to eat it.
How Do I Store the Remaining Royal Icing Until the Next Day?
Store the icing bags in the refrigerator overnight, and then bring it back to room temperature (let it sit out for an hour or two) and knead gently before using.
How Many Houses Can I Build With the Royal Icing Recipe?
This recipe will allow you to assemble at least 20 gingerbread houses.
Printable Gingerbread House Instructions

Graham Cracker Gingerbread Houses
Equipment:
- Serrated Knife
- Paper Plate or Cake Board
- Piping Bag & Tip
What You’ll Need:
- 5 Honey Maid Graham Crackers, per house
- 2 Egg Whites, room temperature
- 3 cups Powdered Sugar
- 1/4 tsp Cream of Tartar
- 1 Tbsp Meringue Powder, optional, but provides extra stability
- Assorted Candy, Fruit, Nuts, etc. for decorating
Instructions:
- Cut five graham crackers according to the photos shown


- To create the royal icing: whip the egg whites until frothy. Add the powdered sugar, cream of tartar, and merengue powder, and whip for 7-9 minutes until the volume has increased and the icing holds stiff peaks. Put your icing into a disposable piping bag.
- Assemble the gingerbread house walls as shown


- Allow the icing to set for at least 10 minutes before adding the roof.
- Add a thick ribbon of icing down the peaks of the house (Shape B), and add two of the Shape A pieces to create the roof.

- Add icing along the top of the roof ridge. Allow to set for at least 30-60 minutes before decorating. (I recommend leaving overnight, if possible)
- Use royal icing or store-bought frosting to add candy decorations.
Notes:
As we celebrate this holiday season, embrace the joy of creating together. Building your own gingerbread houses is not just about crafting; it’s about entering into the holiday season with enthusiasm and joy.
Remember, there’s no right or wrong way to create and decorate these little graham cracker houses. Whether it’s your first time or you’re a seasoned pro, the best approach is to have fun, experiment, and allow the whole family to enjoy the process. From the base of the house to the top of the roof, every piece you add brings your gingerbread house to life. So, gather your supplies, assemble your gingerbread pieces, and get into the holiday spirit with your perfect gingerbread house!
How will you be decorating your gingerbread house this year? Share your ideas and spread the warmth of this fun Christmas tradition.

Check Out These Other Easy Christmas Crafts!


Pin These Graham Cracker Houses For Later!

Heidi Kundin has captivated the hearts of millions with her colorful and inspiring approach to crafting, celebrations, and family fun. With over 15 years of experience, Happiness is Homemade has become a must-visit destination for those seeking quick and easy creative ideas and last-minute solutions. Heidi’s warm personality shines through her posts, inviting readers to join her on a creative journey that’s fun, rewarding, and achievable. Heidi is also the author of Homemade Bath Bombs & More and DIY Tie-Dye.
Super easy and fun, the grown ups had as much fun as the kids. They also tasted great, for the kids and adults as well.
I had a heck of a time cutting the end pieces so i made those out of a “sturdy gingerbread recipe” , sizing them to work with the graham crackers which i used for the roof and sides. MUCH less baking, and the lighter crackers were so much easier to deal with especially for the roof. Thank you for this!
Thank you for this recipe. I will be at a place where I can’t make the icing on site – it is a corporate team building event. Do you have a recommendation for pre-made royal icing and how many ounces.? We will have 8 teams making gingerbread motifs – so probably on a 9 x 13-inch piece of cardboard. Thank you for any advice
Thank you for posting this blog! My littles were bored and begging to make a gingerbread house. I don’t bake. So yeah, this was an amazing find for me. We made some minor adjustments to make our house a little bigger since I only had one pack of non crashed graham crackers… and three kids to decorate lol. Viola! I think we did pretty good though, the icing was awesome! Thank you for saving this mama of three bored boys today!
Thanks for the instructions! I got 3 gingerbread houses put together last night and that icing recipe is superb! It’s holding the graham together like concrete.
Many thanks!
Approximately how many houses does one batch of royal icing make? We are planning on using this recipe for a class of 22 TK students. Thank you!!!!
Hi,
I am so happy I found your website! My daughter’s 7th birthday is this weekend and I plan on making these houses with the kids for her Christmas-themed party.
Question: do I need to put a tip on the icing bag to make a fine enough line to glue the houses, or will it come out good enough straight from the bag? Your picture of the icing bag doesn’t show what the tip looks like.
Thanks,
Monica
Are these edible? Just wondering for the small kiddos
Absolutely, Kathy!
Hi Heidi,
How long do you let the icing sit to come to room temperature after refrigerating? Thank you!
Can I make the icing the day before and if I do how do I store it. I plan to make the houses on Monday with my class and would like to make the icing on Sunday. Also, you mentioned in an above post that the one batch of icing can make around 25 houses. Is that correct?
Hi Jeanne,
I have made the icing the night before and stored it in the refrigerator overnight (already loaded in piping bags with the tips still unsnipped). You will need to let the bag warm a bit and get closer to room temperature before snipping the tips off of the icing bags and using them, but they work just as well. 🙂
Thank you!. That will be perfect!
Just finished assembling the houses. Planning to decorate them this evening. What is the best way to store icing for decorating for about 7 hours, room temperature or refrigerator? Thanks for the easy to follow instructions. Planning to decorate them with my folks, it should be fun!
I usually store mine in the refrigerator and then bring it back to room temperature before using it again. Have fun, and happy holidays! 🙂
I tried this last night but the crackers kept breaking on me. Any advice on getting a clean cut? Thank you!
Hi Maria,
I use a knife that has a very finely serrated edge to it or a bread knife, and slowly saw back and forth with minimal pressure on the cracker until it breaks along the serrated cut line. It does sometimes take a few tries before you get the technique down, but once you do, it should go smoothly.
Do you recommend using the royal icing for attaching the candies, or regular frosting from a jar? We’re doing this with 34 5th graders on Friday, I’m trying to simplify…thanks!
So sorry that I got this message after Friday, Jen! I hope that it went well! I usually recommend the royal icing for children of that age since they can handle the piping bags fairly well, and the royal icing tends to have a stronger grip to adhere heavier candies than jarred frosting does.
I made the mistake of cutting all the pieces the week before forgetting graham crackers soften as they get stale. Do you think this will be a problem? Should I just make them a week ahead or will it be ok next week to “glue” them? Man they are hard to cut!! 🙂
Approximately how many houses will 1 batch of icing glue together? Thinking of doing this with my EC students. Thanks!
I usually make around 20 houses, and we have lots of icing left over, so I can’t say for sure, but at least 25 or more!
How did you transport so many houses already put together on plates?
I usually transport them inside of a large box or two. I carefully place the plates on the bottom of the box and place them close together so that they don’t have room to move around. 🙂
Is the same icing recipe the one you use for the next day, to glue the candy to it?
Yes, it is!
I made these with my grandkids the other night and they came out very nice! I even goofed up! When making the icing I added the egg whites right to the sugar, forgetting to beat them separately first and they still came out great! Your idea of “gluing” the sides of the house to the paper plates was genius! Thanks!
I’m so glad to hear that it worked out well for you, Linda! 🙂
I would like to make the graham cracker gingerbread houses with my girl scouts. I have one girl allergic to eggs. Is there any other way to make the royal icing without eggs?
Thank you,
Wendy
There is a product called EnerG egg replacer; that should do the trick! I use it to substitute for eggs all the time and my pastries turn out better than expected. Hope that helps! (Even if the question is over a year old.)
http://www.ener-g.com/egg-replacer.html
My mother always made these using sugar as the glue. Melt some white sugar in a hot fry pan (take it off the heat almost as soon as it starts to melt so it doesn’t burn!) and dip the edges of the crackers into the molten sugar. This is not a kid-safe activity but it sure glued the graham cracker pieces together well!