• Home
  • Crafts + DIY
    • All Crafts
    • Cricut
    • Glowforge
    • Bath & Body
    • DIY & Home Decor
    • Organization
    • Garden & Outdoors
  • Kids
    • Crafts & Activities
    • Homeschool
  • Food
  • Celebrations
    • Holidays
      • New Years
      • Valentine’s Day
      • St. Patrick’s Day
      • Easter
      • Mother’s Day
      • Father’s Day
      • 4th of July
      • Back to School
      • Halloween
      • Thanksgiving
      • Christmas
      • Hanukkah
    • Party Games & Ideas
    • Gift Ideas
  • Printables
  • SVGs
  • Shop
  • Get Happiness in Your Inbox >>
↑

Happiness is Homemade

creative inspiration for the entire family!

  • Home
  • Crafts + DIY
    • All Crafts
    • Cricut
    • Glowforge
    • Bath & Body
    • DIY & Home Decor
    • Organization
    • Garden & Outdoors
  • Kids
    • Crafts & Activities
    • Homeschool
  • Food
  • Celebrations
    • Holidays
      • New Years
      • Valentine’s Day
      • St. Patrick’s Day
      • Easter
      • Mother’s Day
      • Father’s Day
      • 4th of July
      • Back to School
      • Halloween
      • Thanksgiving
      • Christmas
      • Hanukkah
    • Party Games & Ideas
    • Gift Ideas
  • Printables
  • SVGs
  • Shop
  • Get Happiness in Your Inbox >>
Home » Craft » Bath & Body » 15-Minute DIY Watermelon Soap

15-Minute DIY Watermelon Soap

This post and its photos may contain affiliate links. As an Amazon associate I earn from qualifying purchases. If you make a purchase through these links, I may receive a small commission at no extra cost to you!

  • Facebook
  • Twitter

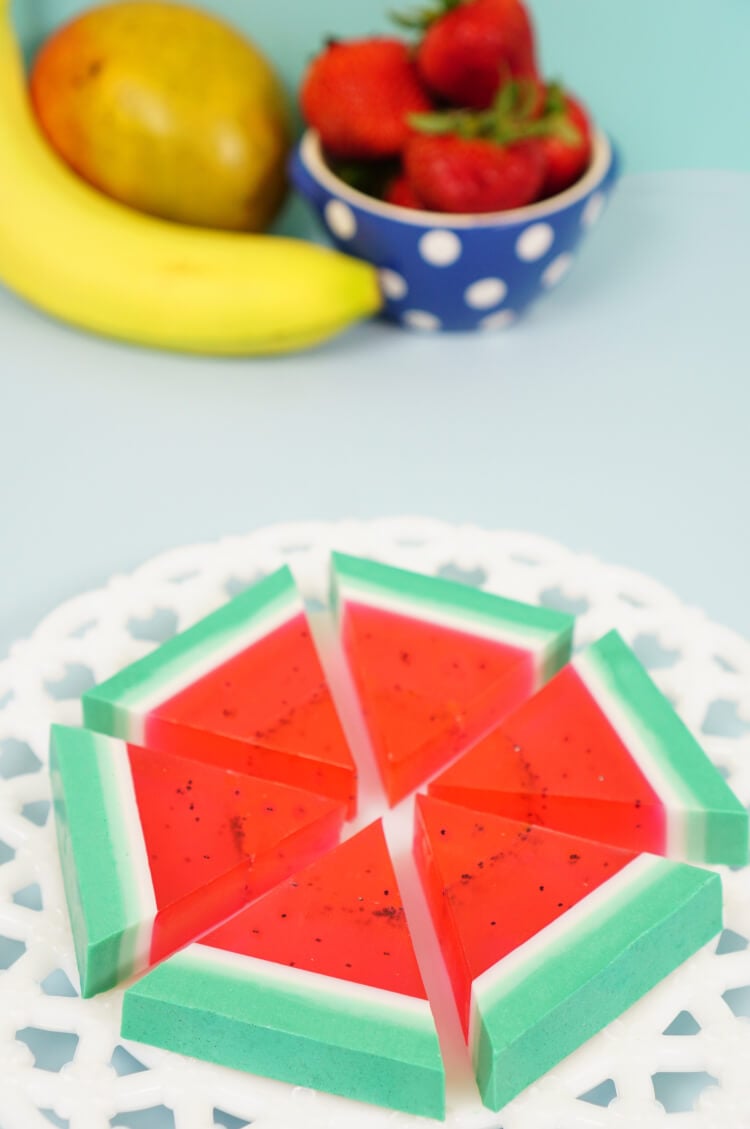
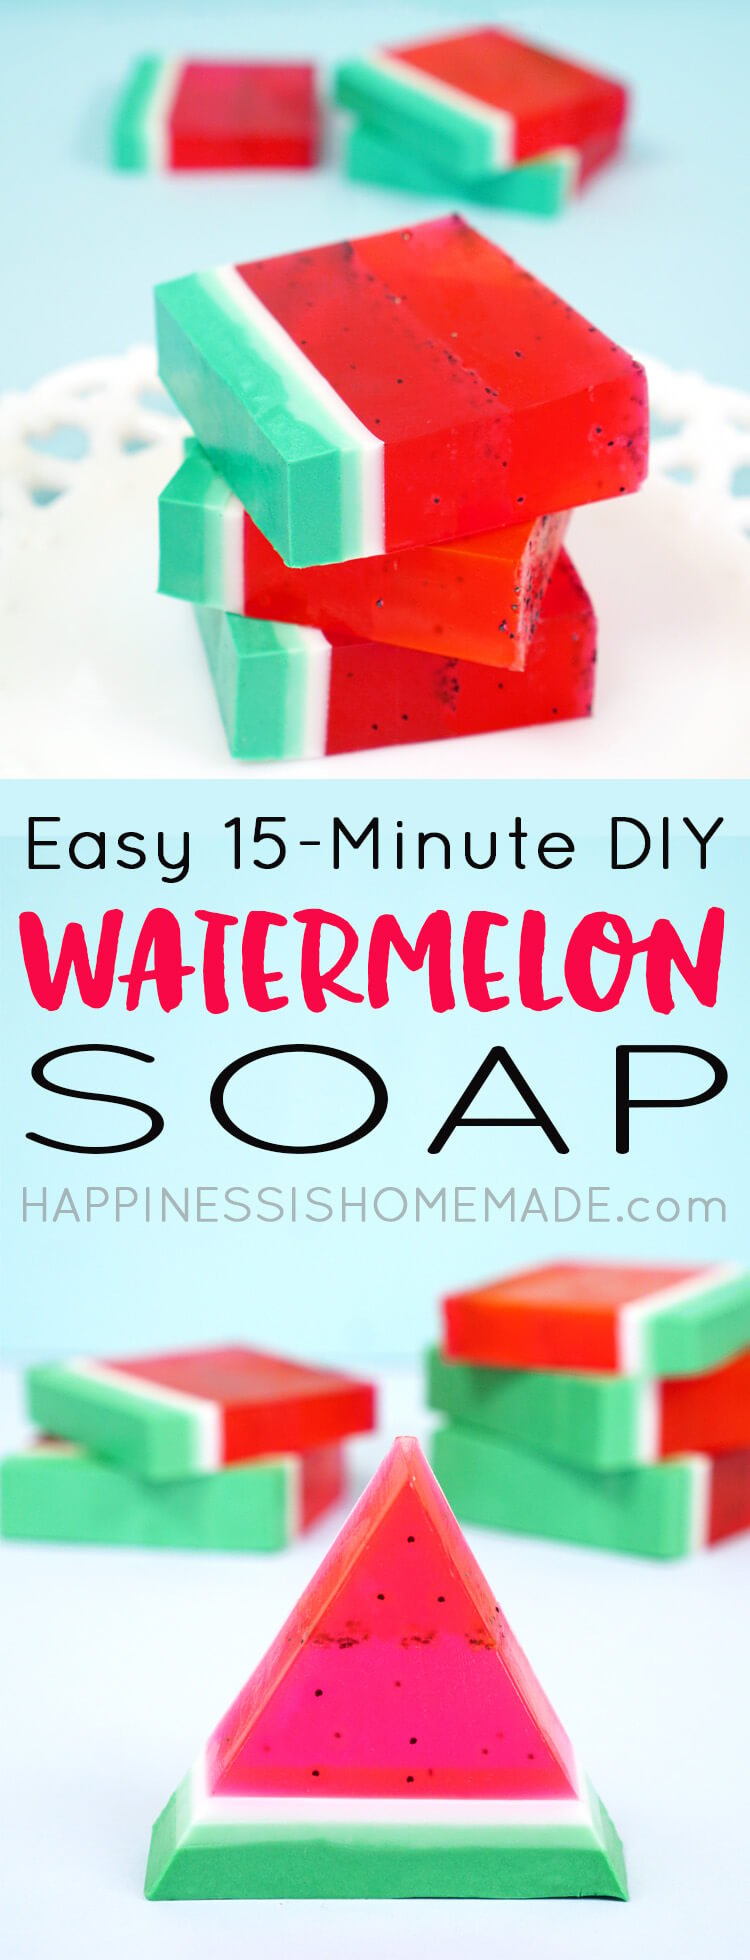
This cute and easy DIY Watermelon Soap can be made in just 15 minutes, and it smells delicious! A quick and easy homemade gift idea that’s perfect for friends, family, teachers, and more!

DIY Watermelon Soap

This DIY watermelon soap is the cutest! I love these homemade soaps for their sweet summertime fragrance and because they are totally adorable, but what I love the most is the fact that I can whip up an entire batch of these beauties in under 15 minutes! Each layer will take a little longer to firm up, but the actual “work” part is done in less than 15 minutes. Easy peasy!

DIY Watermelon SoapDIY Watermelon Soap

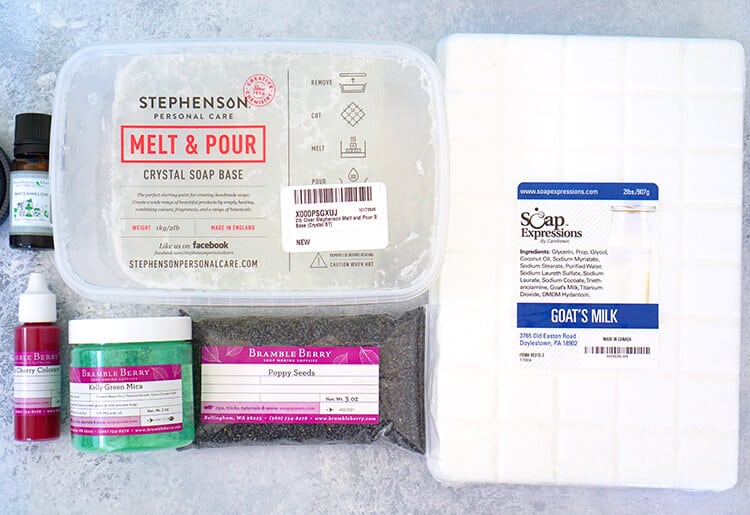
Supplies Needed for DIY Watermelon Soap

  • Goat’s Milk Soap Base (can also use Shea Butter Soap Base or Coconut Soap Base)
  • Clear Soap Base
  • Silicone Loaf Soap Mold
  • Pyrex Measuring Cup
  • Green Soap Colorant*
  • Red Soap Colorant*
  • Watermelon Fragrance Oil
  • Poppy Seeds
  • 99% Isopropyl Alcohol in a Misting Spray Bottle

* Note: I have been playing around with different types/brands of soap colorant lately, so for this watermelon soap, I used new-to-me supplies from Bramble Berry (a soap supply store). They worked wonderfully, and I highly recommend them; however, traditional red and green liquid soap colorants (available on Amazon.com or in local craft stores) will work as well! 

DIY Watermelon Soap

IMPORTANT NOTE: Before pouring the melted soap into the mold, spray the top of the previous soap layer with alcohol to help the layers adhere together!

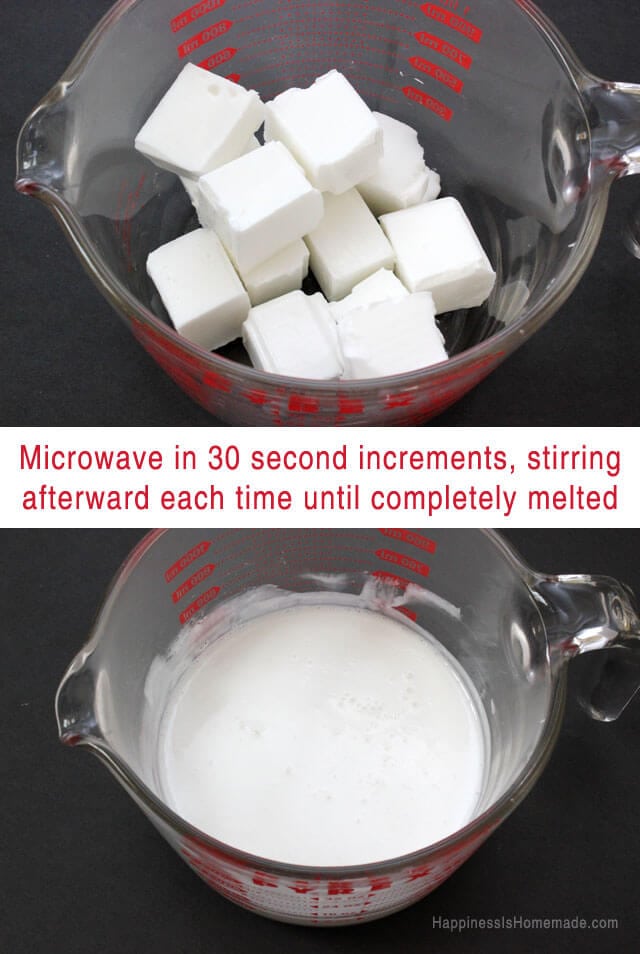
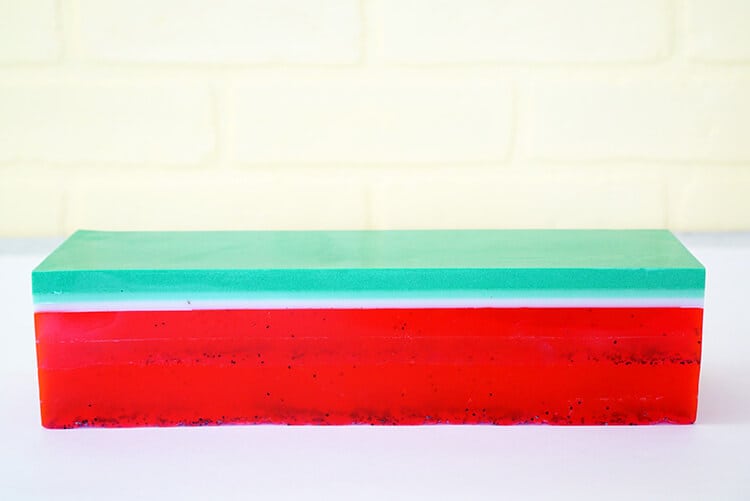
For the Dark Green Layer: Cut 1/2 lb. of the goat’s milk soap into cubes. Place the cubes into a 4-cup Pyrex measuring cup, and melt in the microwave in 30-second increments, stirring well after each. When the soap is completely melted, add 10 drops of watermelon fragrance oil and green soap colorant (as much as needed to achieve the desired color). Pour 3/4 of the green soap into the bottom of the soap mold and allow to firm for 15-20 minutes. Spritz the top of the liquid soap with isopropyl alcohol to remove any air bubbles. 

For the Light Green Layer: Take the remaining dark green soap (still in the Pyrex measuring cup) and add 1/4 lb. of white soap cubes. Melt in the microwave and stir until fully mixed (will be a light green color). Spritz the top of the dark green layer with alcohol again and pour the light green mixture into the soap mold. Spritz with alcohol again to remove any air bubbles, and allow to firm for 15-20 minutes.

For the White Layer: Melt 1/4 lb. of white soap cubes in the microwave. Add 5-10 drops of watermelon fragrance oil. Spritz the light green layer with alcohol, pour the white layer into the soap mold, and spritz the top with alcohol to remove bubbles. Allow to firm for 15-20 minutes.


DIY Watermelon Soap

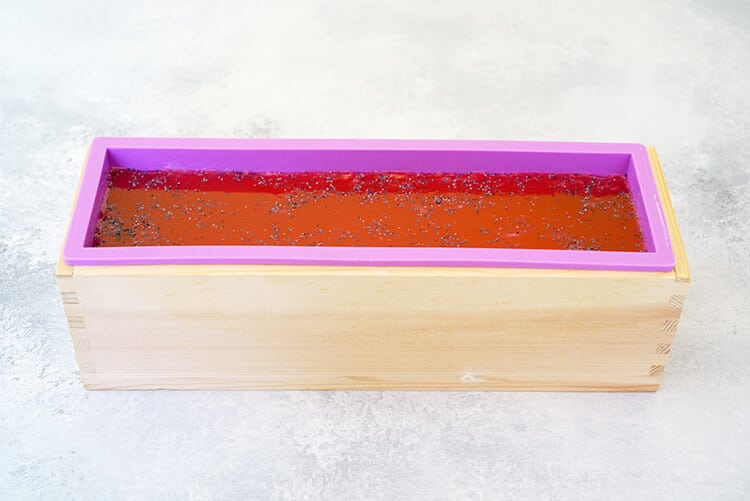
For the Red/Pink Layer: Cut 2 lbs of clear soap base into cubes. Microwave until fully melted, then stir in 15-25 drops of watermelon fragrance oil and 1 tbsp. of poppy seeds. Spritz the white layer with alcohol, pour the red layer into the soap mold, sprinkle the top with a few more poppy seeds, and spritz one last time with alcohol to remove bubbles. Allow to firm for 90 minutes or until soap has completely hardened (time will depend on temperature and humidity).

DIY Watermelon Soap

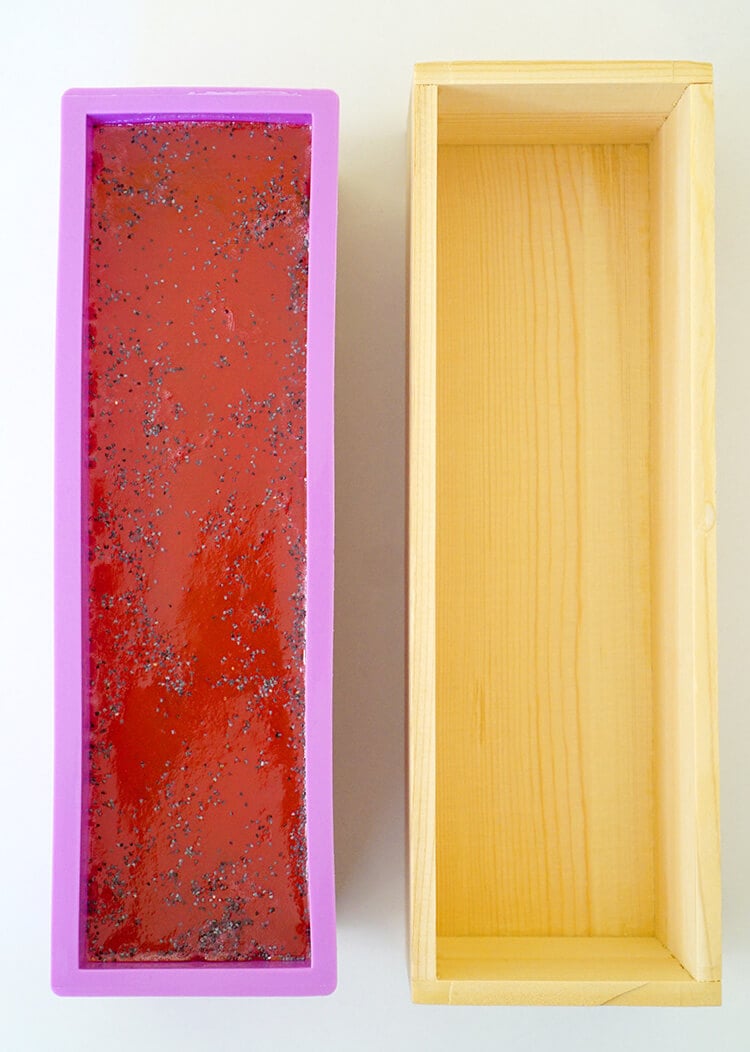
Carefully remove the silicone liner from the wooden mold, and then remove the soap from the silicone.

DIY Watermelon Soap

This loaf mold makes an extra large batch of soap, so you can expect to get around 10-12 soaps from each batch.

DIY Watermelon Soap

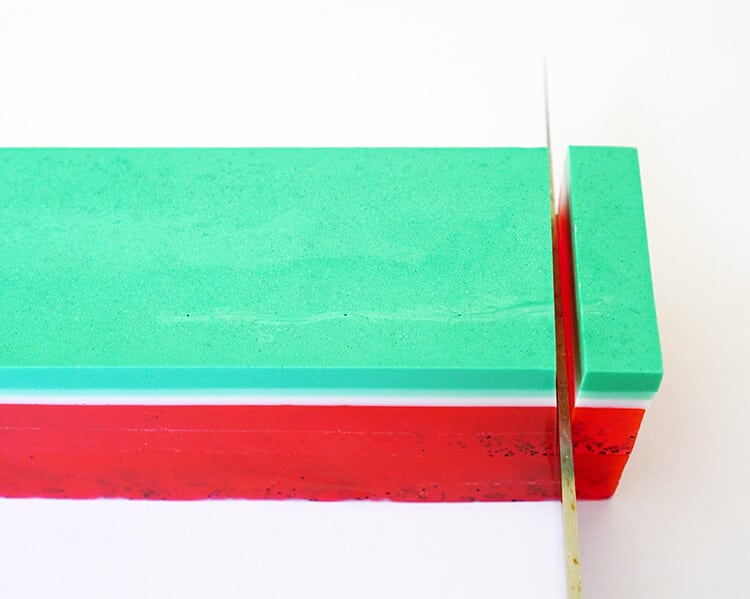
Use a sharp knife to slice the soap into bars.

DIY Watermelon Soap

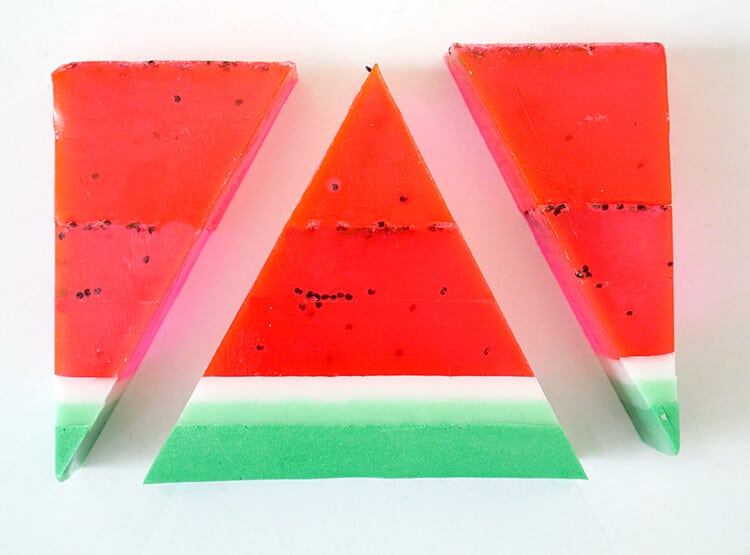
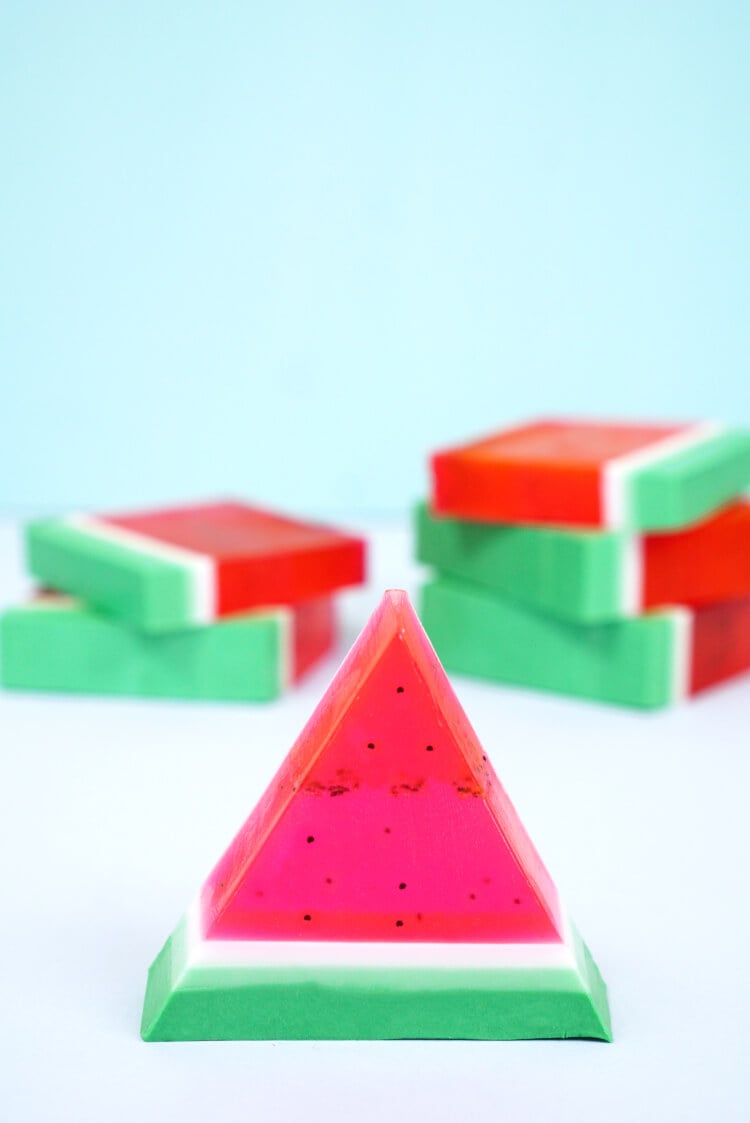
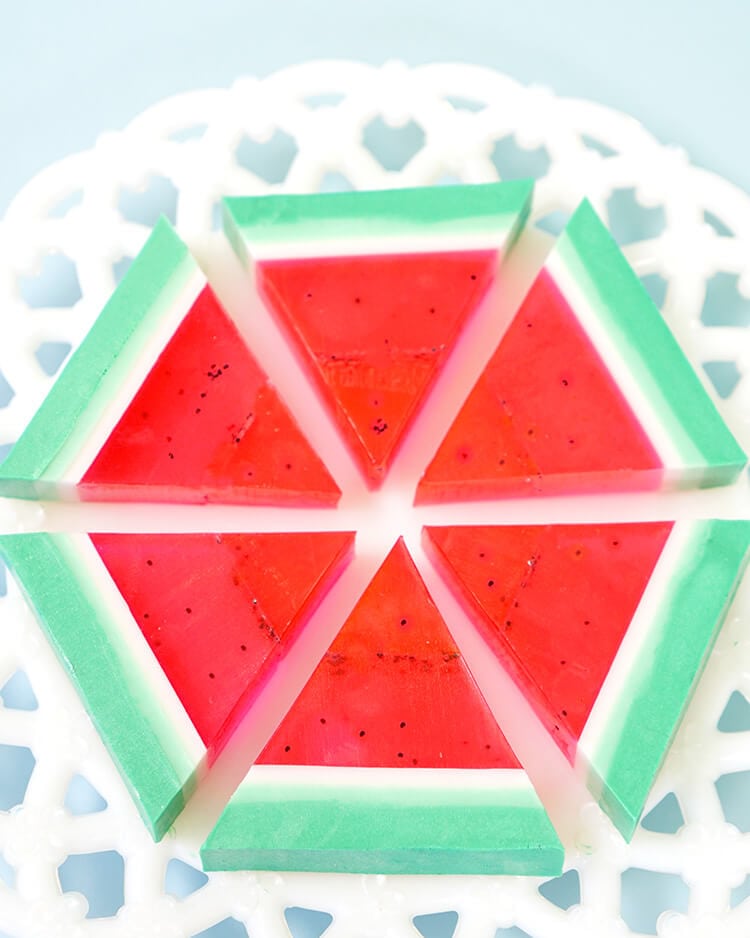
You can leave the rectangular soap as-is, or you can cut the corners as shown to create cute little triangle-shaped watermelon slice soaps!
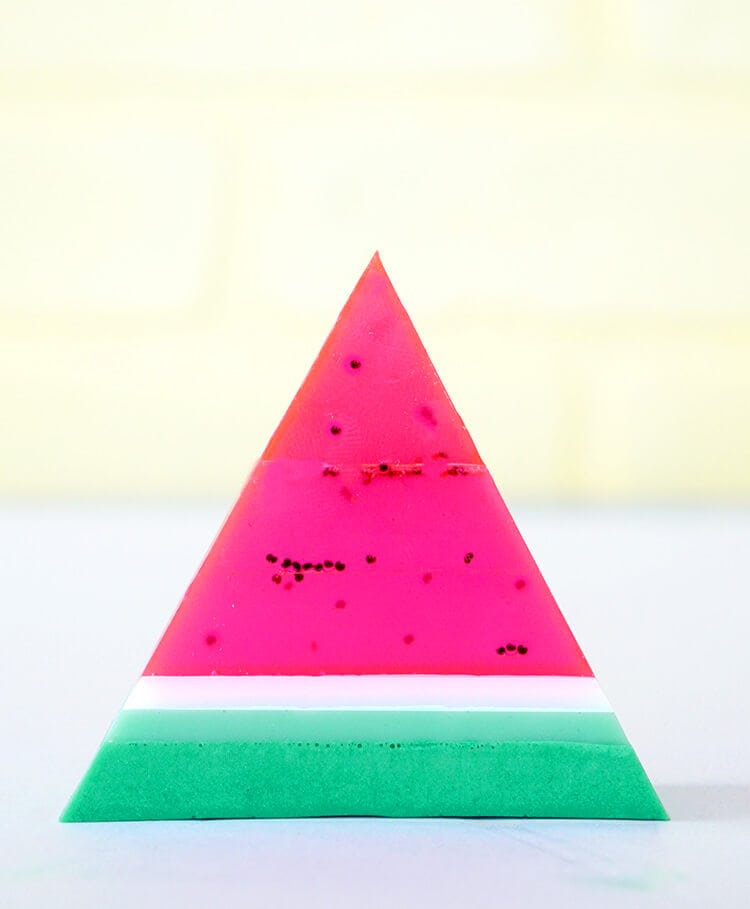
DIY Watermelon Soap

The watermelon soap looks red upon an opaque background, but if you allow the light to shine through it, you’ll see that it’s actually a bright magenta pink!

DIY Watermelon Soap

DIY Watermelon Soap

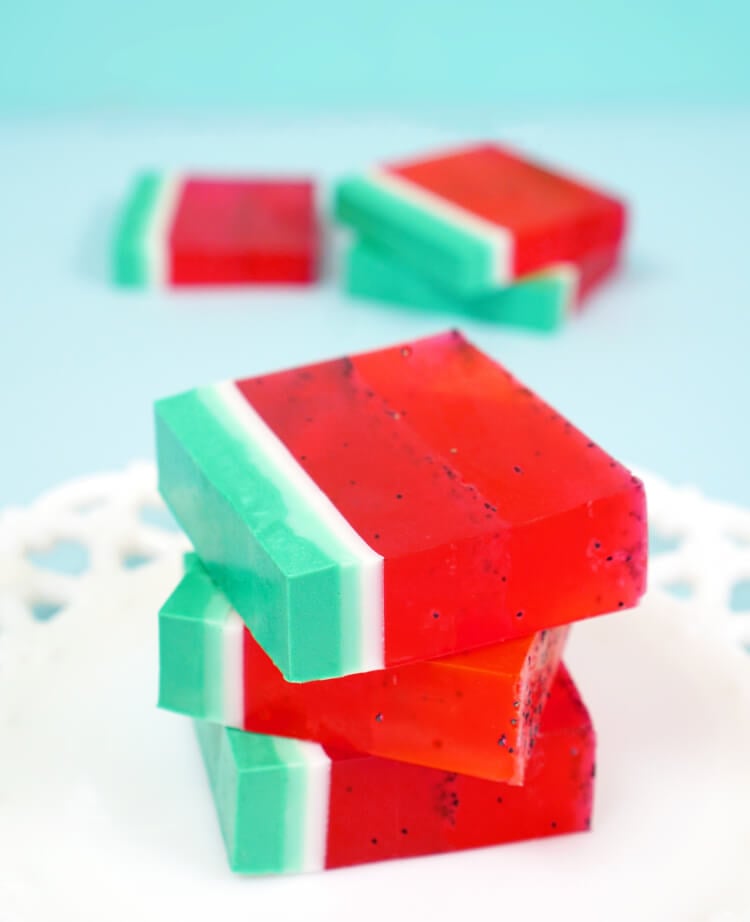
They almost look good enough to eat! The watermelon fragrance is incredible – it smells just like Bubbleicious watermelon gum!

DIY Watermelon Soap

DIY Watermelon Soap

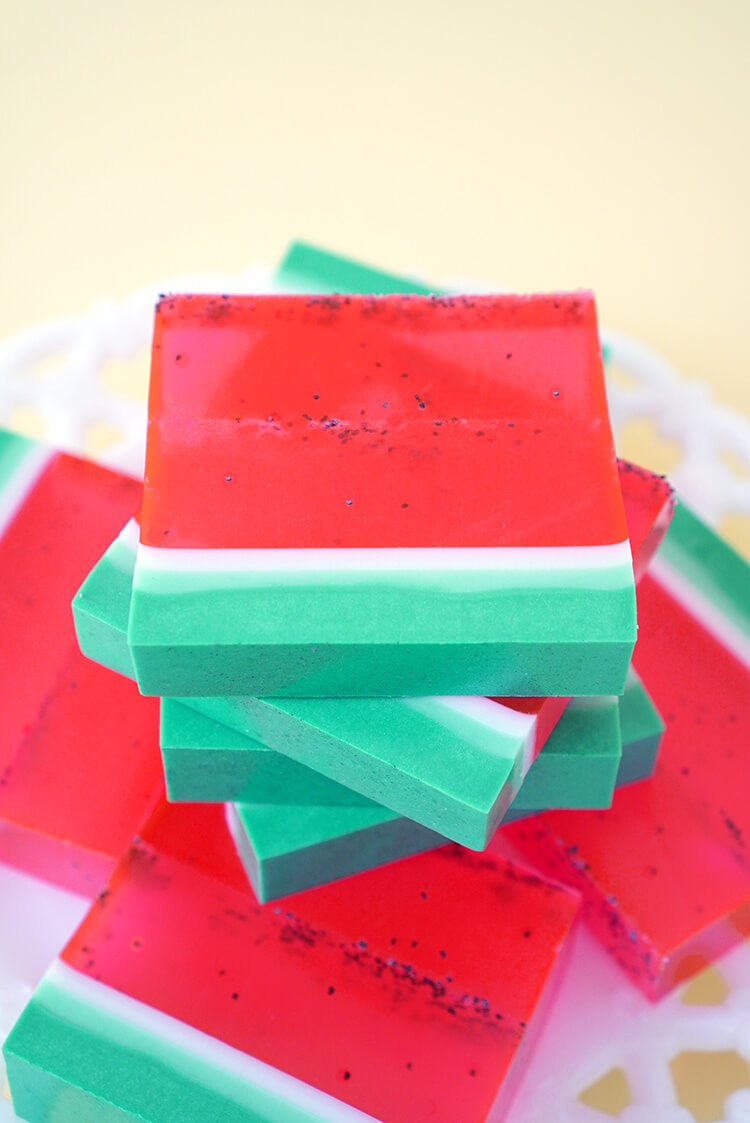
These DIY watermelon soaps are the perfect way to brighten up your summer, and the would make a great gift for friends, family, teachers…or anyone on your gift list!

DIY Watermelon Soap


If you like this DIY Watermelon Soap, don’t forget to pin it!

DIY Watermelon Soap


You Might Also Like: 


DIY Watermelon Soap

DIY Rocket Pop Soaps

DIY Watermelon Soap

DIY Gemstone Jewel Soaps

DIY Watermelon Soap

DIY Pina Colada Pineapple Soaps

[riview id=297 num=2000 orderby=title order=asc size=200×200 showtitle=always lightbox=0]

  • Facebook
  • Twitter

Filed Under: Bath & Body, Craft, Gift

Comments

  1. Grace Pun says

    October 16, 2017 at 6:29 pm

    Instead of using the colourants is it possible to use food colouring?

    Reply
    • Heidi says

      October 21, 2017 at 3:53 pm

      Food coloring will color the soap, however, the color fades quickly and will come off onto hands, washcloths, etc. I do not recommend it.

      Reply
  2. Grace Pun says

    October 16, 2017 at 7:34 pm

    Also, for another alternative is it ok to just any brand’s goat milk soap?

    Reply
    • Heidi says

      October 21, 2017 at 3:51 pm

      Yes, any brand should work!

      Reply
  3. Shelly says

    June 9, 2018 at 5:40 pm

    This is darling! I am planning to make this with my sisters at our monthly craft night. Can you tell me approximately how much of the colorant and watermelon fragrance oil I should order for three of us? Thank you!

    Reply
    • Heidi says

      June 12, 2018 at 5:19 pm

      That sounds like a lot of fun, Shelly! For three people (making this same sized recipe), I would recommend purchasing one bottle of green and red colorant if buying the ones from Brambleberry or two of each color if you’re using the ones from Amazon. You’ll also likely need two bottles of fragrance oil (though you might be able to get away with using only one if you go lighter on the scent). Have a fun craft night!

      Reply
  4. Pat says

    May 18, 2019 at 5:08 am

    Can you please tell me when you add the red colorant? And how much do you use? (I don’t see this information in the instructions above.) Thank you.

    Reply
  5. Jaclyn says

    May 28, 2019 at 1:53 pm

    Having trouble cutting soap w/ nice without bottom part wanting to separate from red clear soap. Any suggestions?

    Reply
    • Heidi says

      June 6, 2019 at 12:18 pm

      Hi Jaclyn, spritzing the soap with isoproyl alcohol between layers can help the layers better adhere to one another. I just updated the post to include this information as well. 🙂

      Reply
  6. Arthur says

    September 20, 2019 at 2:49 am

    Hie Heidi,
    This looks beautiful and fun. I am making a batch of this, will keep some for myself and give away a few to my friends. Thank you so much.

    Reply
  7. Savannah Berd says

    March 18, 2020 at 9:35 pm

    I am dying over how adorable these are! a few months ago I bought some materials to try my hand at homemade soap, but I haven’t really had time to do so. Now that we are in quarantine I cannot wait to do this and some of your other ideas. Thank you so much for sharing. I did want to ask what do you suggest I cut it with?

    Reply

Leave a Reply Cancel reply

Your email address will not be published. Required fields are marked *

Hi, I'm Heidi!

Welcome! I'm SO glad that you're here! I'm a Northern California #BoyMom who loves sprinkled donuts, rainbows, and sharing quick and easy crafts and printables with you! read more here
Get our weekly newsletter filled with the latest craft projects, free printables, party ideas, holiday fun, and creative inspiration for the entire family!

Thank you!

You have successfully joined our creative community!

CraftsFor All Ages

Holidays+ party Ideas

PrintablesActivities + More

ShopThe Store

Featured On:

  • About
  • Privacy Policy
  • How to Start a Blog
  • Resources
  • FAQ
The images and content of Happiness is Homemade are protected by copyright laws. DO NOT distribute or copy the content found within this blog without written permission. DO NOT edit or remove watermarks from any image. Images may NOT be used for any advertising purposes.

If you would like to share an image feel free to pick ONE IMAGE only with a direct link to its original post. If linking to one of my free printables only link to my blog post, not the printable link. Free printables are for personal use only and may not be altered in any way. For questions contact me using this form. Thank you!

Happiness is Homemade/Heidi Kundin is a participant in the Amazon Services LLC Associates Program, an affiliate advertising program designed to provide a means for sites to earn advertising fees by advertising and links to Amazon.com. As part of this Amazon Associates program, the Website will post customized links, provided by Amazon, to track the referrals to their website. This program utilizes cookies to track visits for the purposes of assigning commission on these sales. As an Amazon Associate I earn from qualifying purchases.
AboutWork With UsDisclosure
Copyright ©2021, Happiness is Homemade. All Rights Reserved. Design by Pixel Me Designs
  • Pinterest
  • Facebook
  • Twitter