

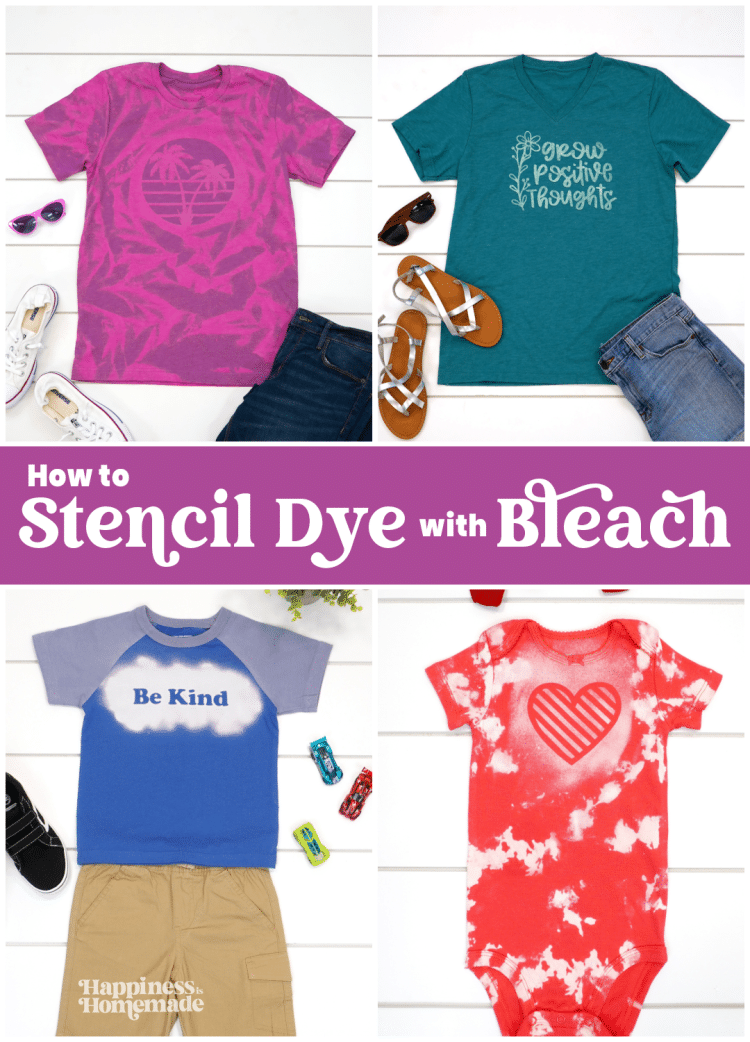
Discover unique bleach shirt designs and unleash your creativity with our step-by-step guide for bleach stencil shirt techniques! Transform plain shirts into stylish fashion statements using vinyl stencils, masks, and simple bleaching methods!

This post may contain affiliate links. I will receive a small commission from these sales at no additional cost to you!
Bleached Shirt Designs
Bleach Shirt Designs are an innovative and stylish technique that transforms ordinary shirts into one-of-a-kind fashion statements. If you’ve been on the hunt for creative and fresh bleach shirt ideas, you’ve come to the right place!
Today, I’ll be showing you two awesome methods for creating your own custom bleached shirts – using a vinyl stencil and using a vinyl mask, both cut with my Cricut machine. These different ways to create bleach shirts make the process so much fun and so versatile. You’re sure to find a unique design that fits your style!
You might be wondering, “What’s the difference between a vinyl stencil and a vinyl mask?” I’ve got you covered! I’ll explain the differences between the two techniques, and guide you step-by-step through the processes so that you can choose which one will work best for your creative vision. In this hands-on guide, we’ll make the bleach stenciling process fun and approachable, so that anyone, from beginners to seasoned crafters, can confidently join in on the fun!
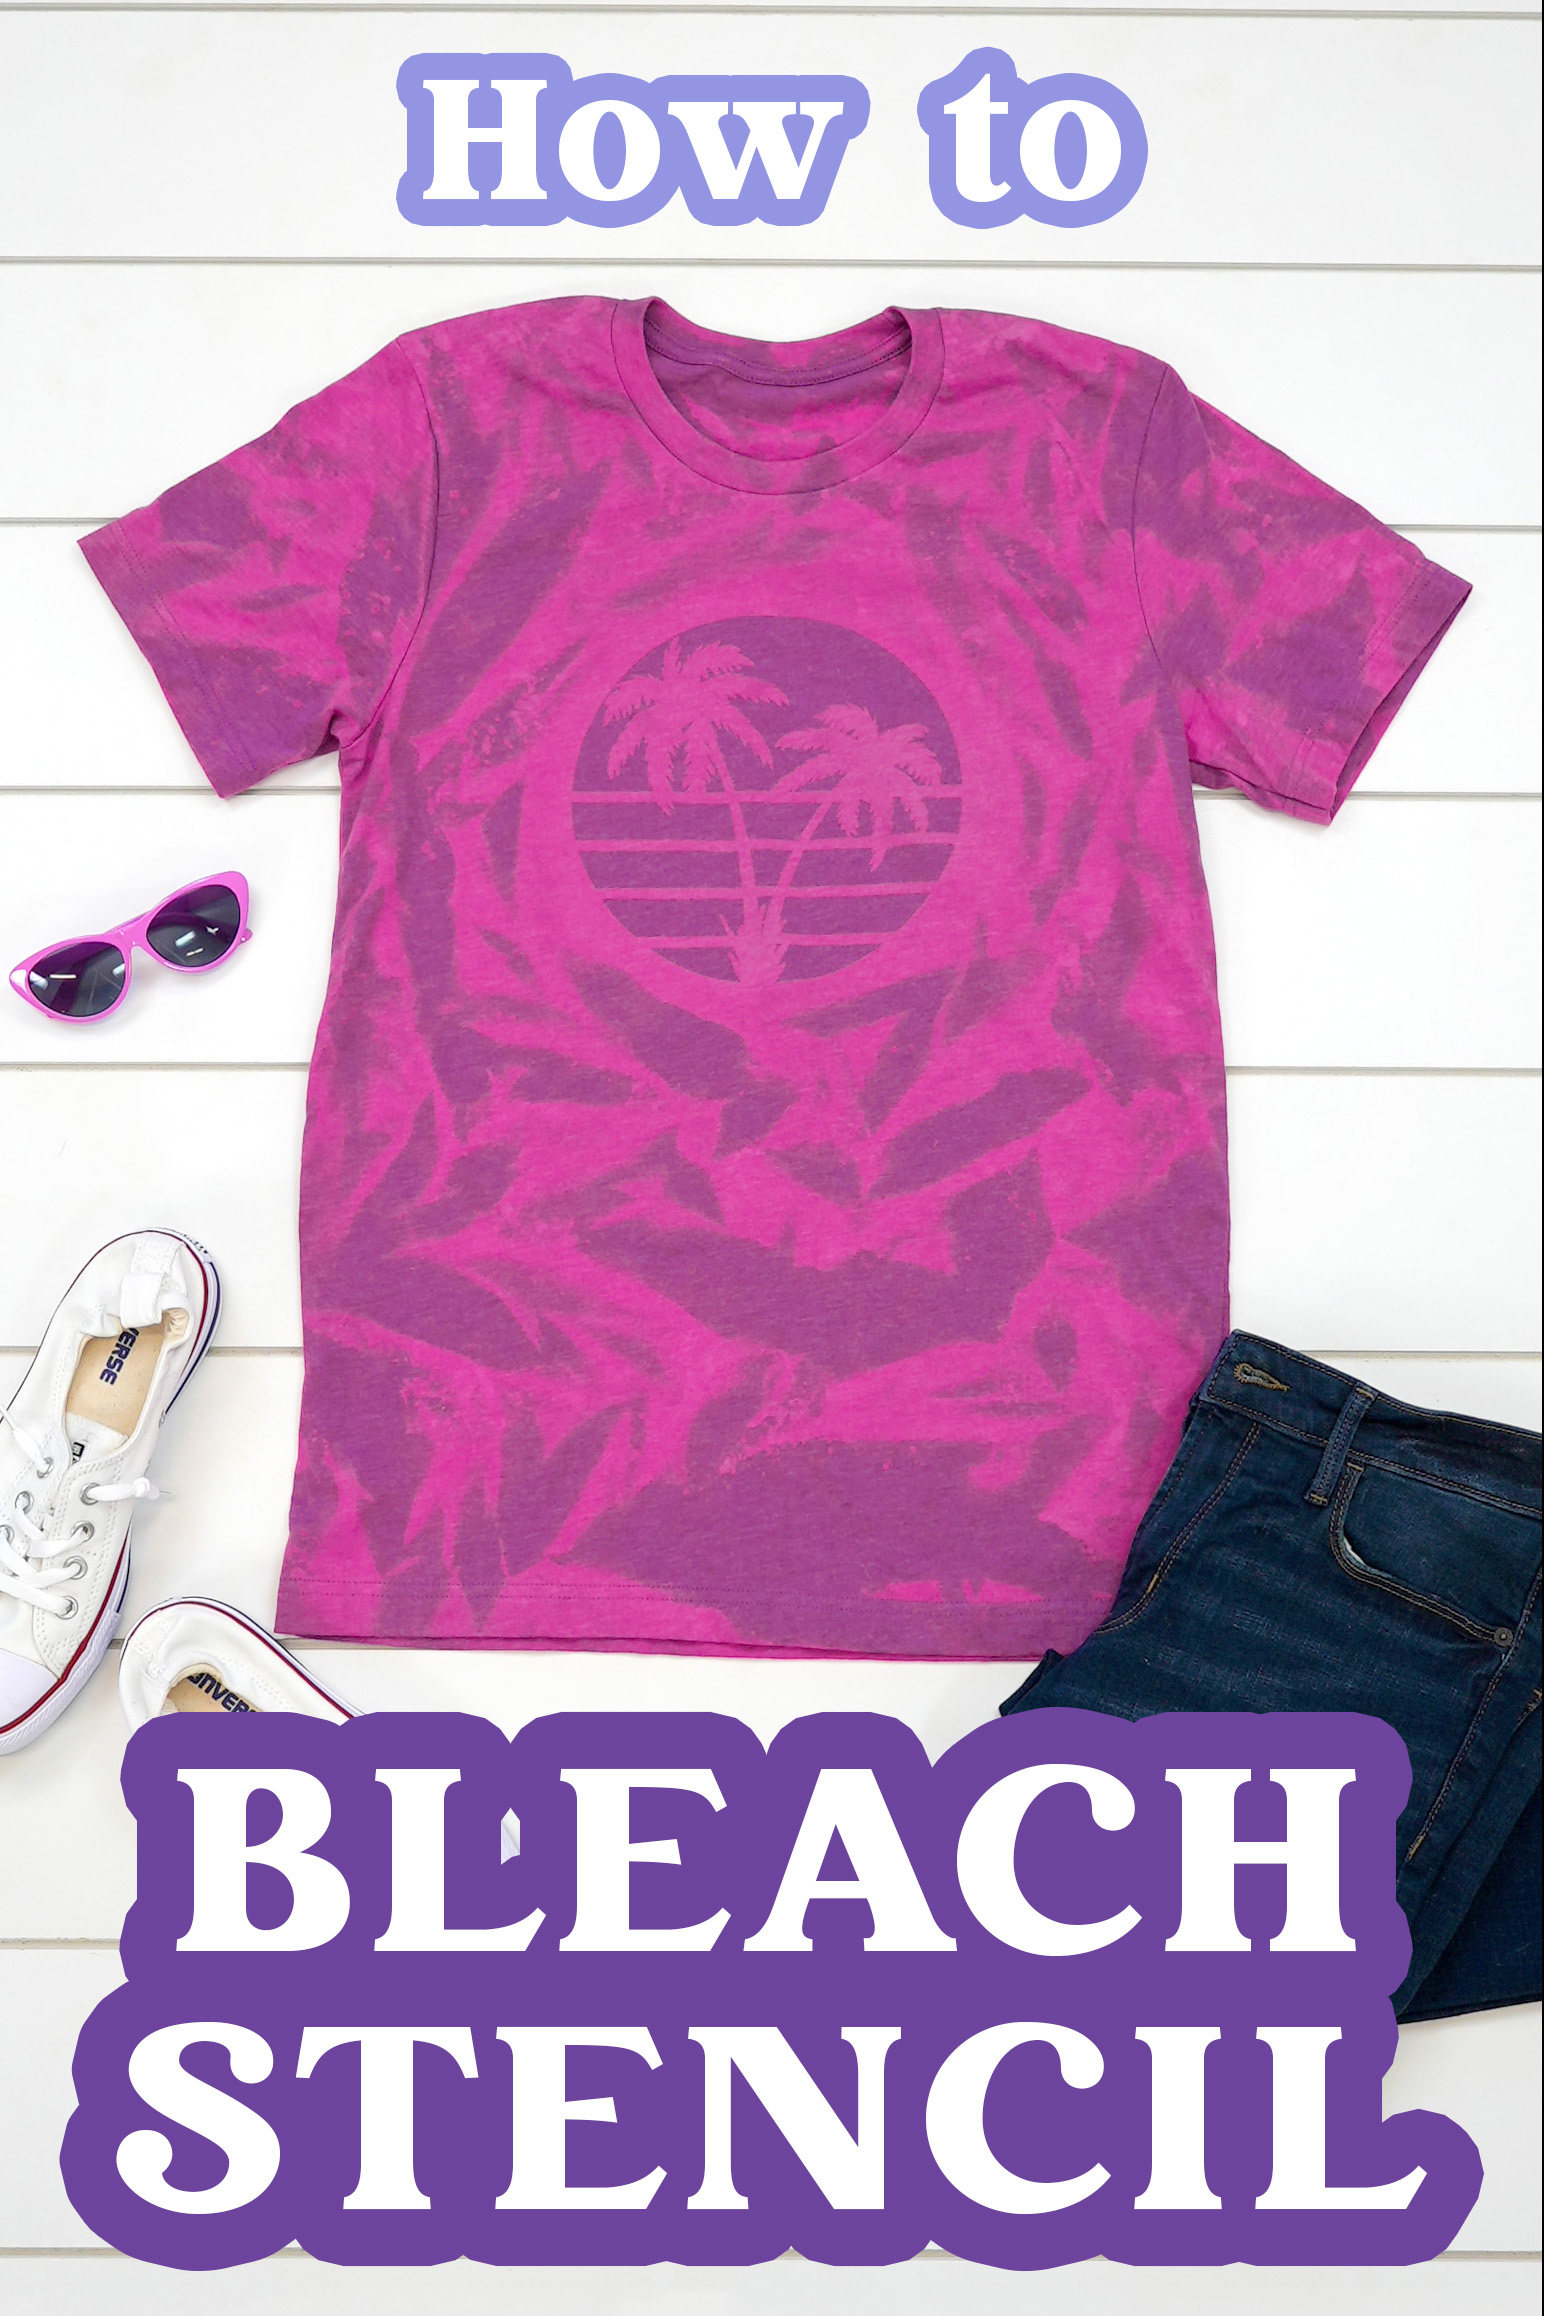
In our first method, we’ll be using a vinyl stencil cut with the Cricut machine. This technique is perfect for people who want to achieve more crisp and precise designs on their bleached shirts. I’ll walk you through the entire process, from selecting the perfect images for bleach stenciling to cutting and applying the stencil, before finally revealing the magic of bleach.
For our second approach, we’ll explore the world of vinyl mask designs, again using our handy Cricut machine. This technique combines stenciling and tie-dye and offers a slightly different outcome, with softer and more abstract results. I’ll guide you through the process of creating an awesome, one-of-a-kind shirt that I guarantee you’re going to love!
Are you ready to start making your own stenciled bleach shirt designs? Grab your Cricut machine (any of them will do!), some blank shirts, and a bottle of bleach, and get ready to unleash your creativity!
You May Also Like:
How to Tie-Dye with Avocado Pits 🤯🤯🤯 (you won’t believe the amazing color it turns!)
How to Reverse Tie-Dye with Bleach
DIY Bleach Shirt Designs
With these two amazing techniques, you’ll be rocking your custom-bleached shirt designs in no time, turning heads and inspiring others with your unique sense of style! This is a great way to make your own personalized bleach shirt project that reflects your individual personality!
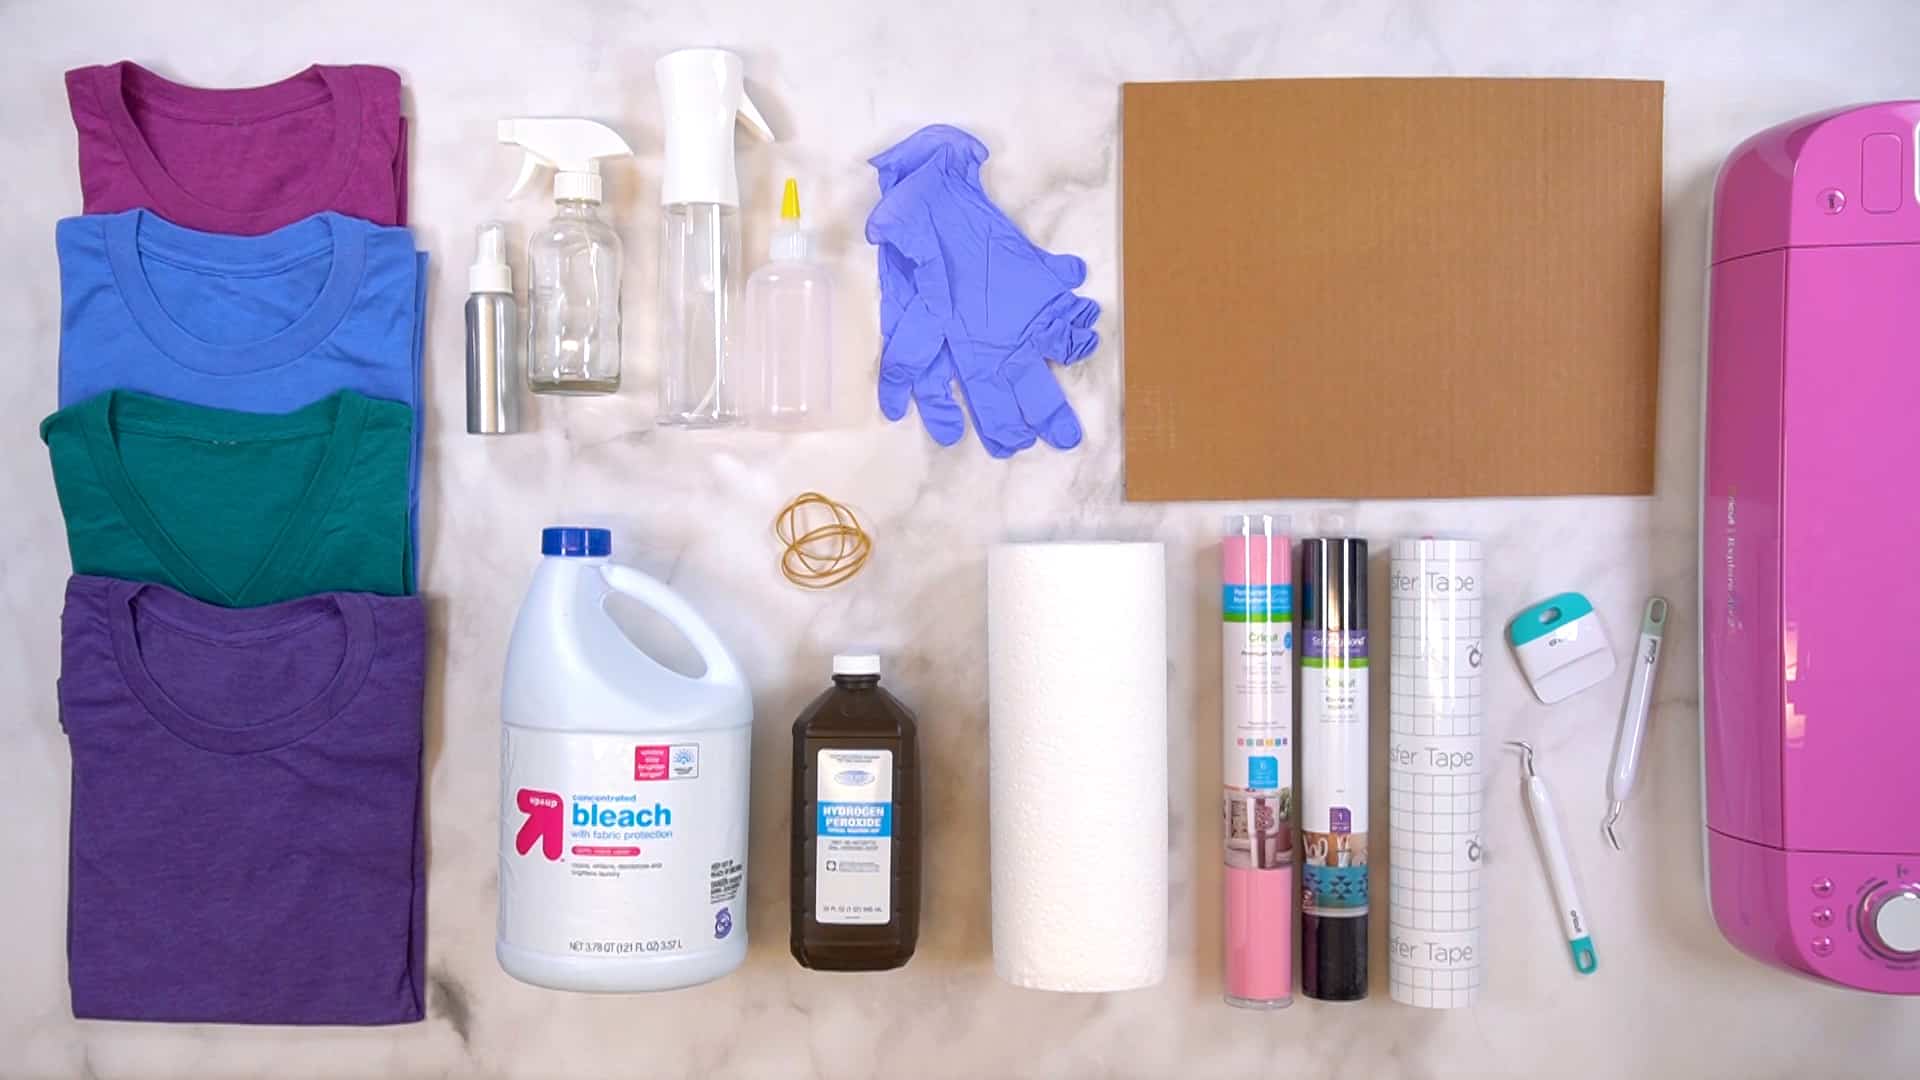
To make bleach-stenciled shirts, you’ll need just a few basic supplies, many of which you may have on hand already!
Supplies Needed for Bleach Stenciled Shirts:
- Blank T-Shirts
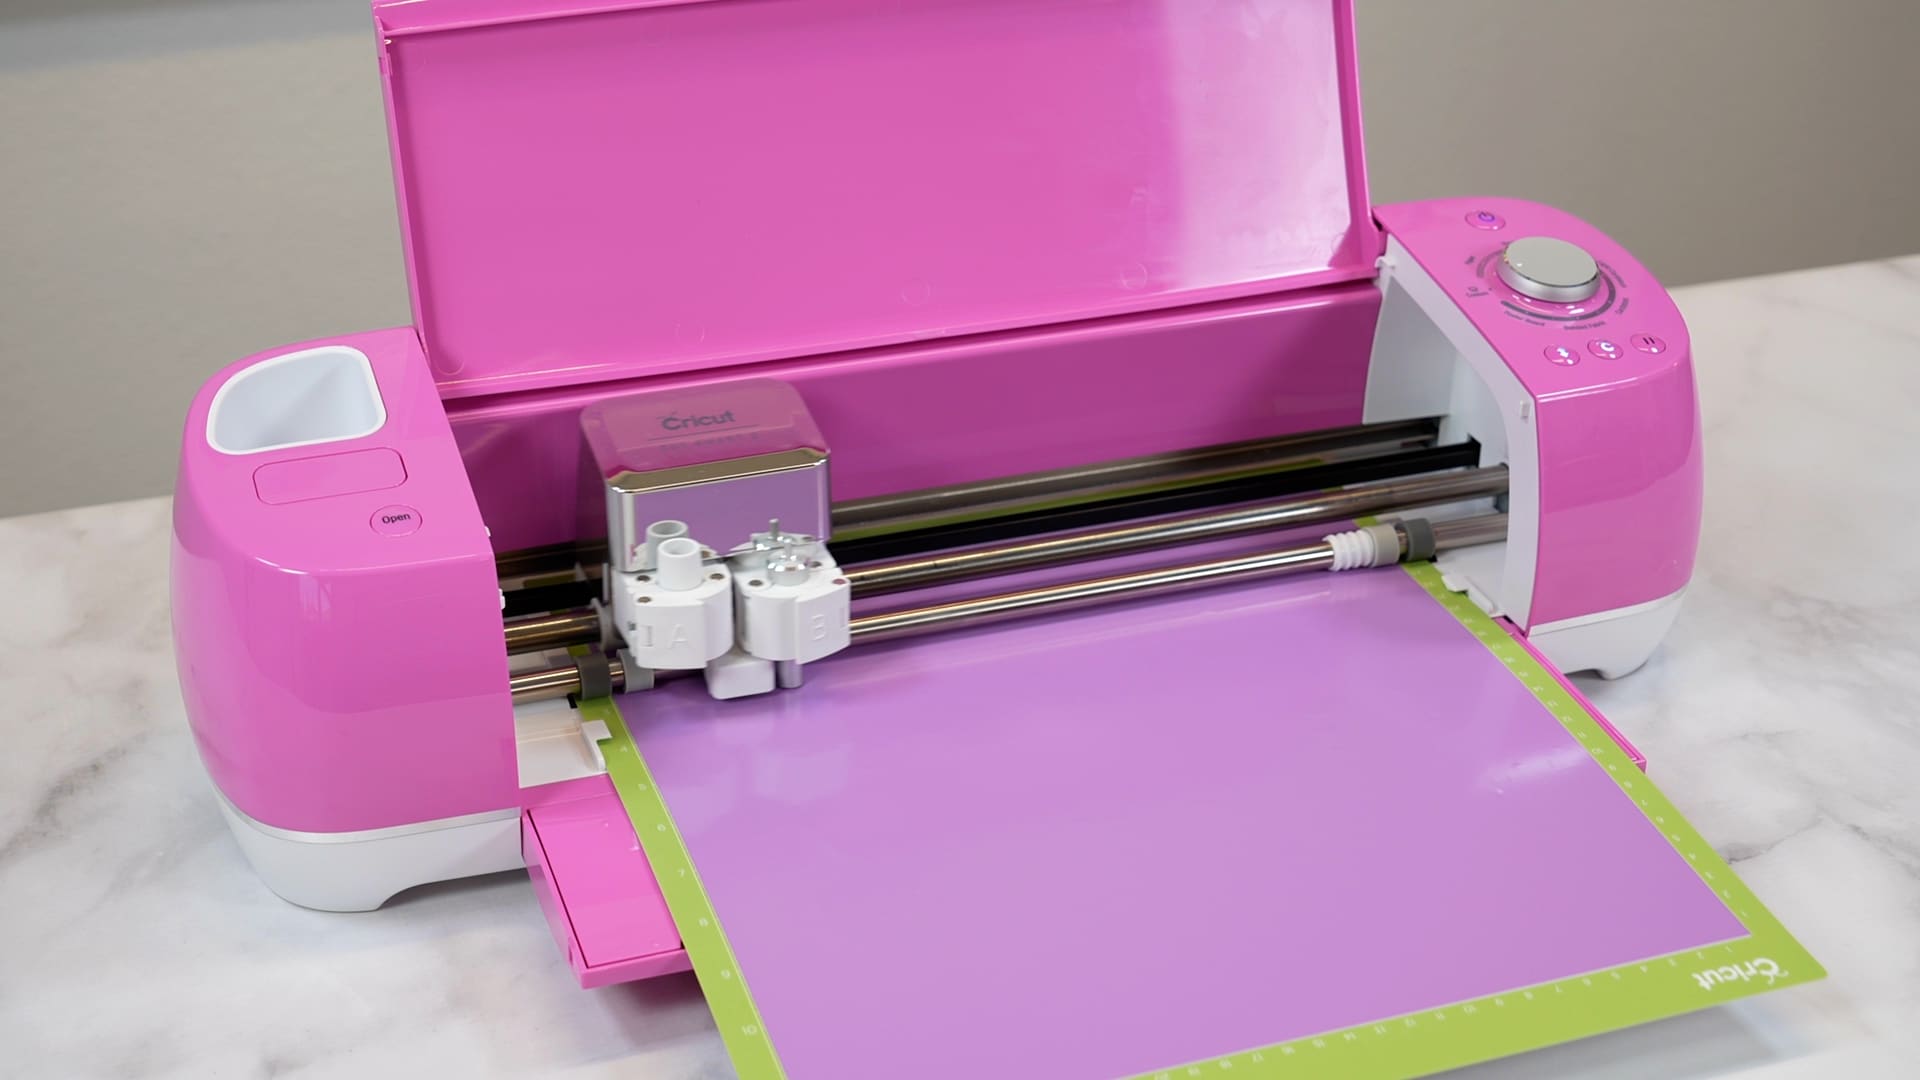
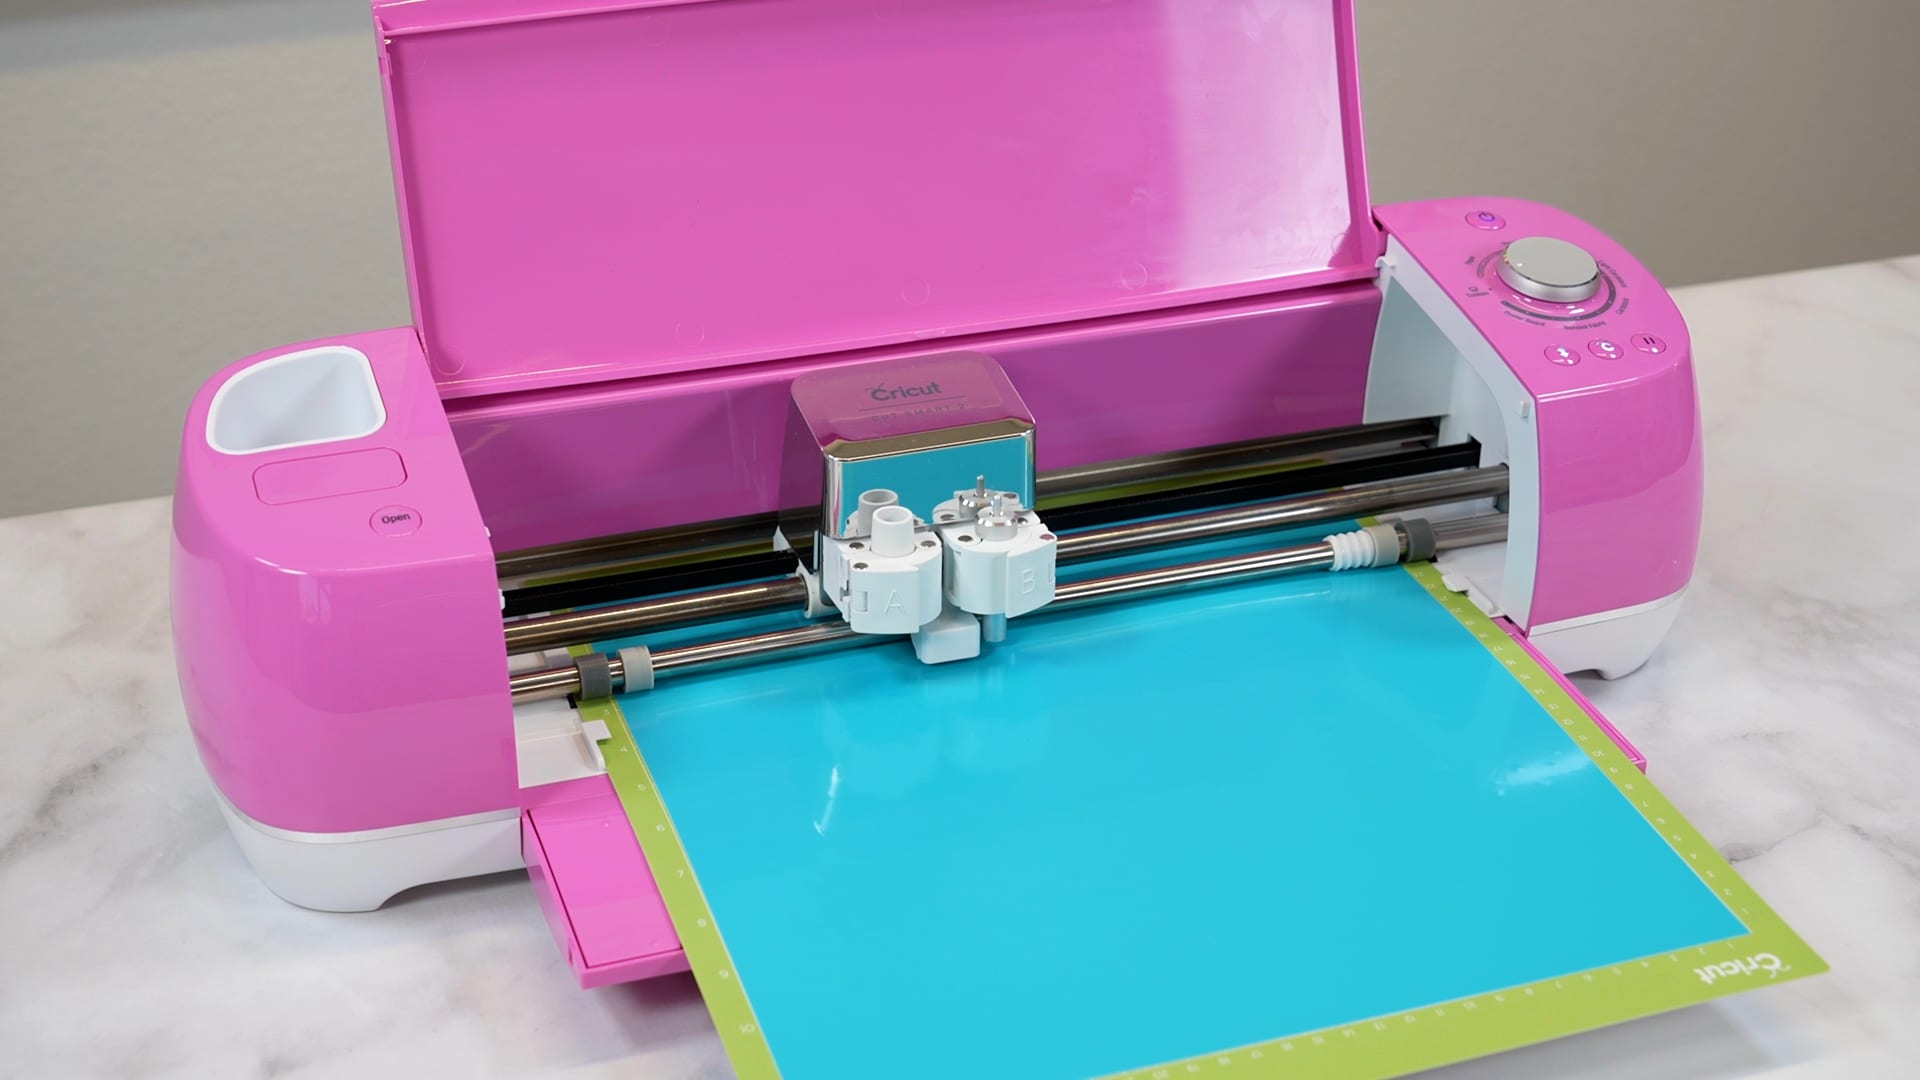
- Cricut Machine, Silhouette Machine, or Similar Cutting Machine – I used the Cricut Explore Air 2
- Chlorine Bleach
- Hydrogen Peroxide
- Continuous Fine Mist Spray Bottle
- Spray Bottle
- Gloves (nitrile gloves or plastic gloves)
- Rubber Bands , optional
- Paper Towels
- Permanent Adhesive Vinyl (12×12 sheets)
- Transfer Tape
- Vinyl Tools
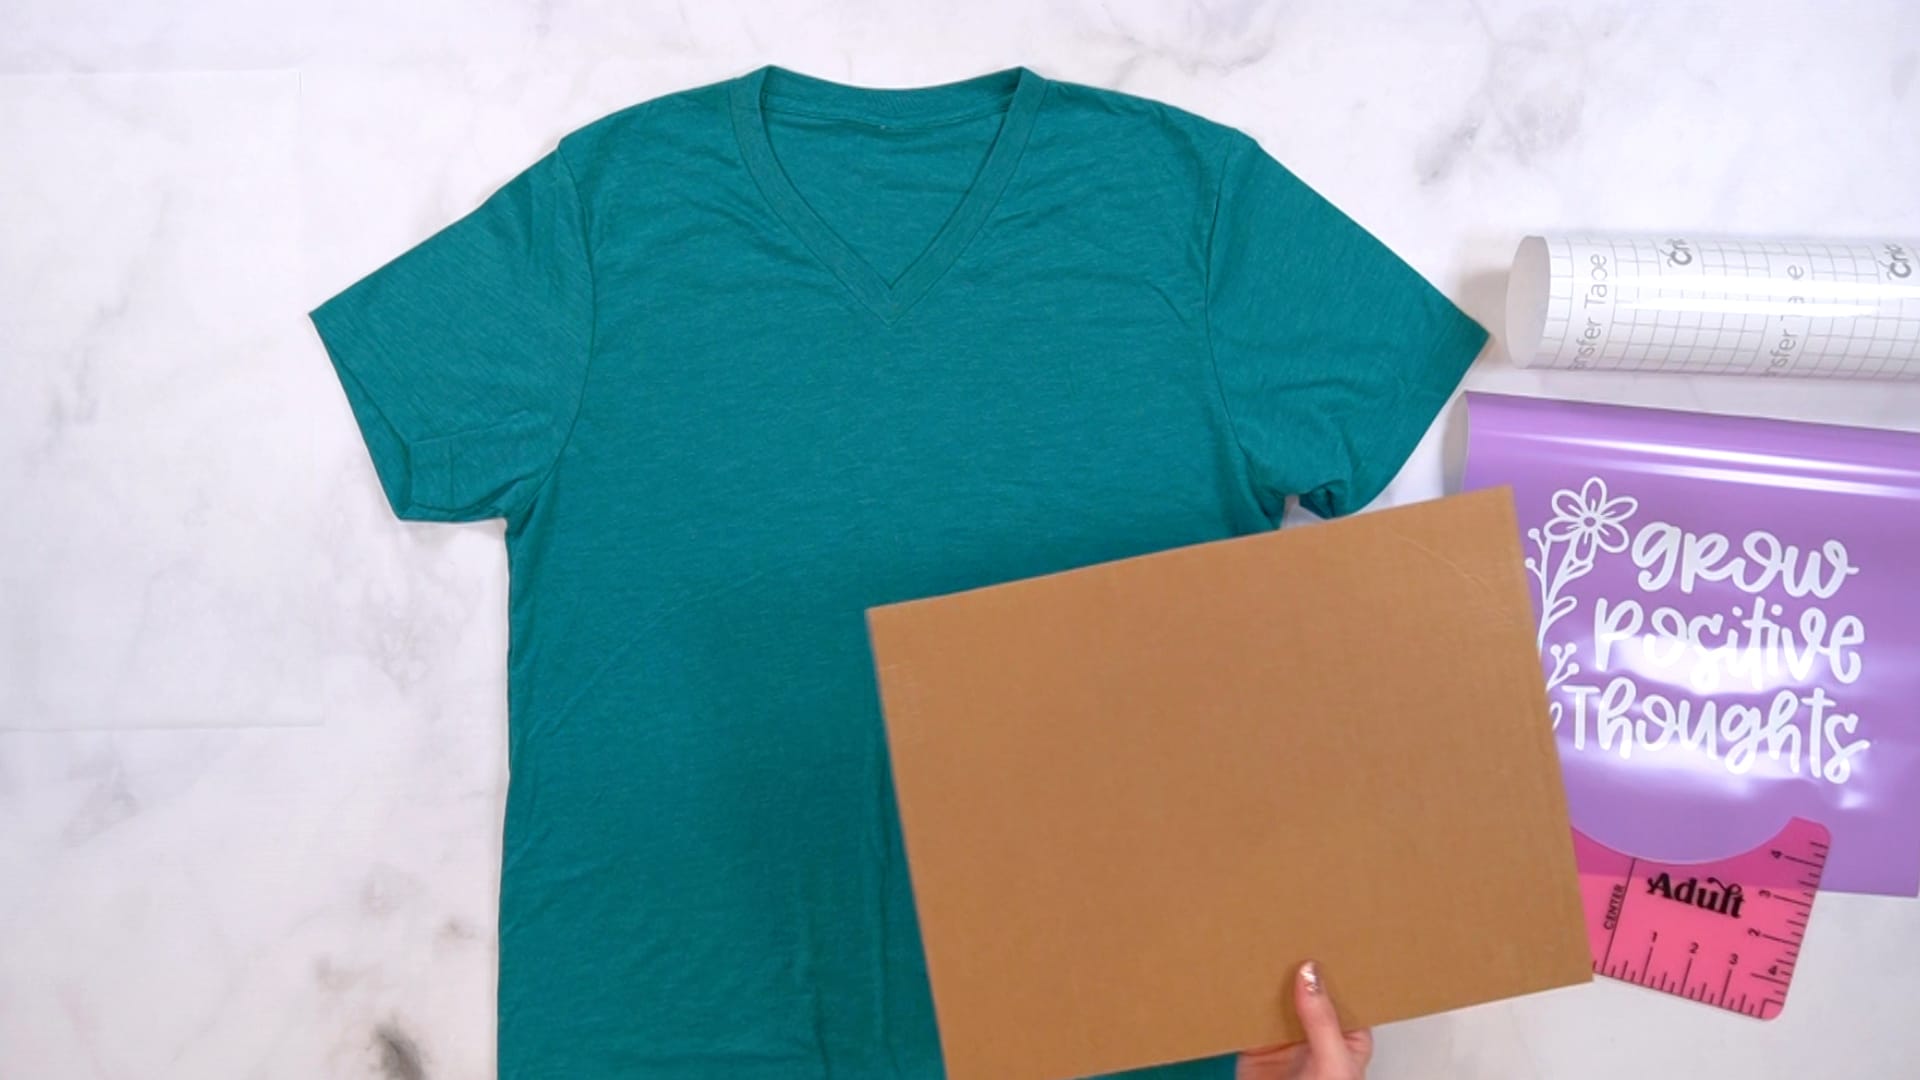
- Piece of Cardboard to fit inside your shirt
- Large Plastic Tubs (2), optional
- Plastic Wrap, optional
- T-Shirt Ruler Guide
NOTE: Cotton-poly blend shirts work best! If you are using 100% cotton, reduce the bleaching time as bleach can eat away at the delicate natural fibers VERY quickly!
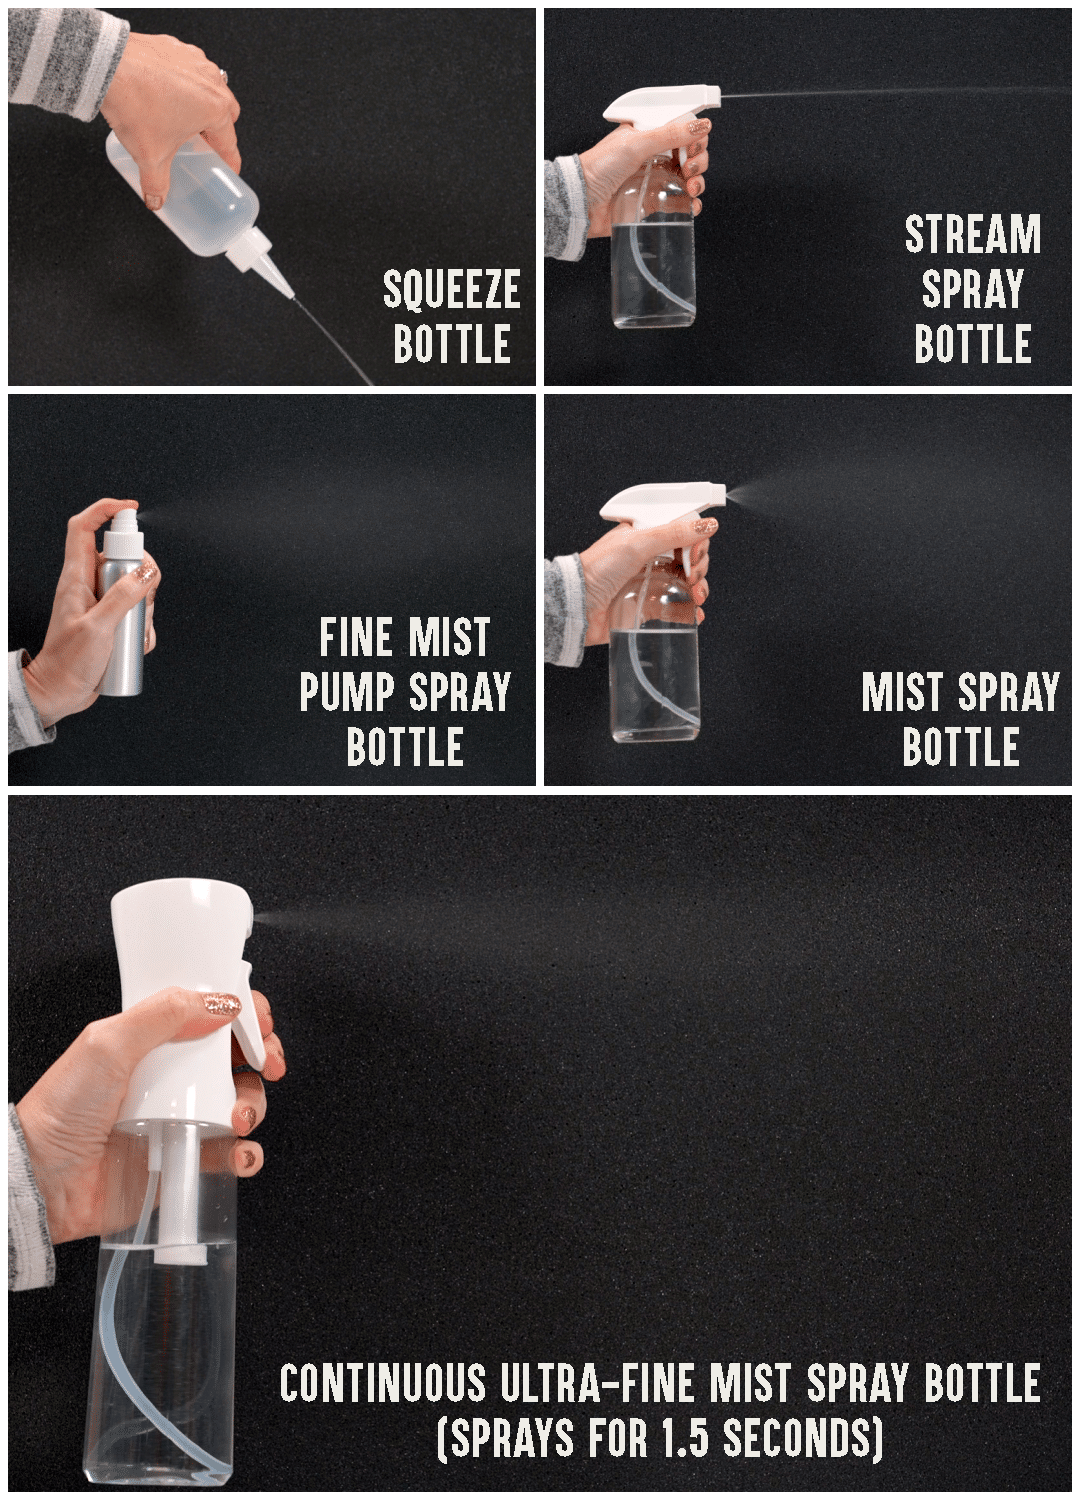
There are many different types of spray bottles that you can use for your bleaching solution. For the techniques in this post, I recommend using a continuous-mist spray bottle and a spray bottle that has both a stream and spray nozzle.
Watch the Bleach Dye & Stencil Video!

Watch our video above, and keep reading for all of the links and more details and information!
How to Make a Bleach-Stenciled Shirt:
Color Patch Test
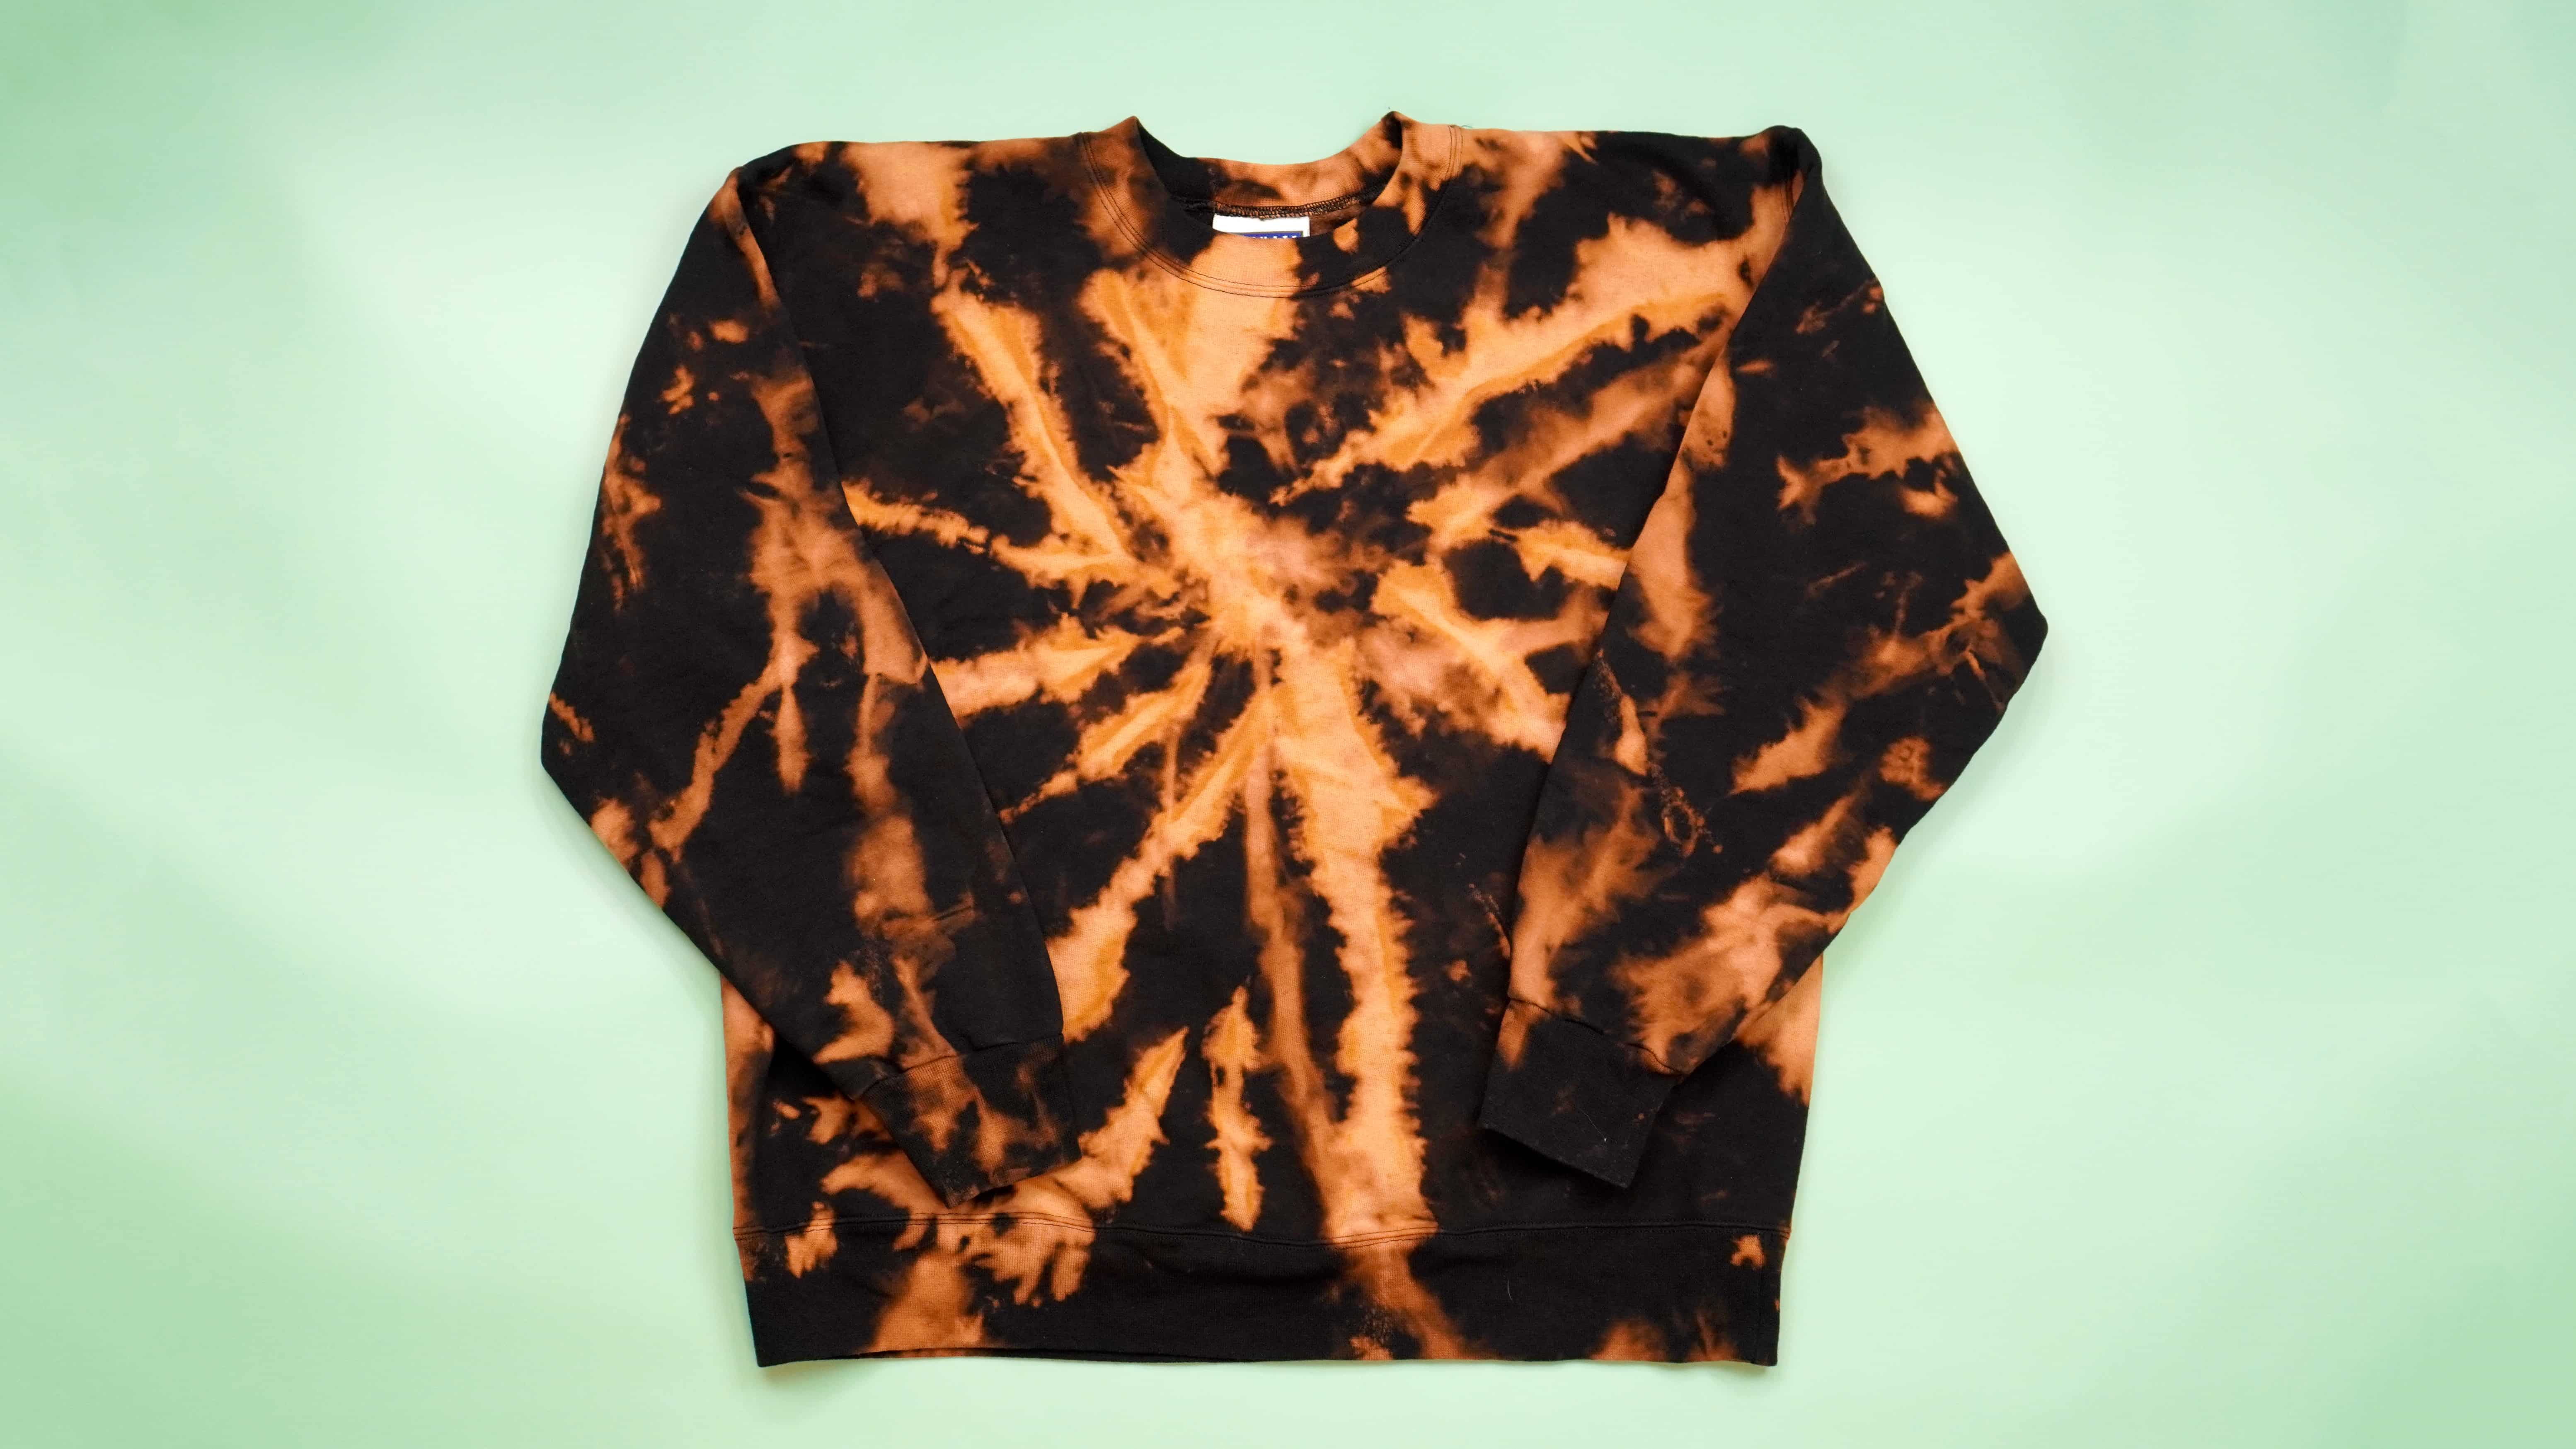
First, before you begin, you will want to do a small patch test with the bleach. Adding bleach to a colored shirt doesn’t always work the way that you expect it to – for example, a black shirt will often bleach to a bright, rusty orange color – so I always recommend doing a patch test first to make sure that you’re going to be happy with the color change.
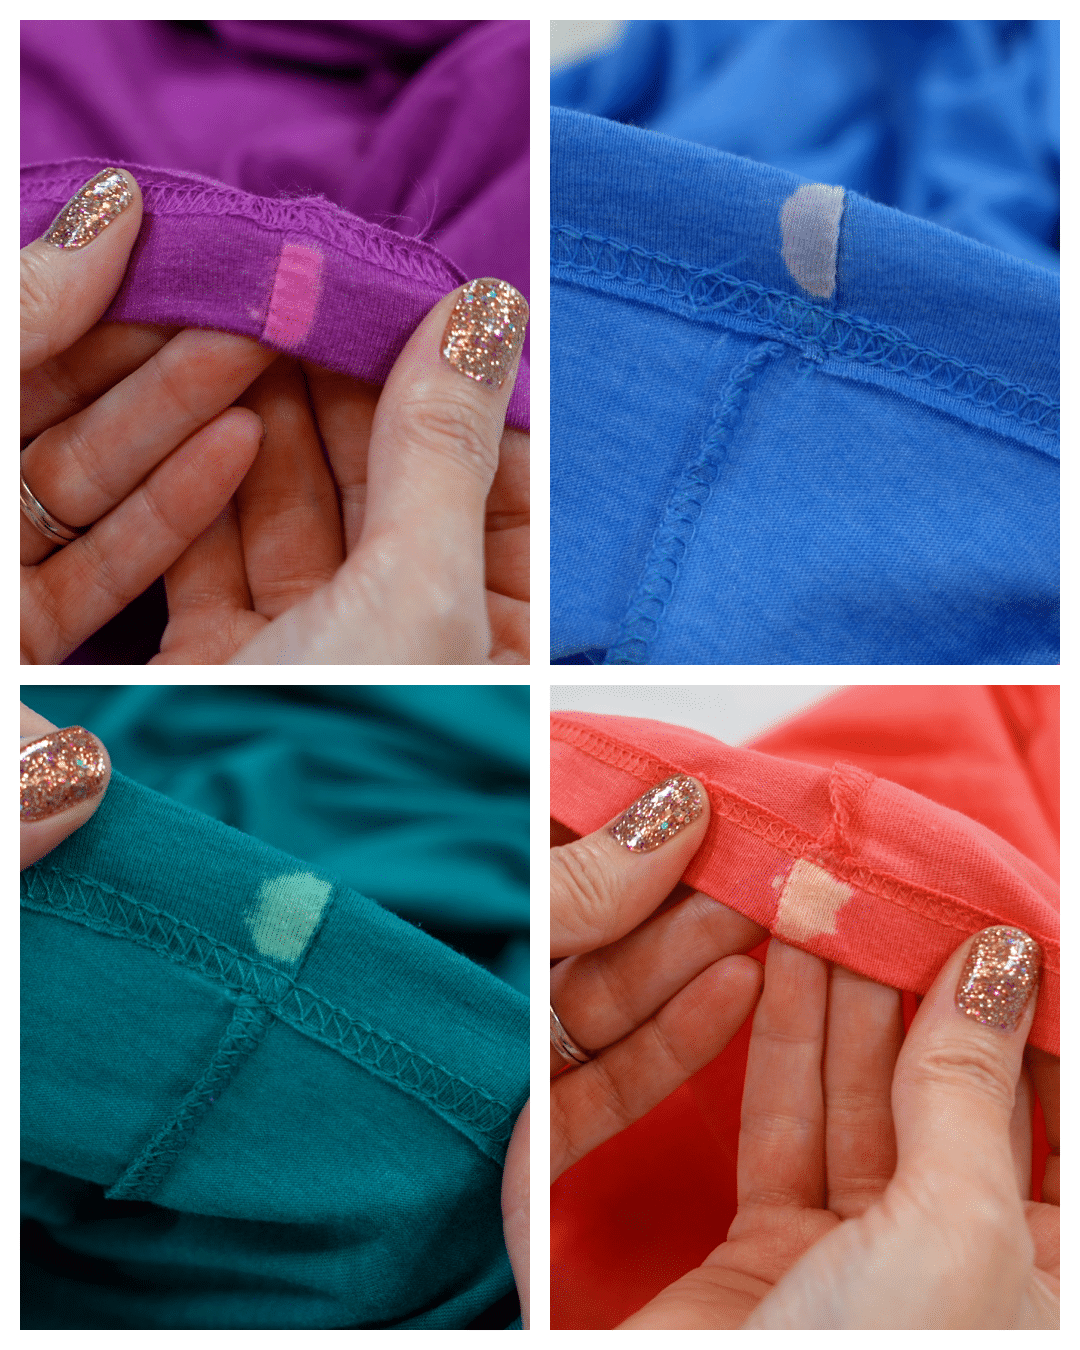
Mix up a small amount of bleach solution made from 50% cold water and 50% bleach. It’s important to use cold water for your bleach solution as hot water decomposes the active ingredient in bleach and renders it ineffective.
Use a cotton swab to add a small amount of the bleach solution to the inside seam of the shirt, and watch it for about 10-20 minutes to observe how the color changes. Do NOT bleach your shirt for more than 20 minutes or you can run the risk of damaging the fibers.
Note: bleached colors will become one to two shades lighter after drying as well!
Create Your Own Stencil
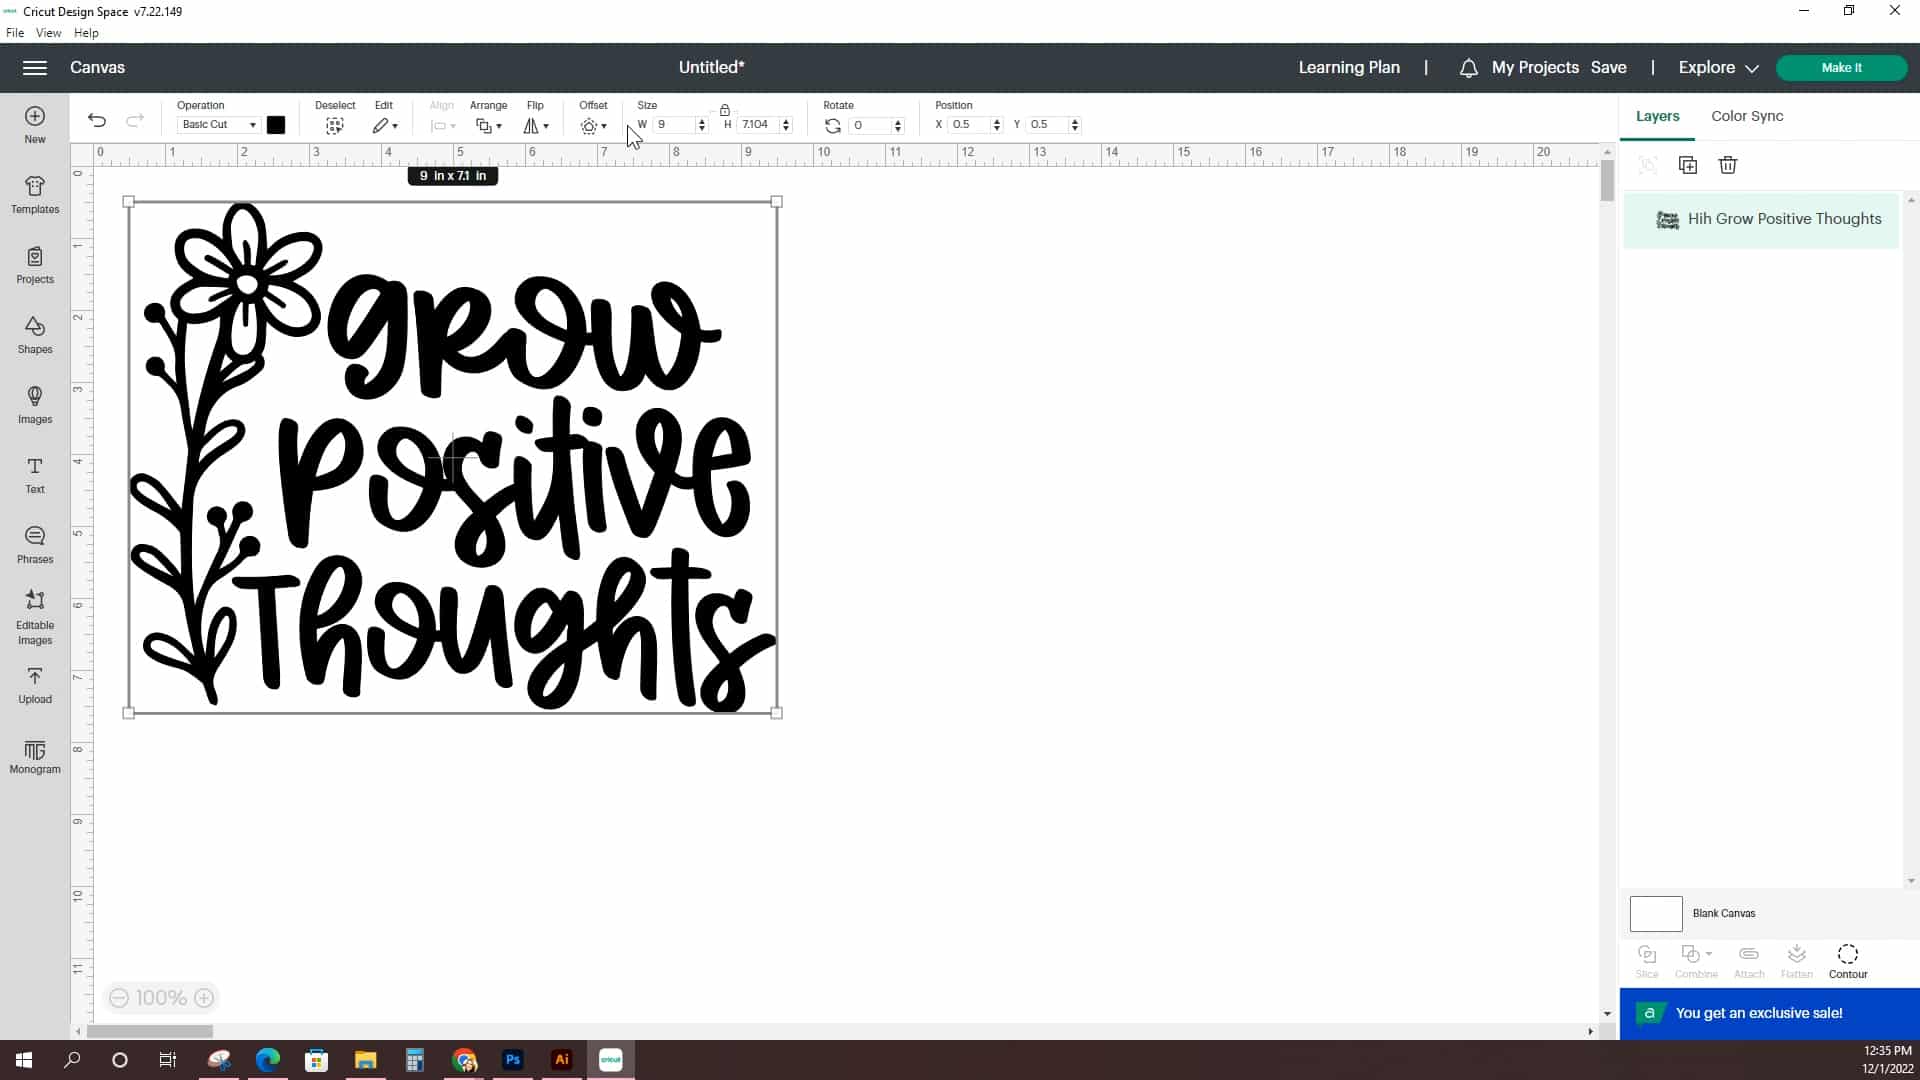
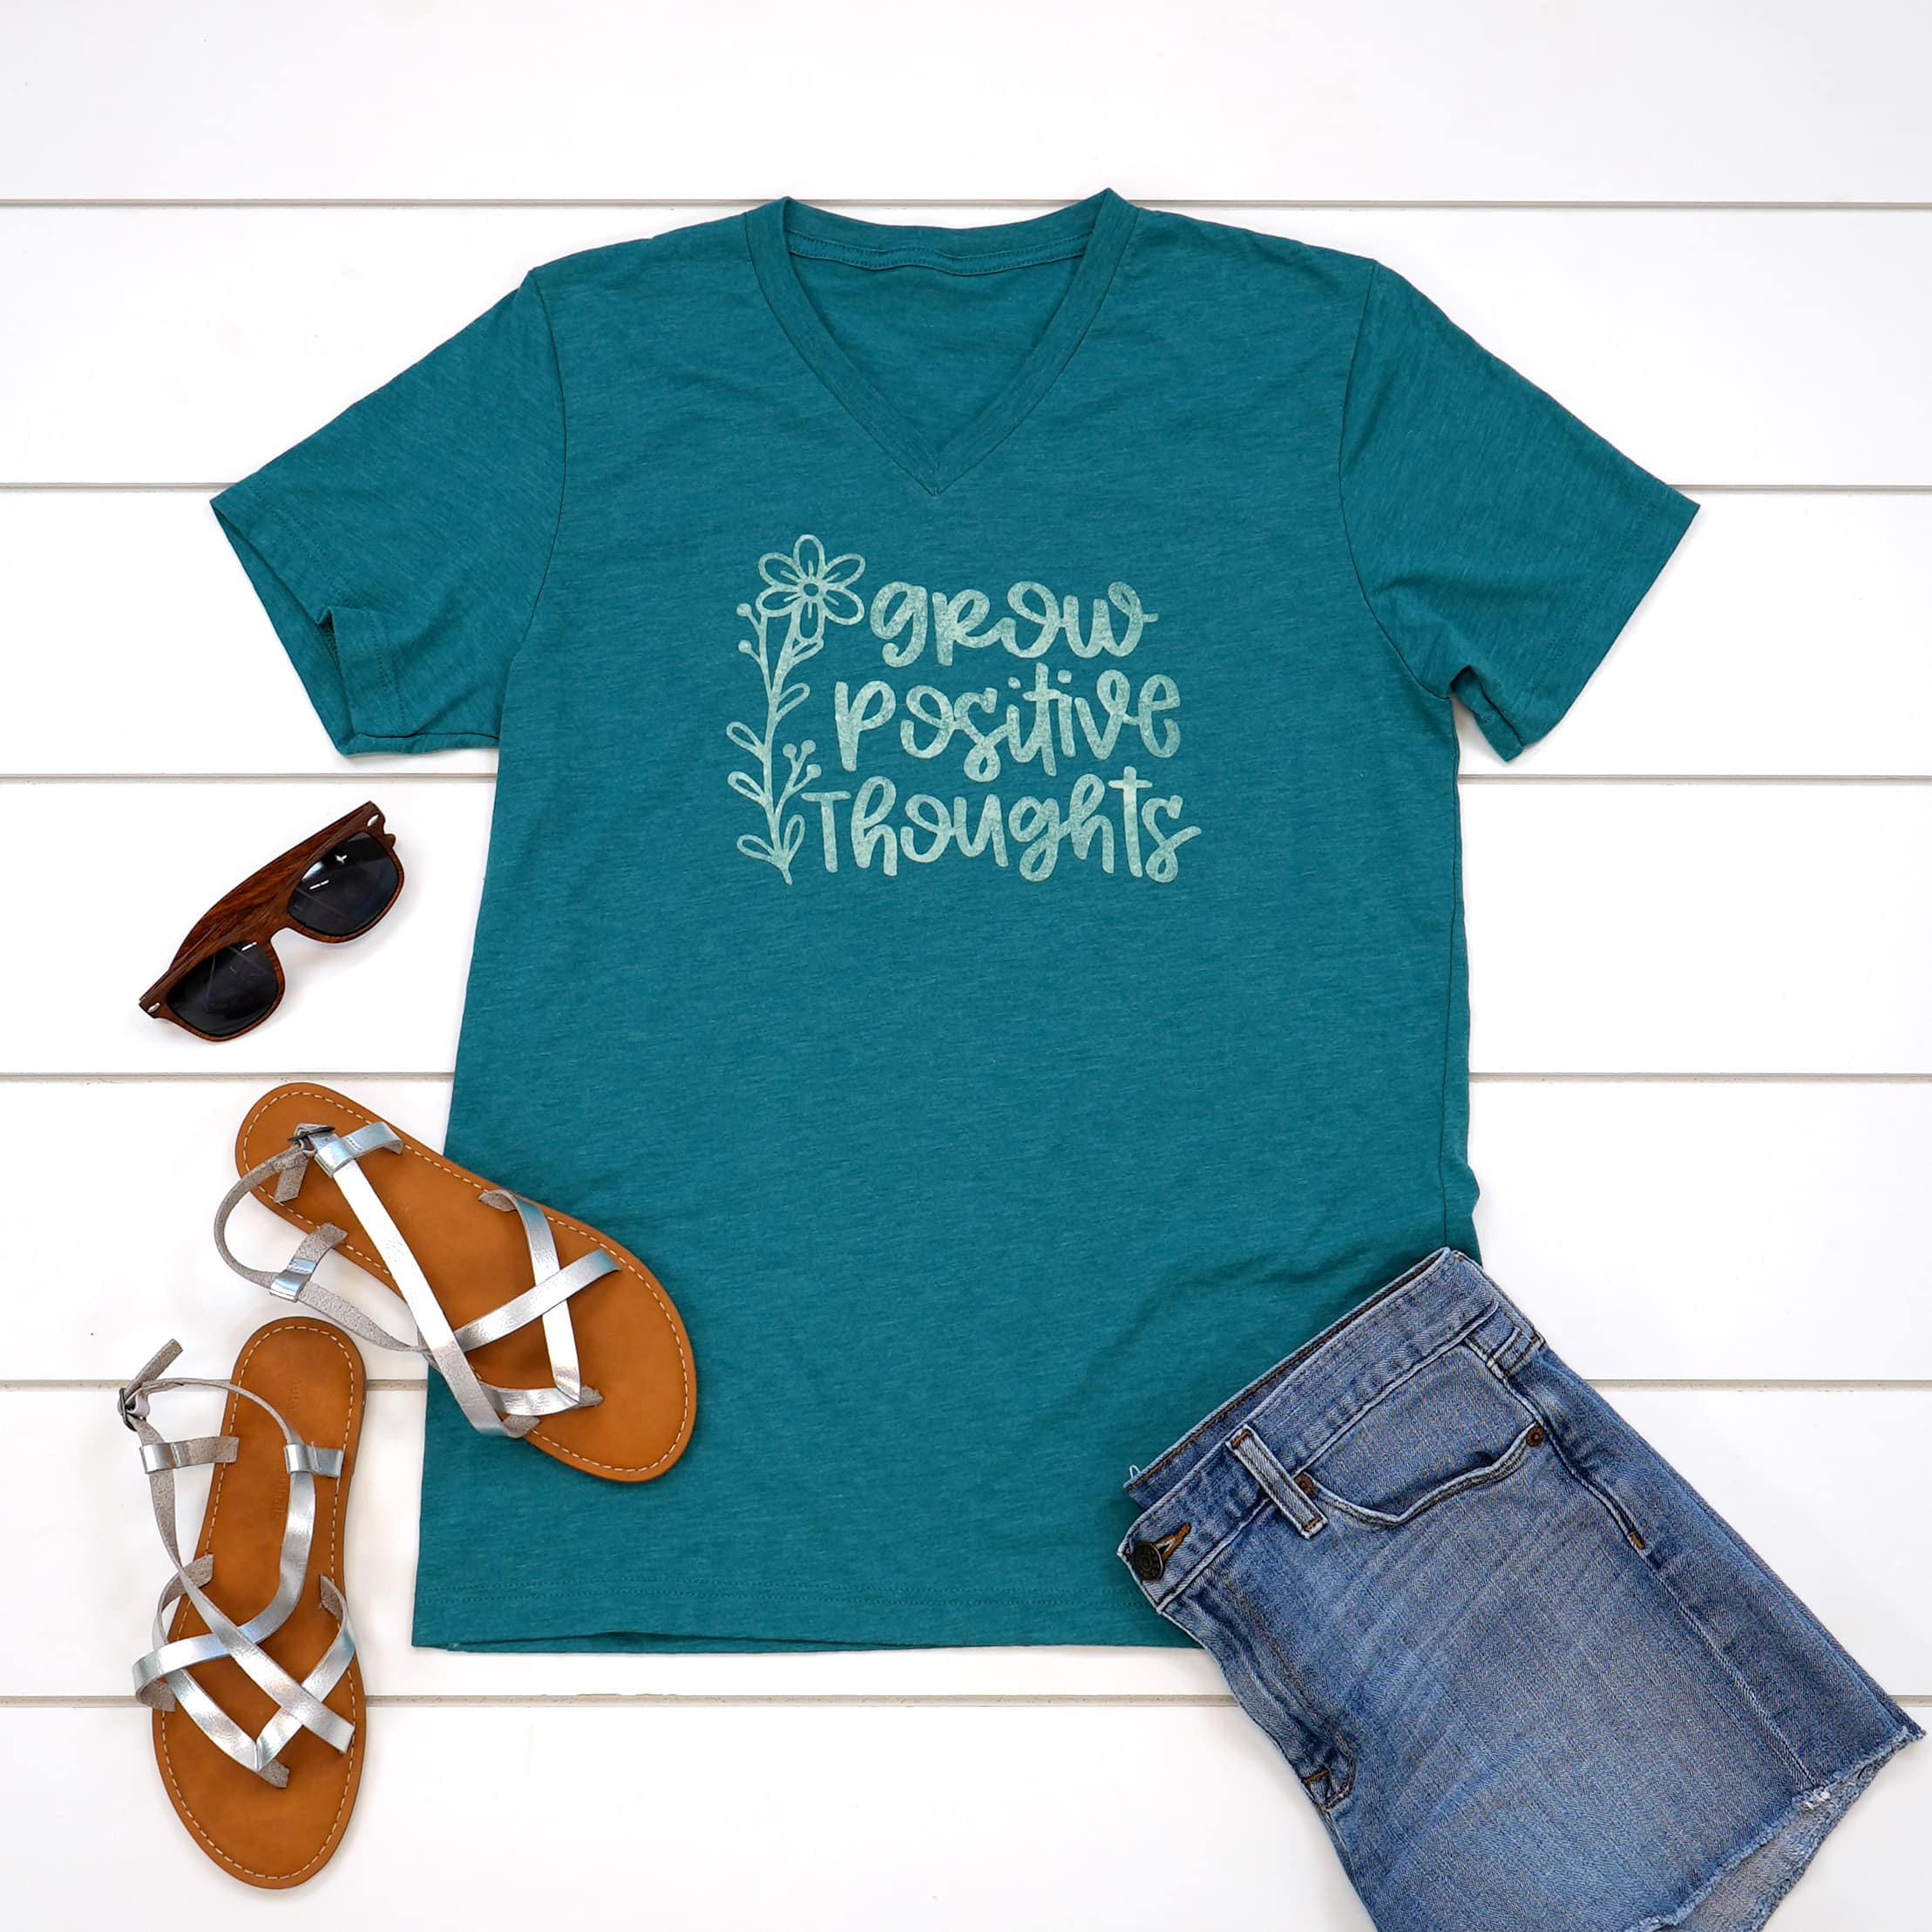
Next, it’s time to create your stencil. Open up a new canvas in Cricut Design Space, and upload your SVG file or select an image from the Cricut Design Space Image Library. For this example, I am using our Grow Positive Thoughts SVG.
For best results, the ideal type of images to use for bleach-stenciled shirts are ones that have medium-sized text and image detail. Large sections of open space within the stencil can be difficult to cover evenly with bleach, and intricate designs can sometimes become fuzzy if your stencil isn’t firmly adhered to the shirt.
Once you have selected and imported your design, resize the image as needed to fit your shirt. I’m making an adult-size small shirt, so my design is 9 inches wide. You can reference our Design Sizing and Placement Guide here for more assistance.
RELATED: Learn How to Upload an SVG File to Cricut Design Space here!
We are using adhesive vinyl, so we don’t need to worry about mirroring things, but we DO want to adjust the design’s position on the mat. In order to maximize the effectiveness of the stencil, move the design into the center of the mat.
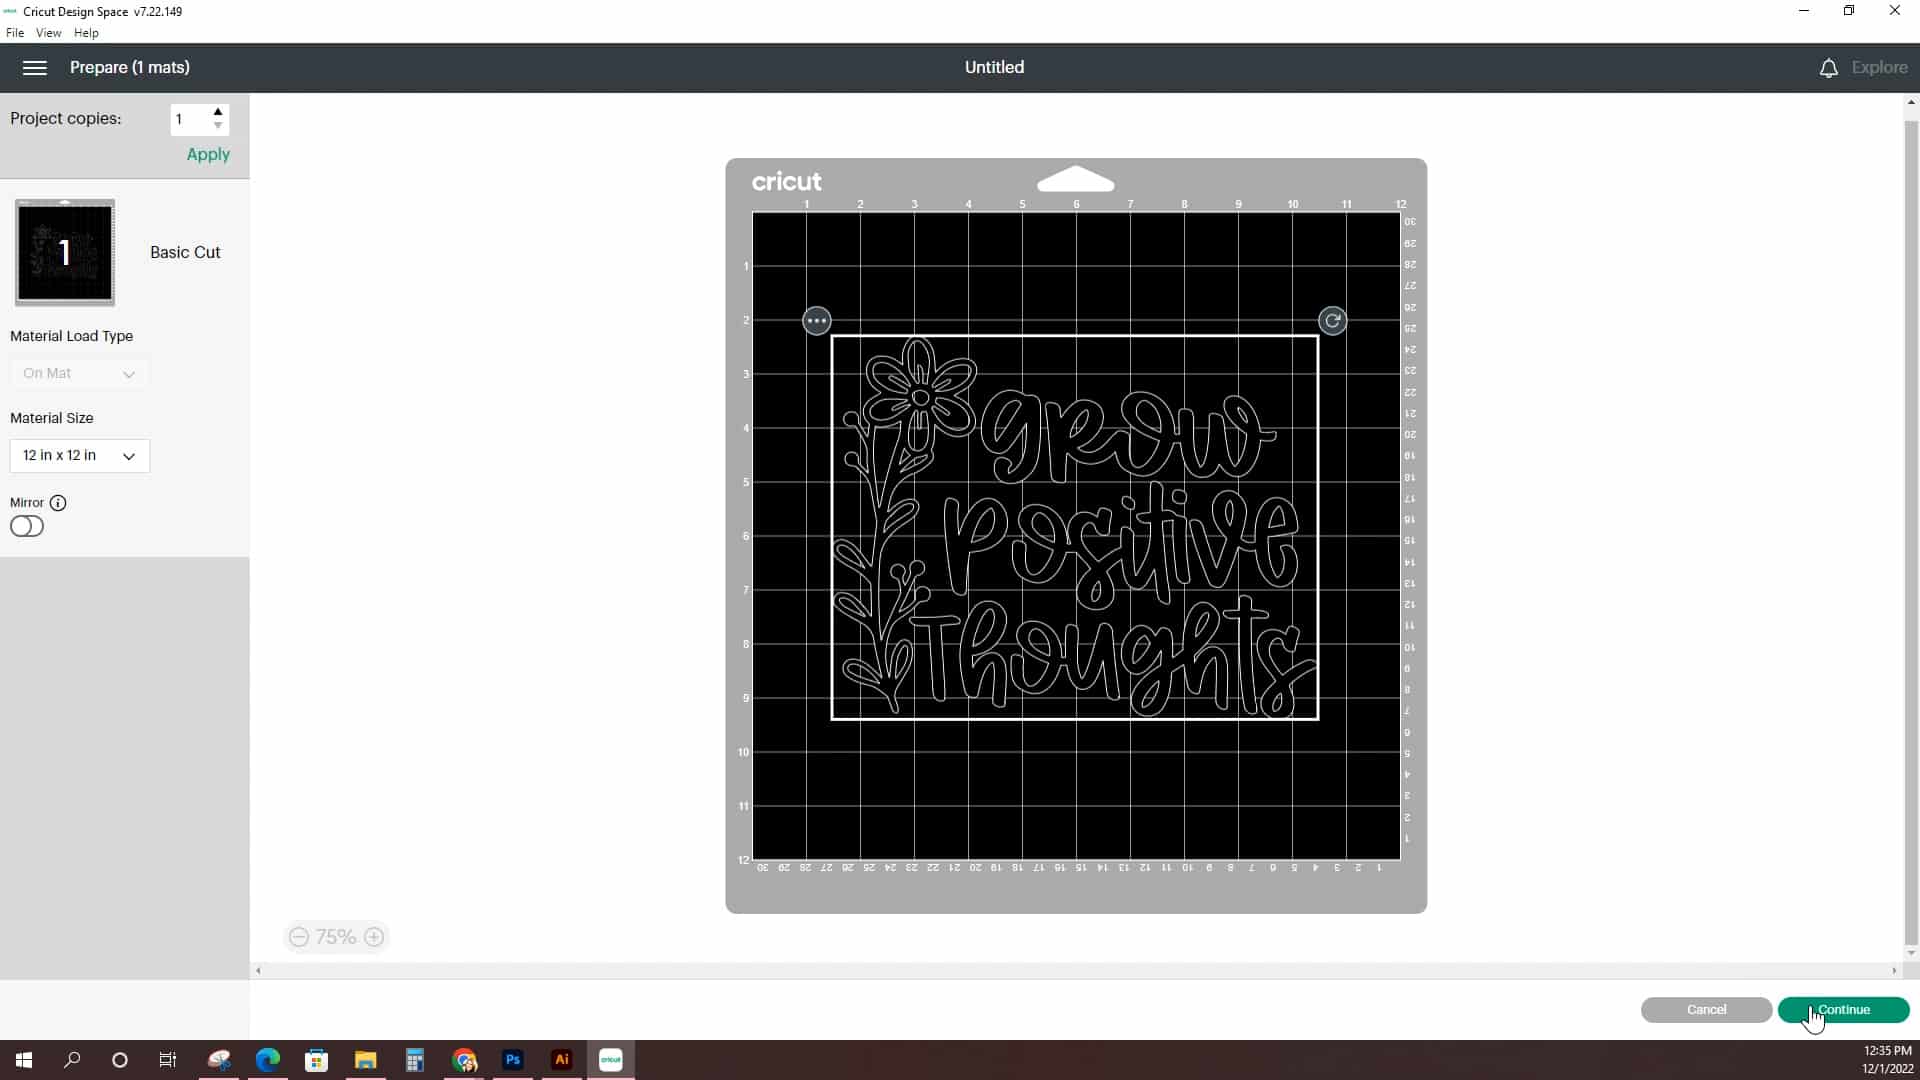
In the materials list, select Premium Vinyl and “more pressure” before loading your vinyl into your machine and cutting the design.
Since we will be discarding the stencil at the end, now is a great time to use up your LEAST favorite colors of vinyl!
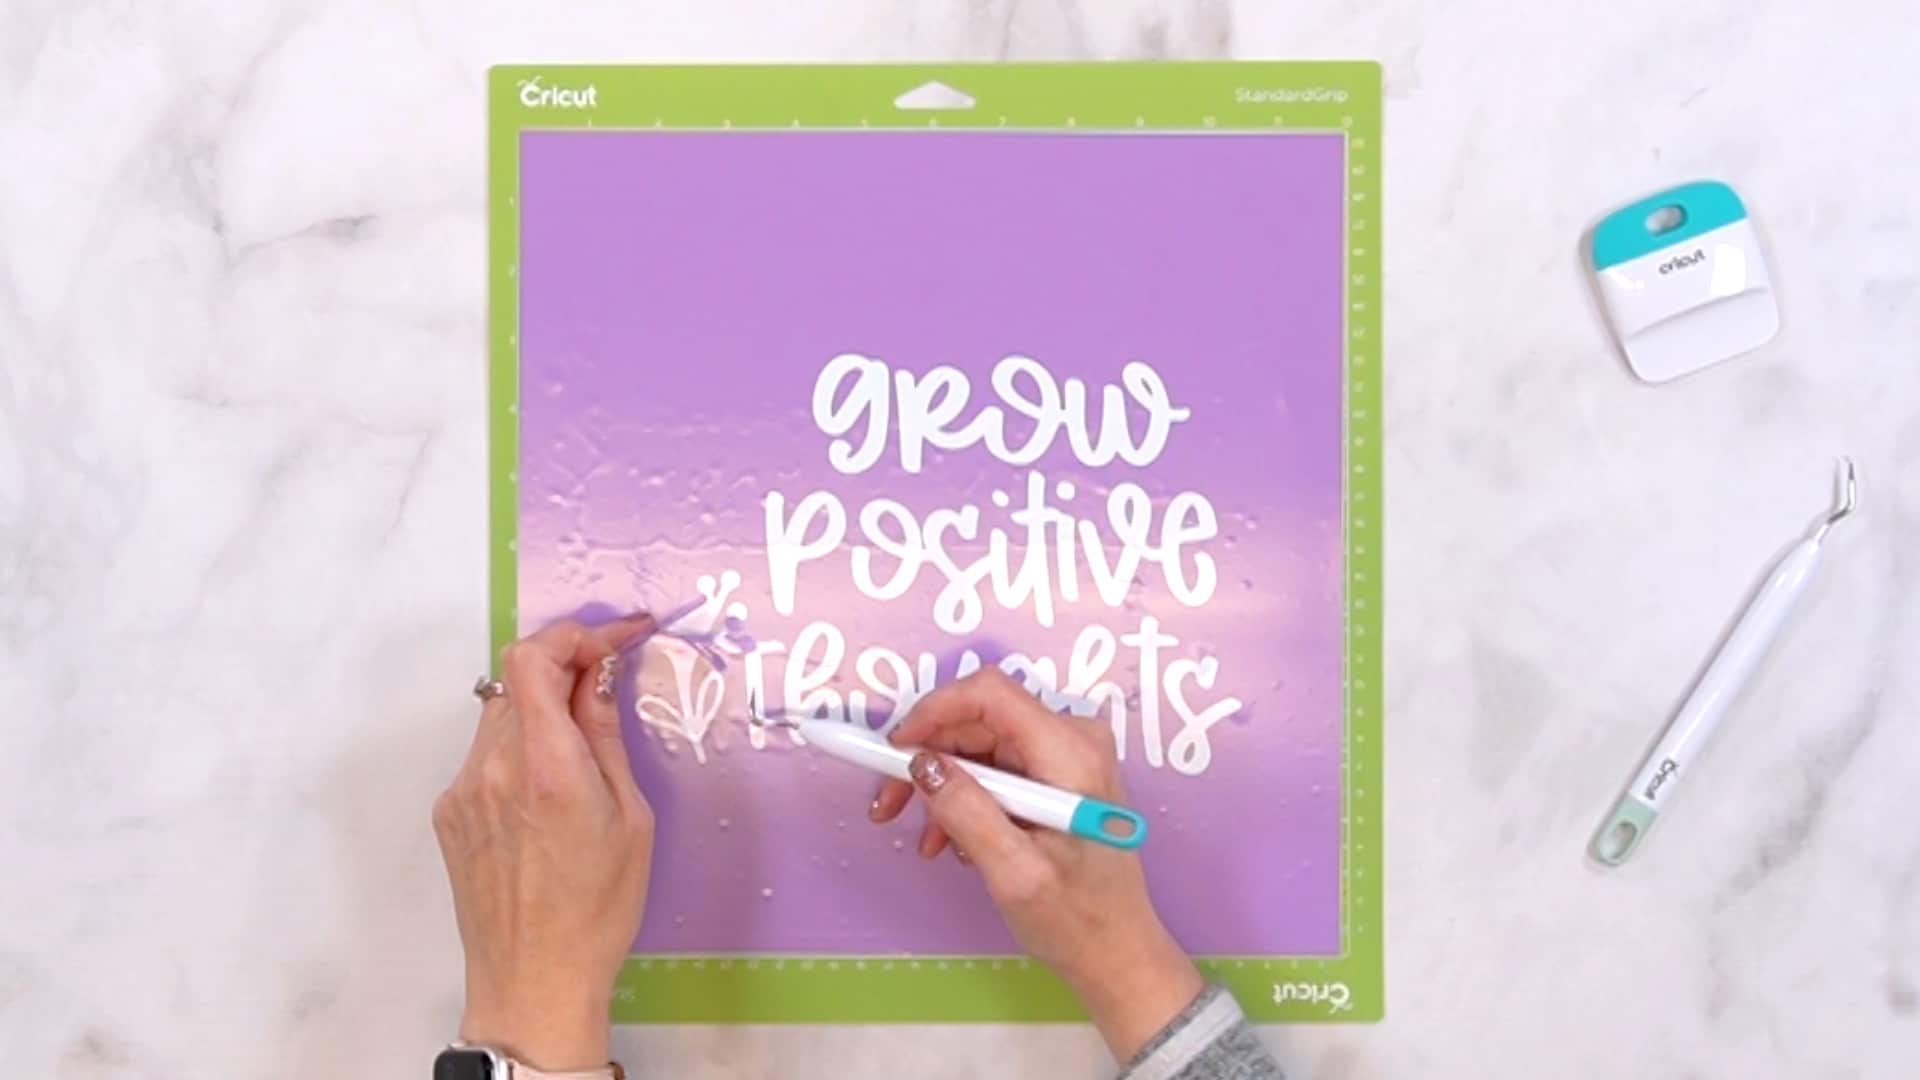
Use the weeding tools to weed the vinyl. In order to use this as a stencil, I’m going to leave the outside and the negative space in place and remove the design.
Apply the Stencil
Start with a clean, dry shirt to help keep the bleach lines as crisp and clean as possible. Insert a piece of thick cardboard into the shirt.
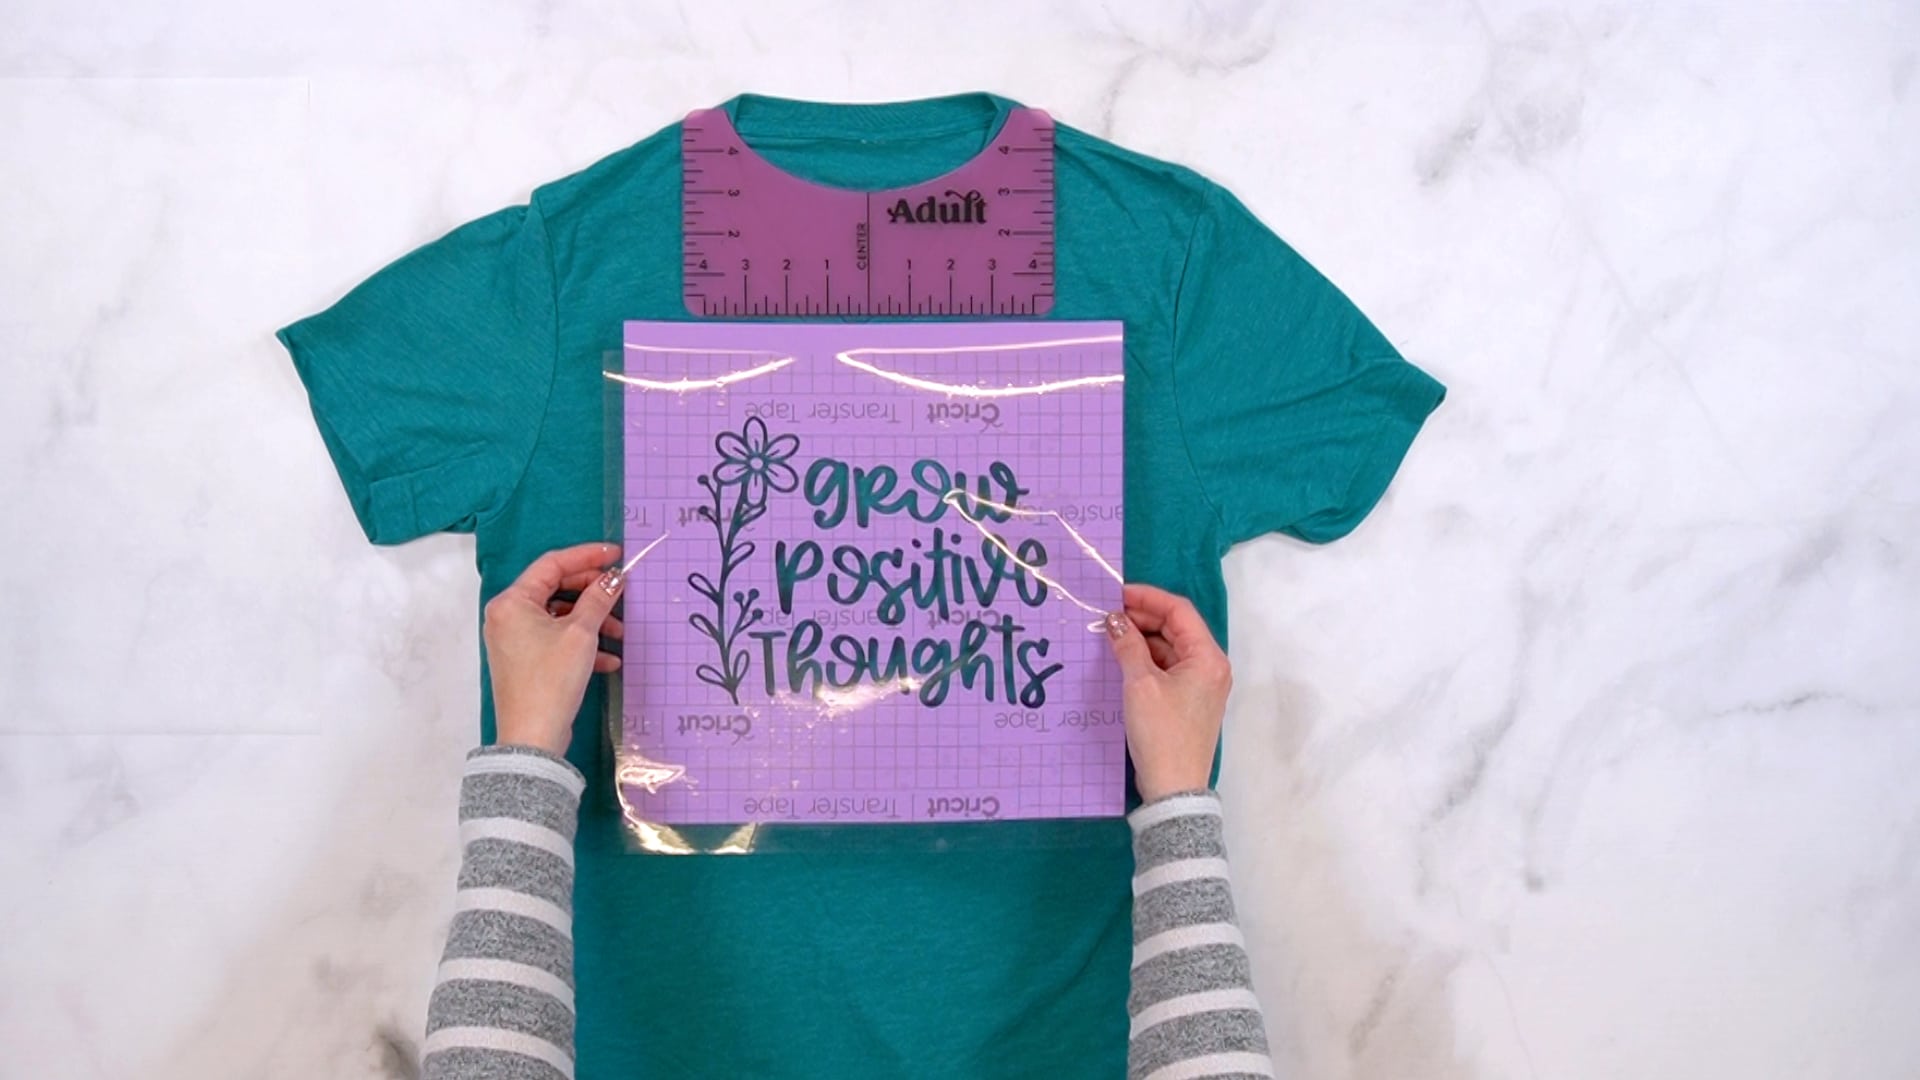
Use a piece of transfer tape to transfer the stencil to the shirt, and then peel back and remove the transfer tape.
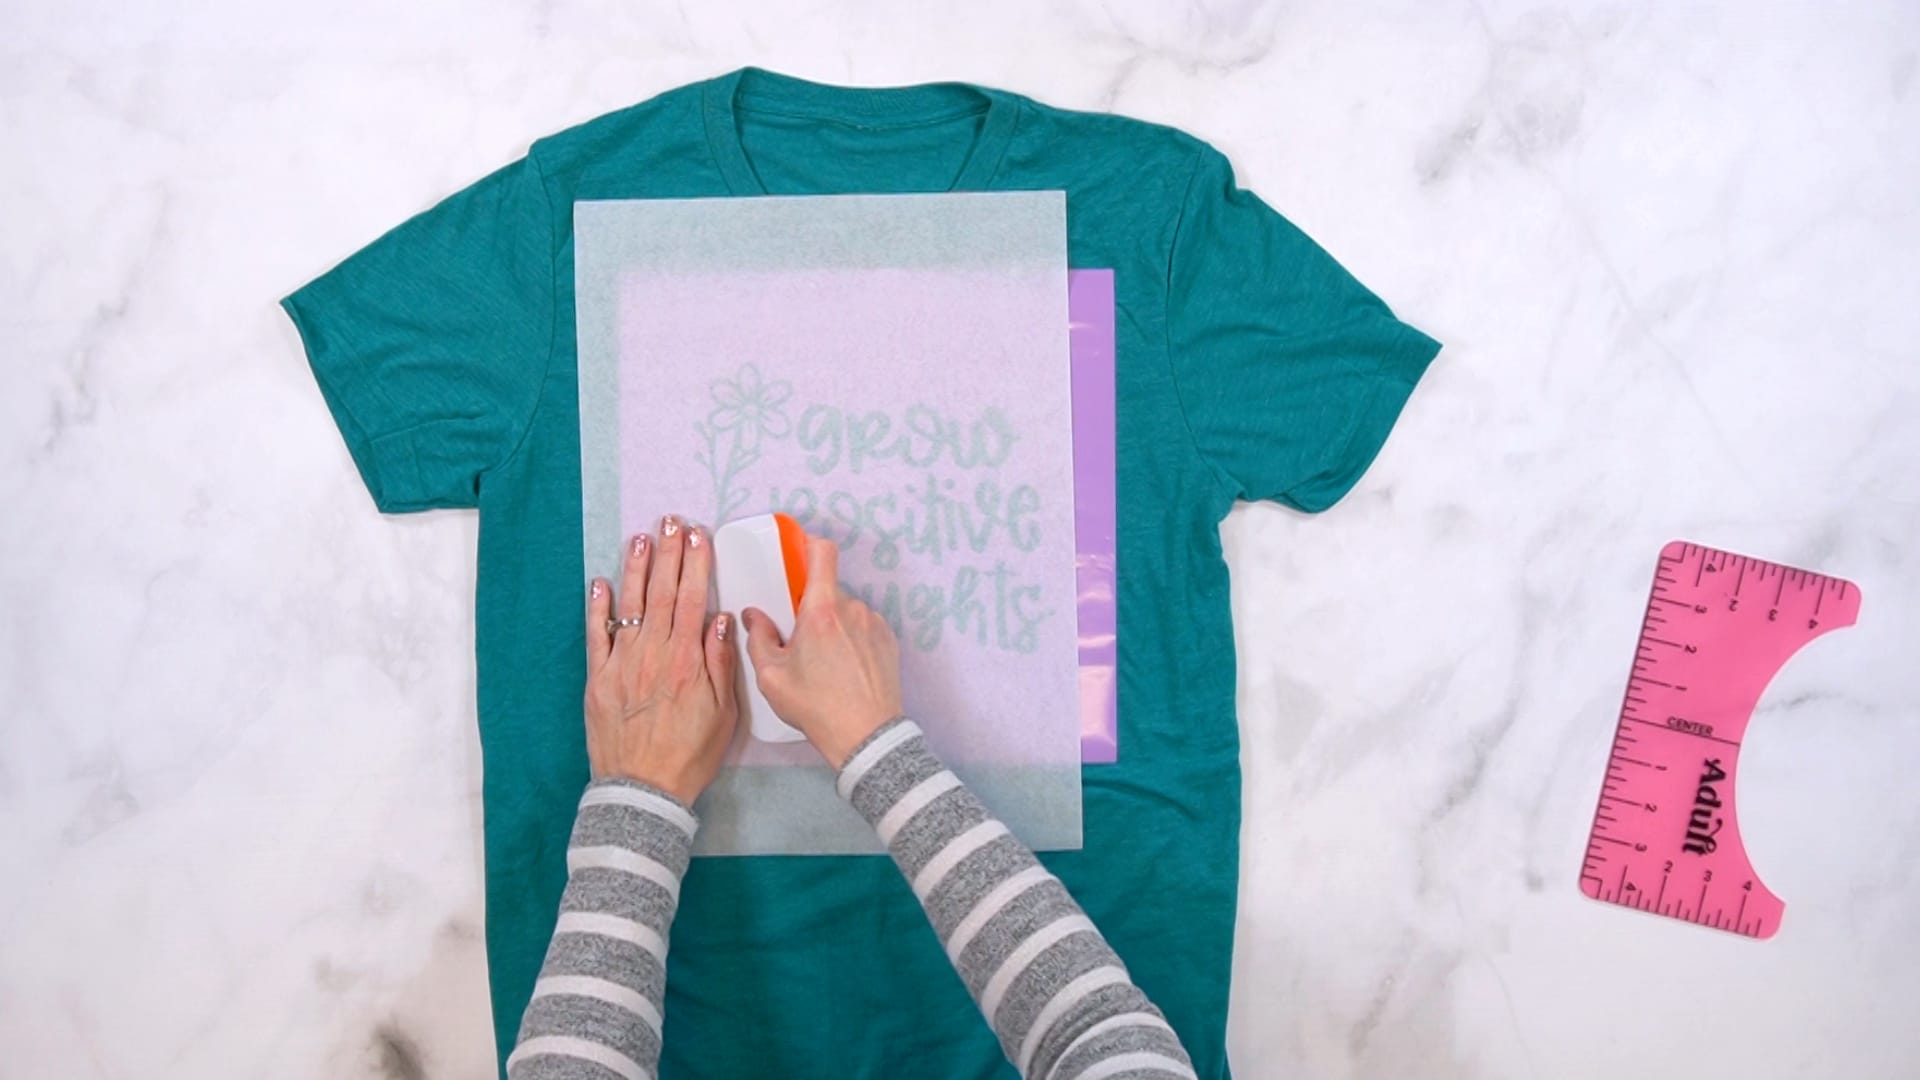
Cover everything with a sheet of paper and use the scraper tool to make sure that the vinyl is firmly adhered to the shirt.

Wrap the Shirt
Fold and wrap the shirt sleeves and any excess fabric around to the back side of the cardboard.
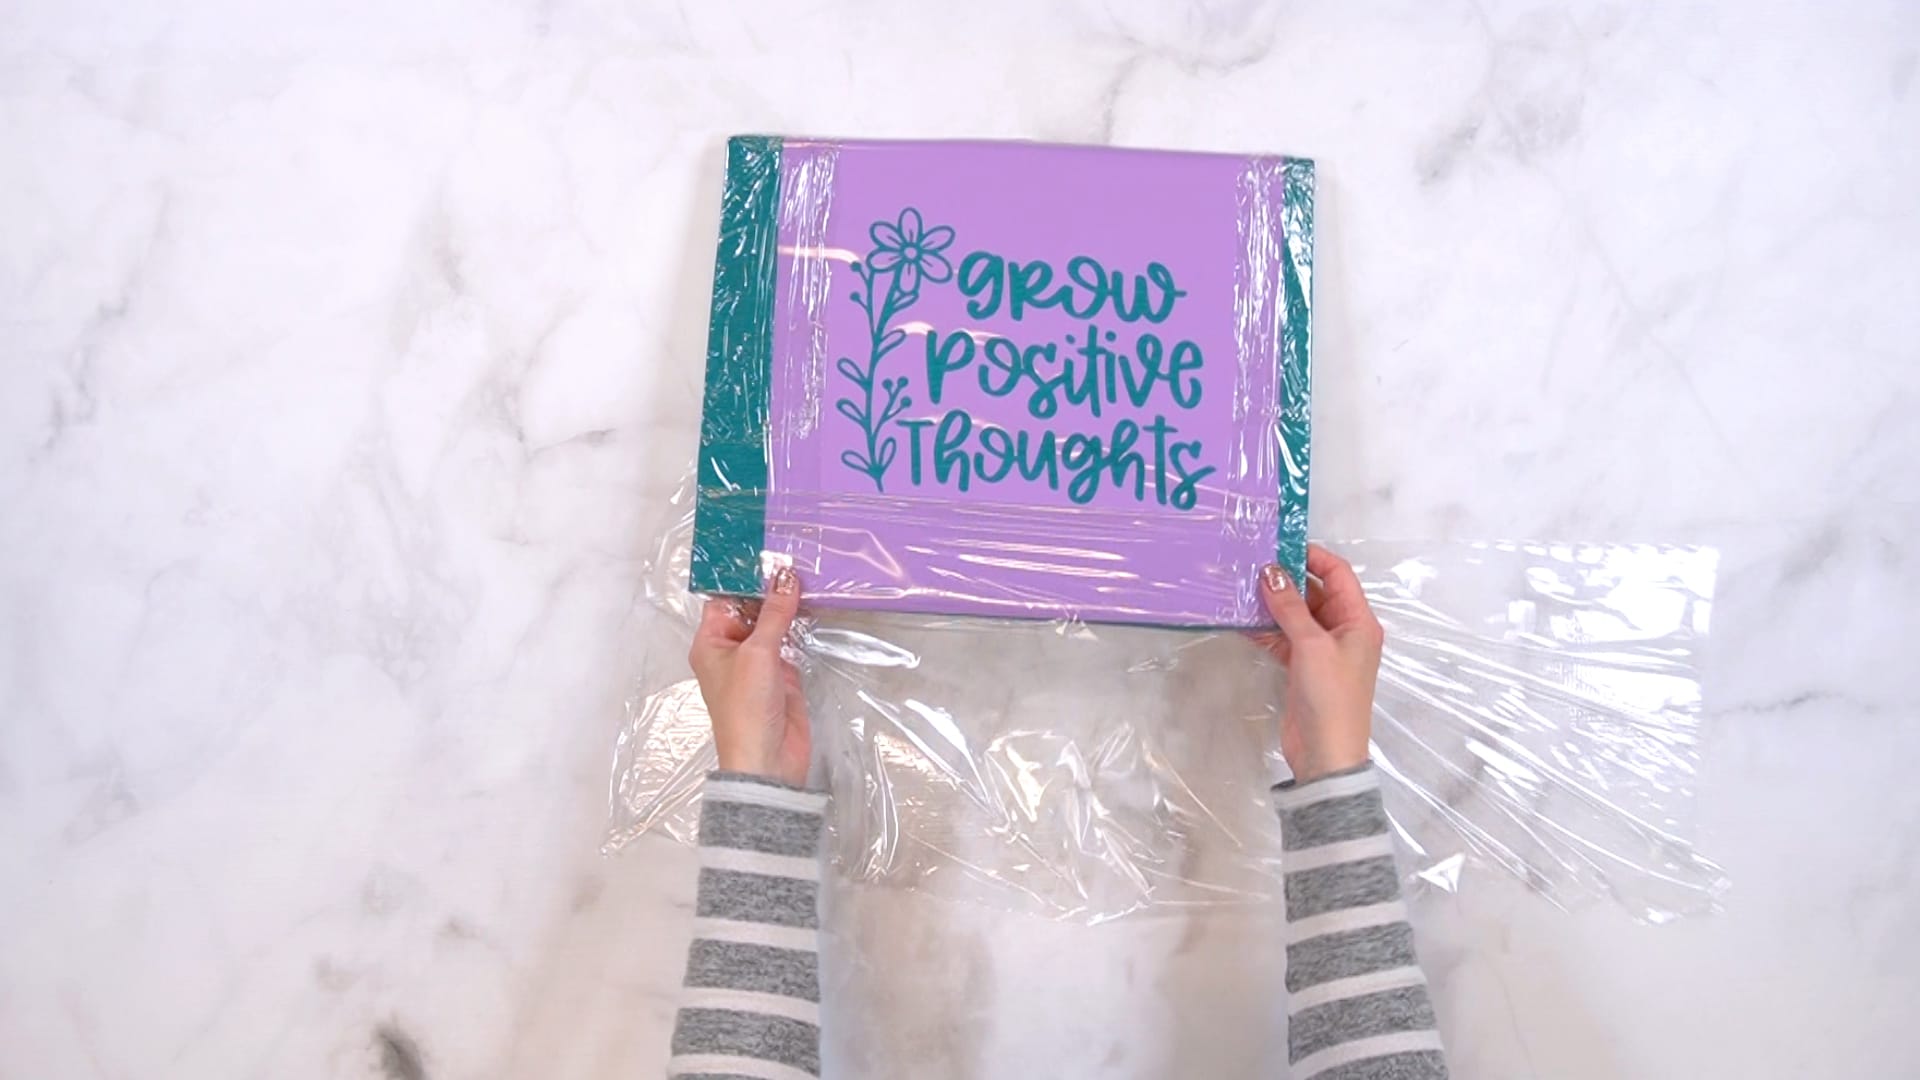
At this point, I like to wrap all of the exposed areas of the shirt in a layer of plastic wrap…mostly because I can get a little messy with my bleach sometimes, and I definitely want to avoid getting any accidental bleach spots on the shirt.
Note: You can skip the plastic wrap step if you feel confident in your ability to apply the bleach spray without any accidents.
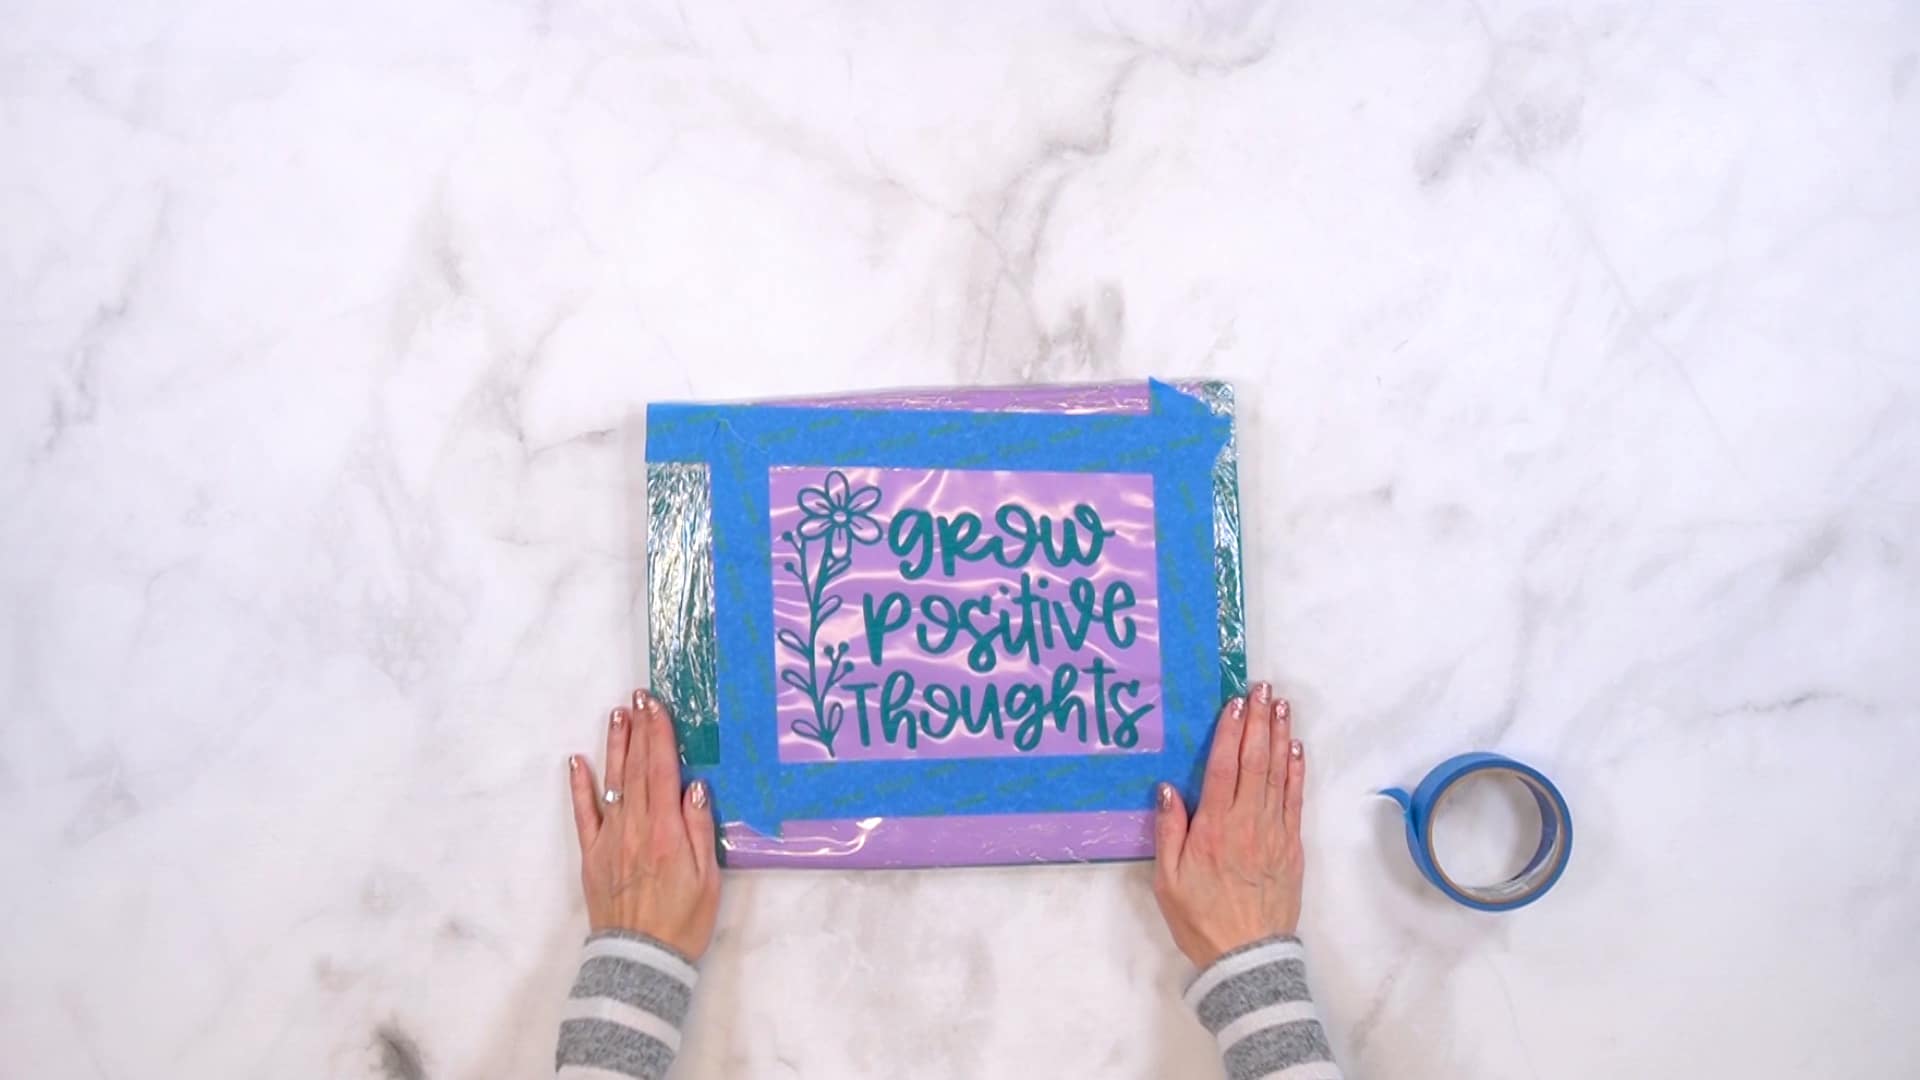
Lay the shirt down and use additional pieces of vinyl or painters tape to cover any remaining areas of the shirt that are still exposed. Again, this step is optional, but I like to be EXTRA cautious!
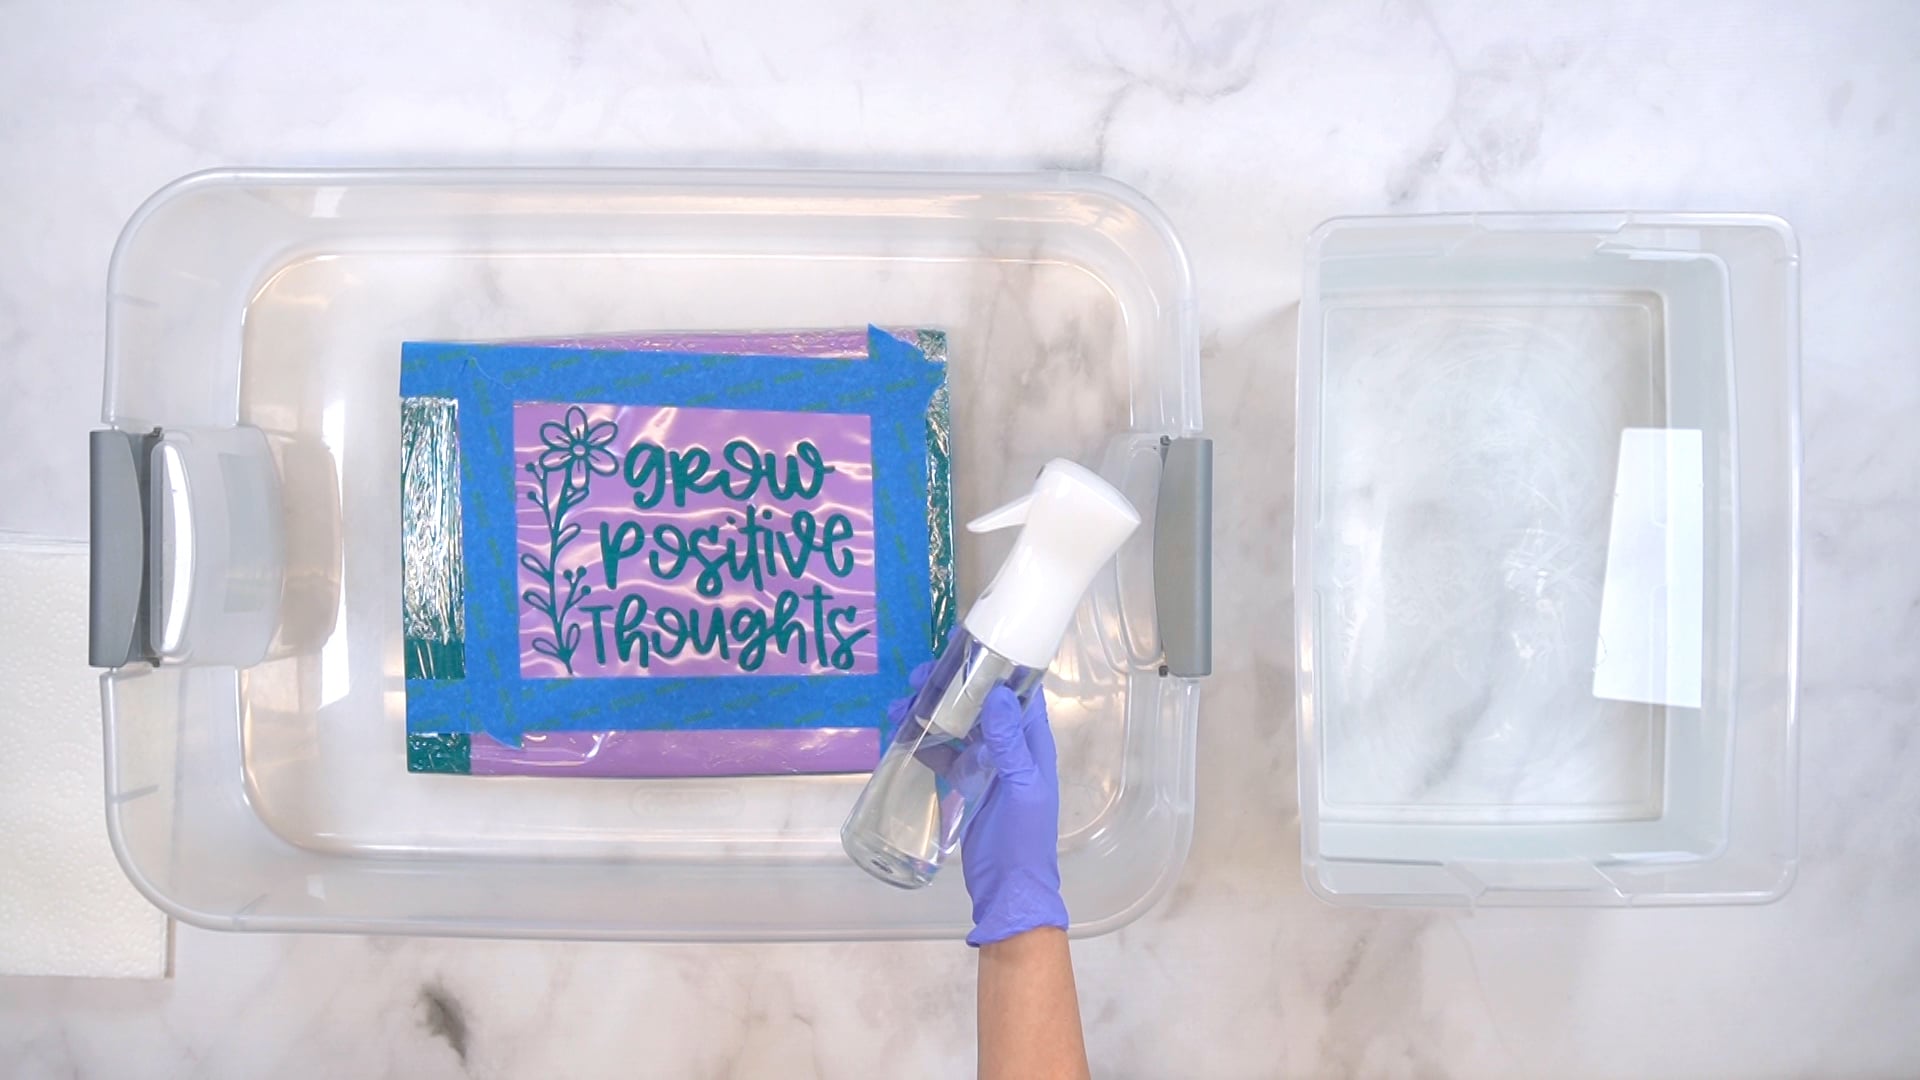
Bleach & Neutralize
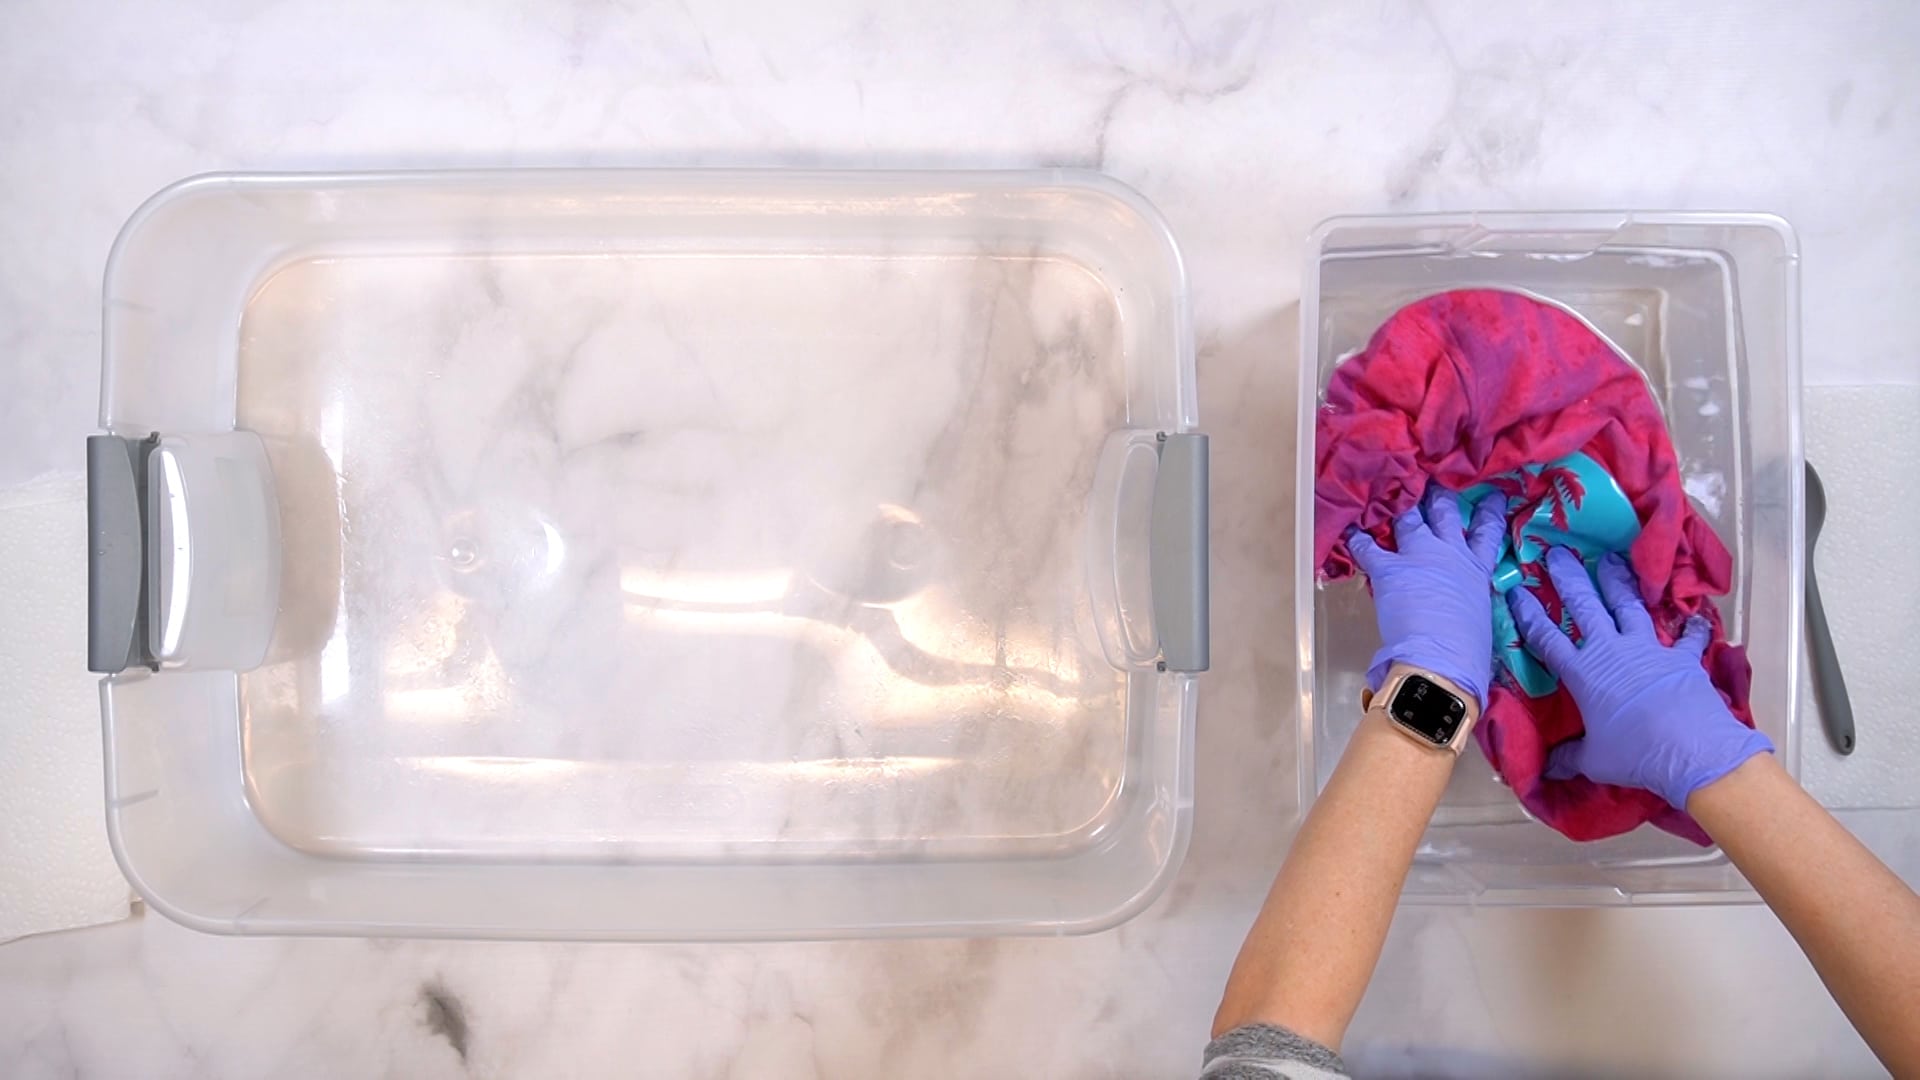
Now, it’s time to bleach the shirt, but first, you’ll need to prep your work area – you can opt to do this step in a sink or your bathtub, but I prefer to use two separate plastic tubs, one for bleaching and one for my bleach neutralizer solution.
In a well-ventilated area or outside, mix a bleaching solution of equal parts bleach and cold water in a continuous fine-mist spray bottle.
To create the bleach-neutralizing solution, mix together one part hydrogen peroxide to 10 parts water. You will want to fill your plastic tub with enough of this solution to submerge your shirt after bleaching.
Always make sure to wear gloves and eye protection when working with bleach, as it can be a strong irritant.
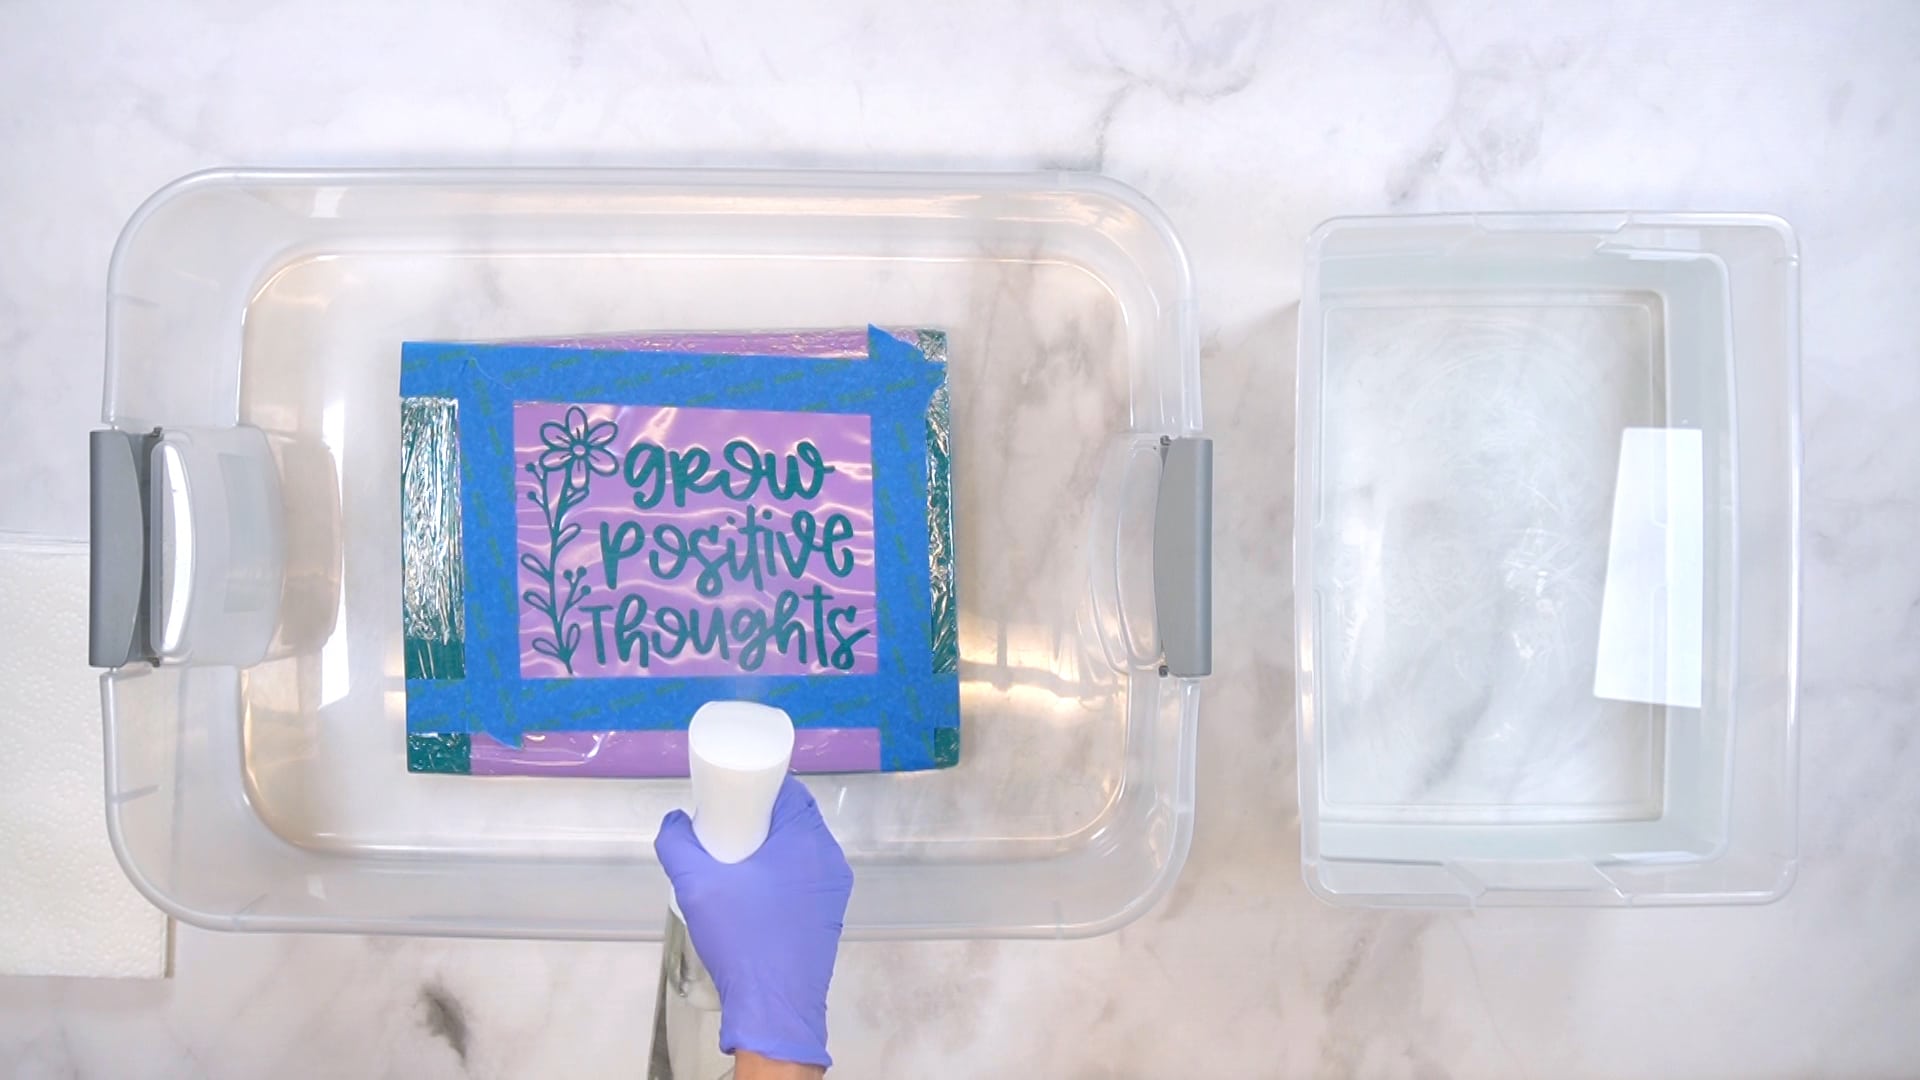
Carefully spray bleach solution onto all of the exposed areas of the stencil with the bleach solution. The bleach solution will likely puddle a bit on top of the vinyl, so use a paper towel to gently dab up any excess from the top of the bleached area.
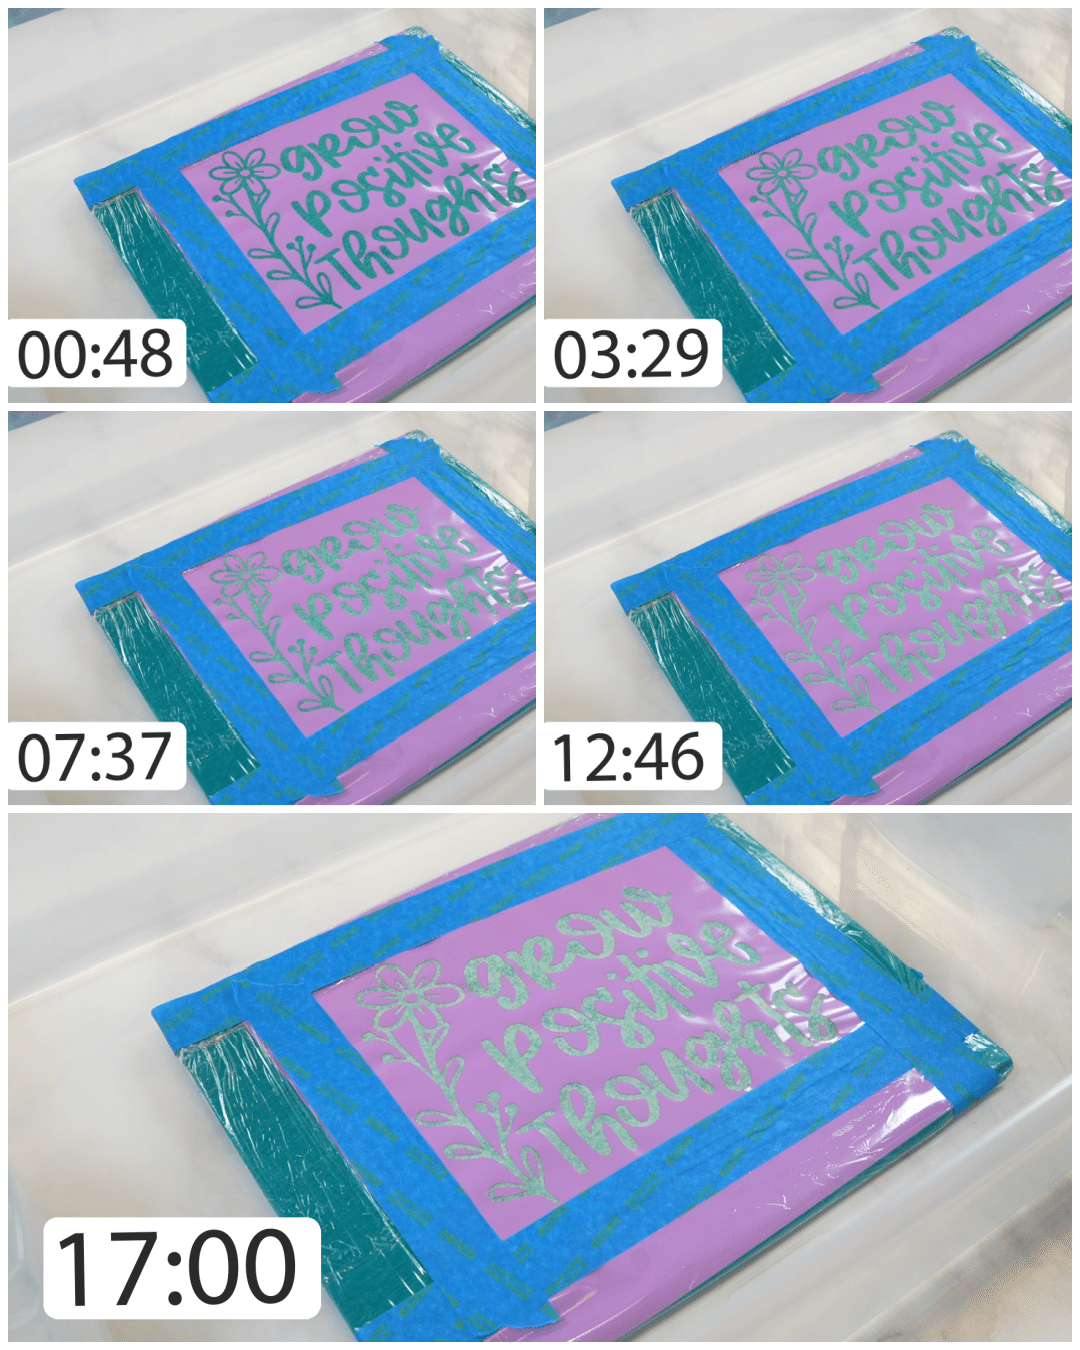
Allow the bleach to sit until it reaches the desired color – remember, do NOT bleach for longer than 20 minutes!
Pro Tip:
You can speed up the bleaching process by doing this step outdoors on a warm, sunny day!

When the color has lightened to your liking, remove the larger pieces of the stencil, the plastic wrap, and the tape. Place the shirt into the rinse tub, and swish it around. Remove any smaller pieces of the stencil that still remain, and allow the shirt to soak for about 5 minutes before rinsing under hot running water. If desired, you can also wash the shirt in a washing machine at this point. Then, allow the shirt to dry completely.
How cool is that? I love the simplicity of the stenciled design here, but you could also get creative with things and reverse bleach dye the remaining shirt around the design as well (we’ll take a closer look at that process in our masked shirt option below!).
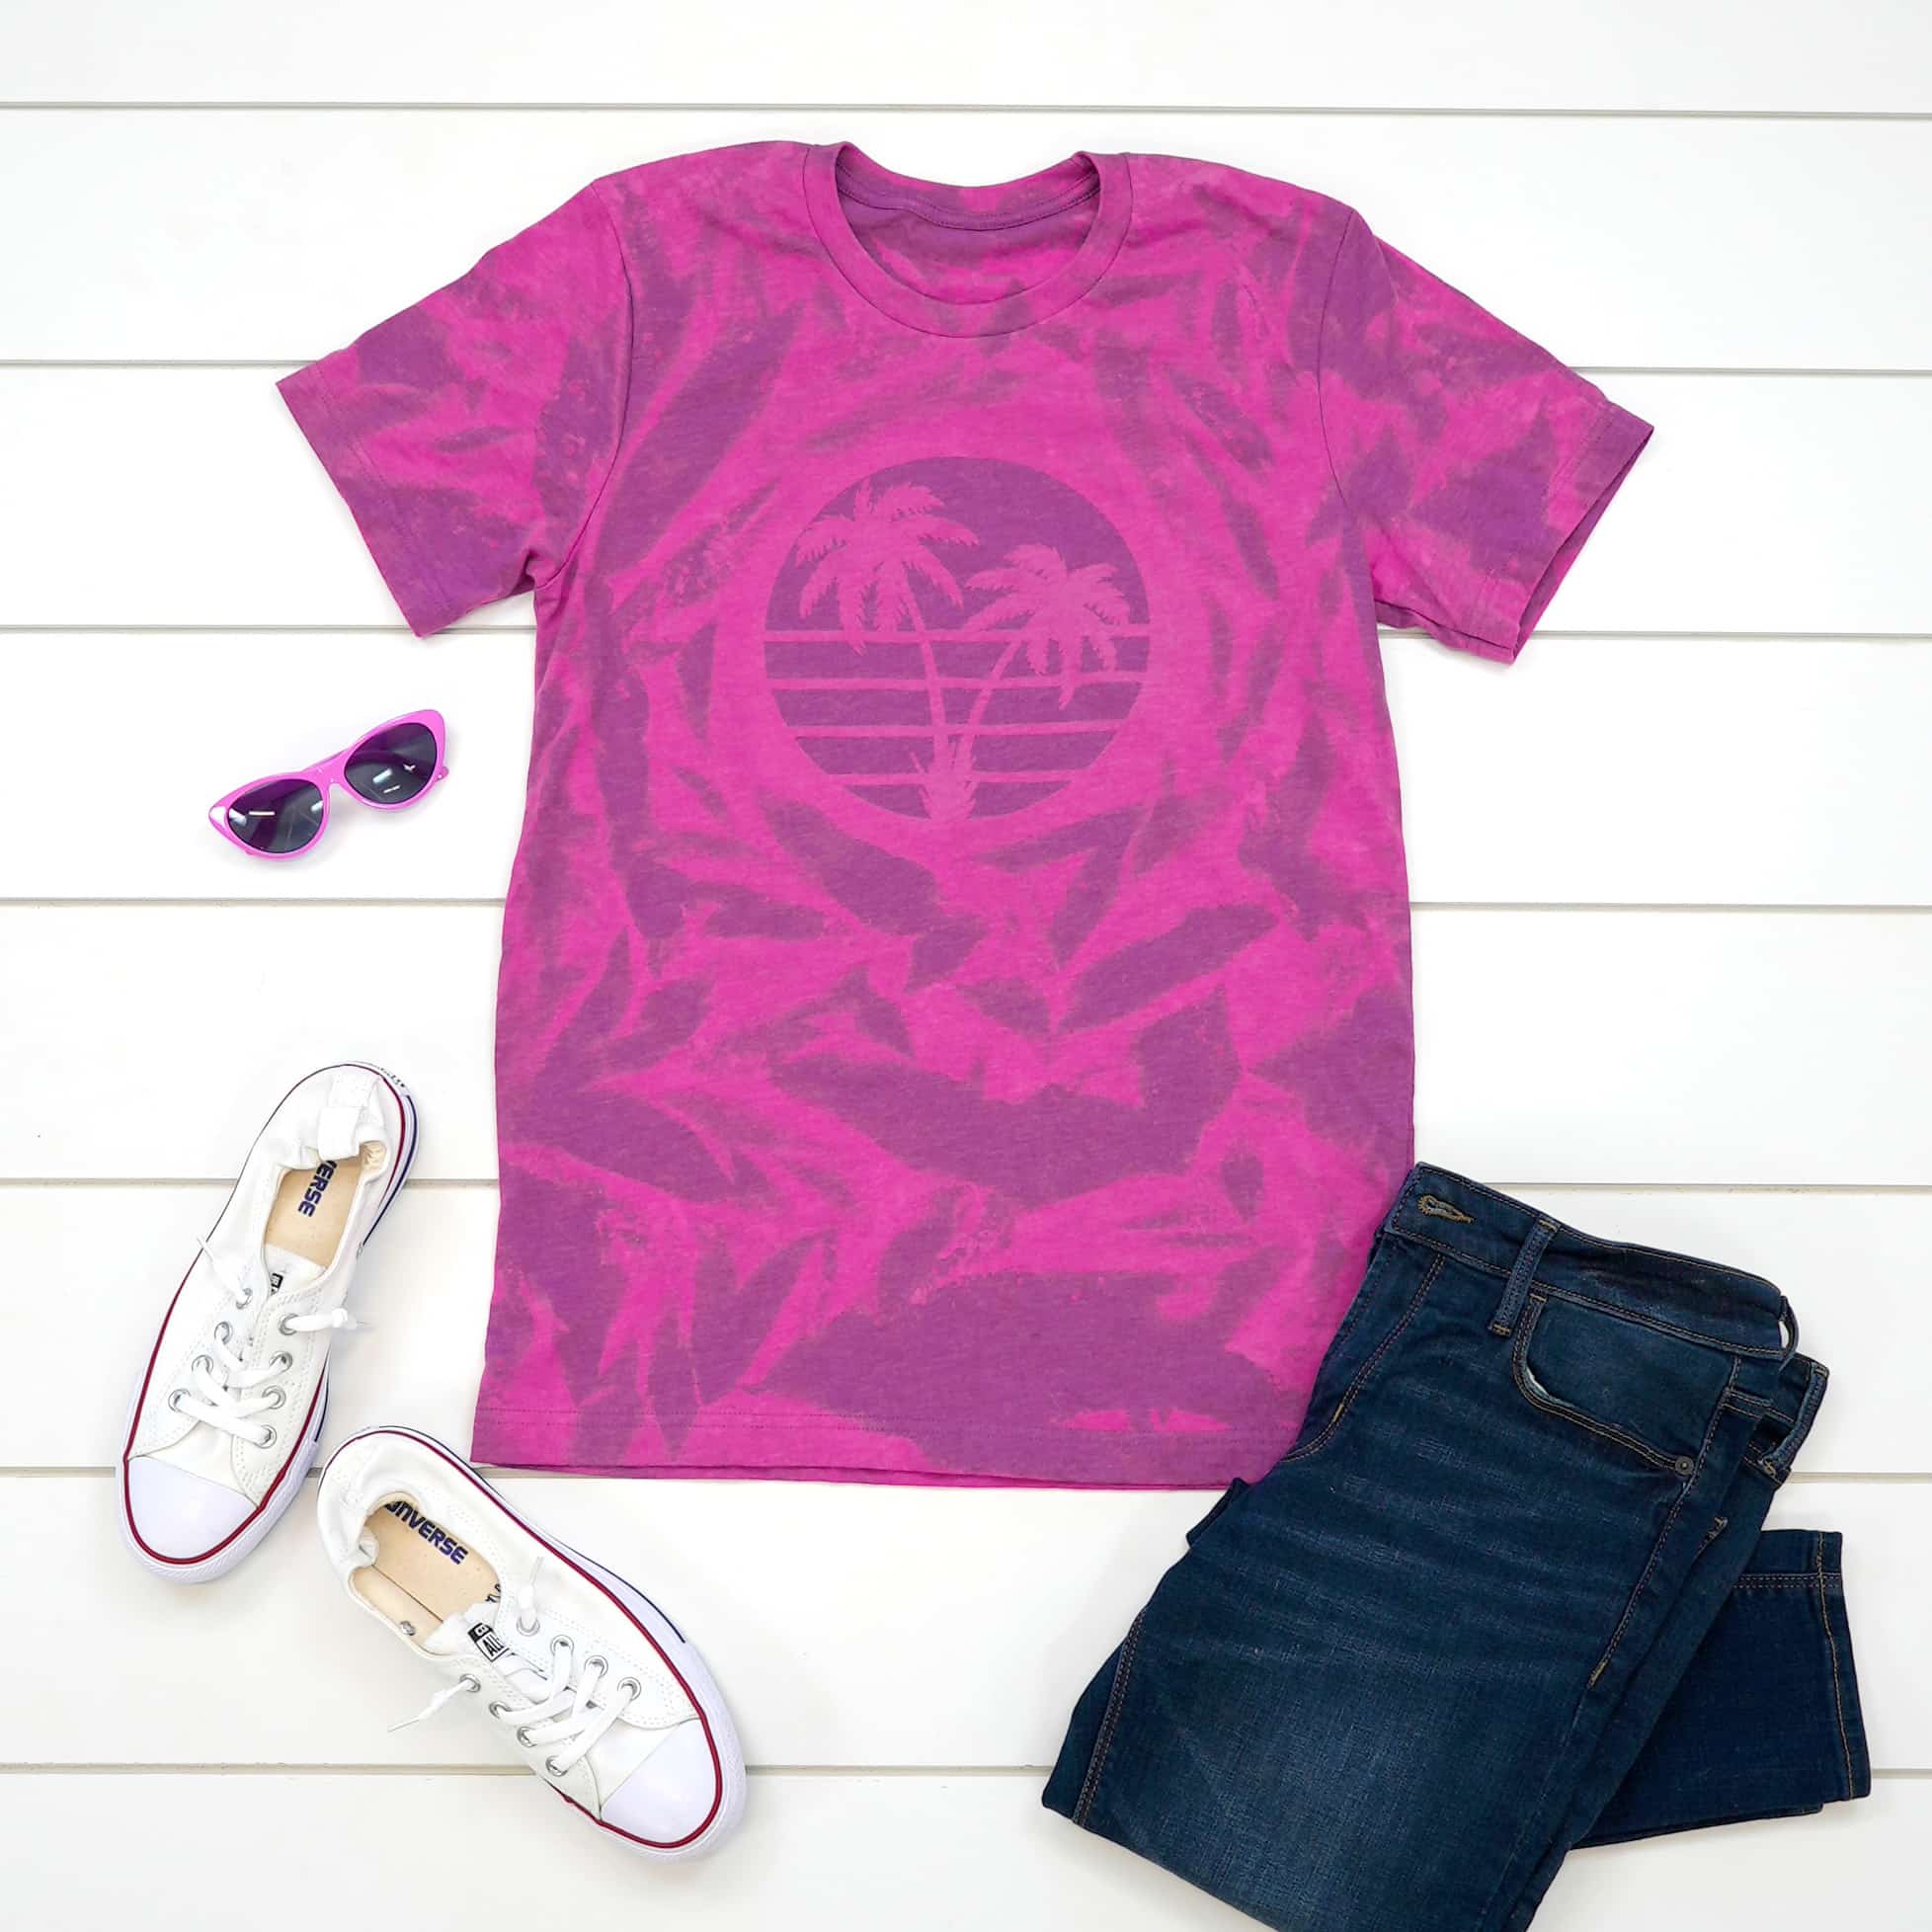
How to Make a Masked Bleached Shirt
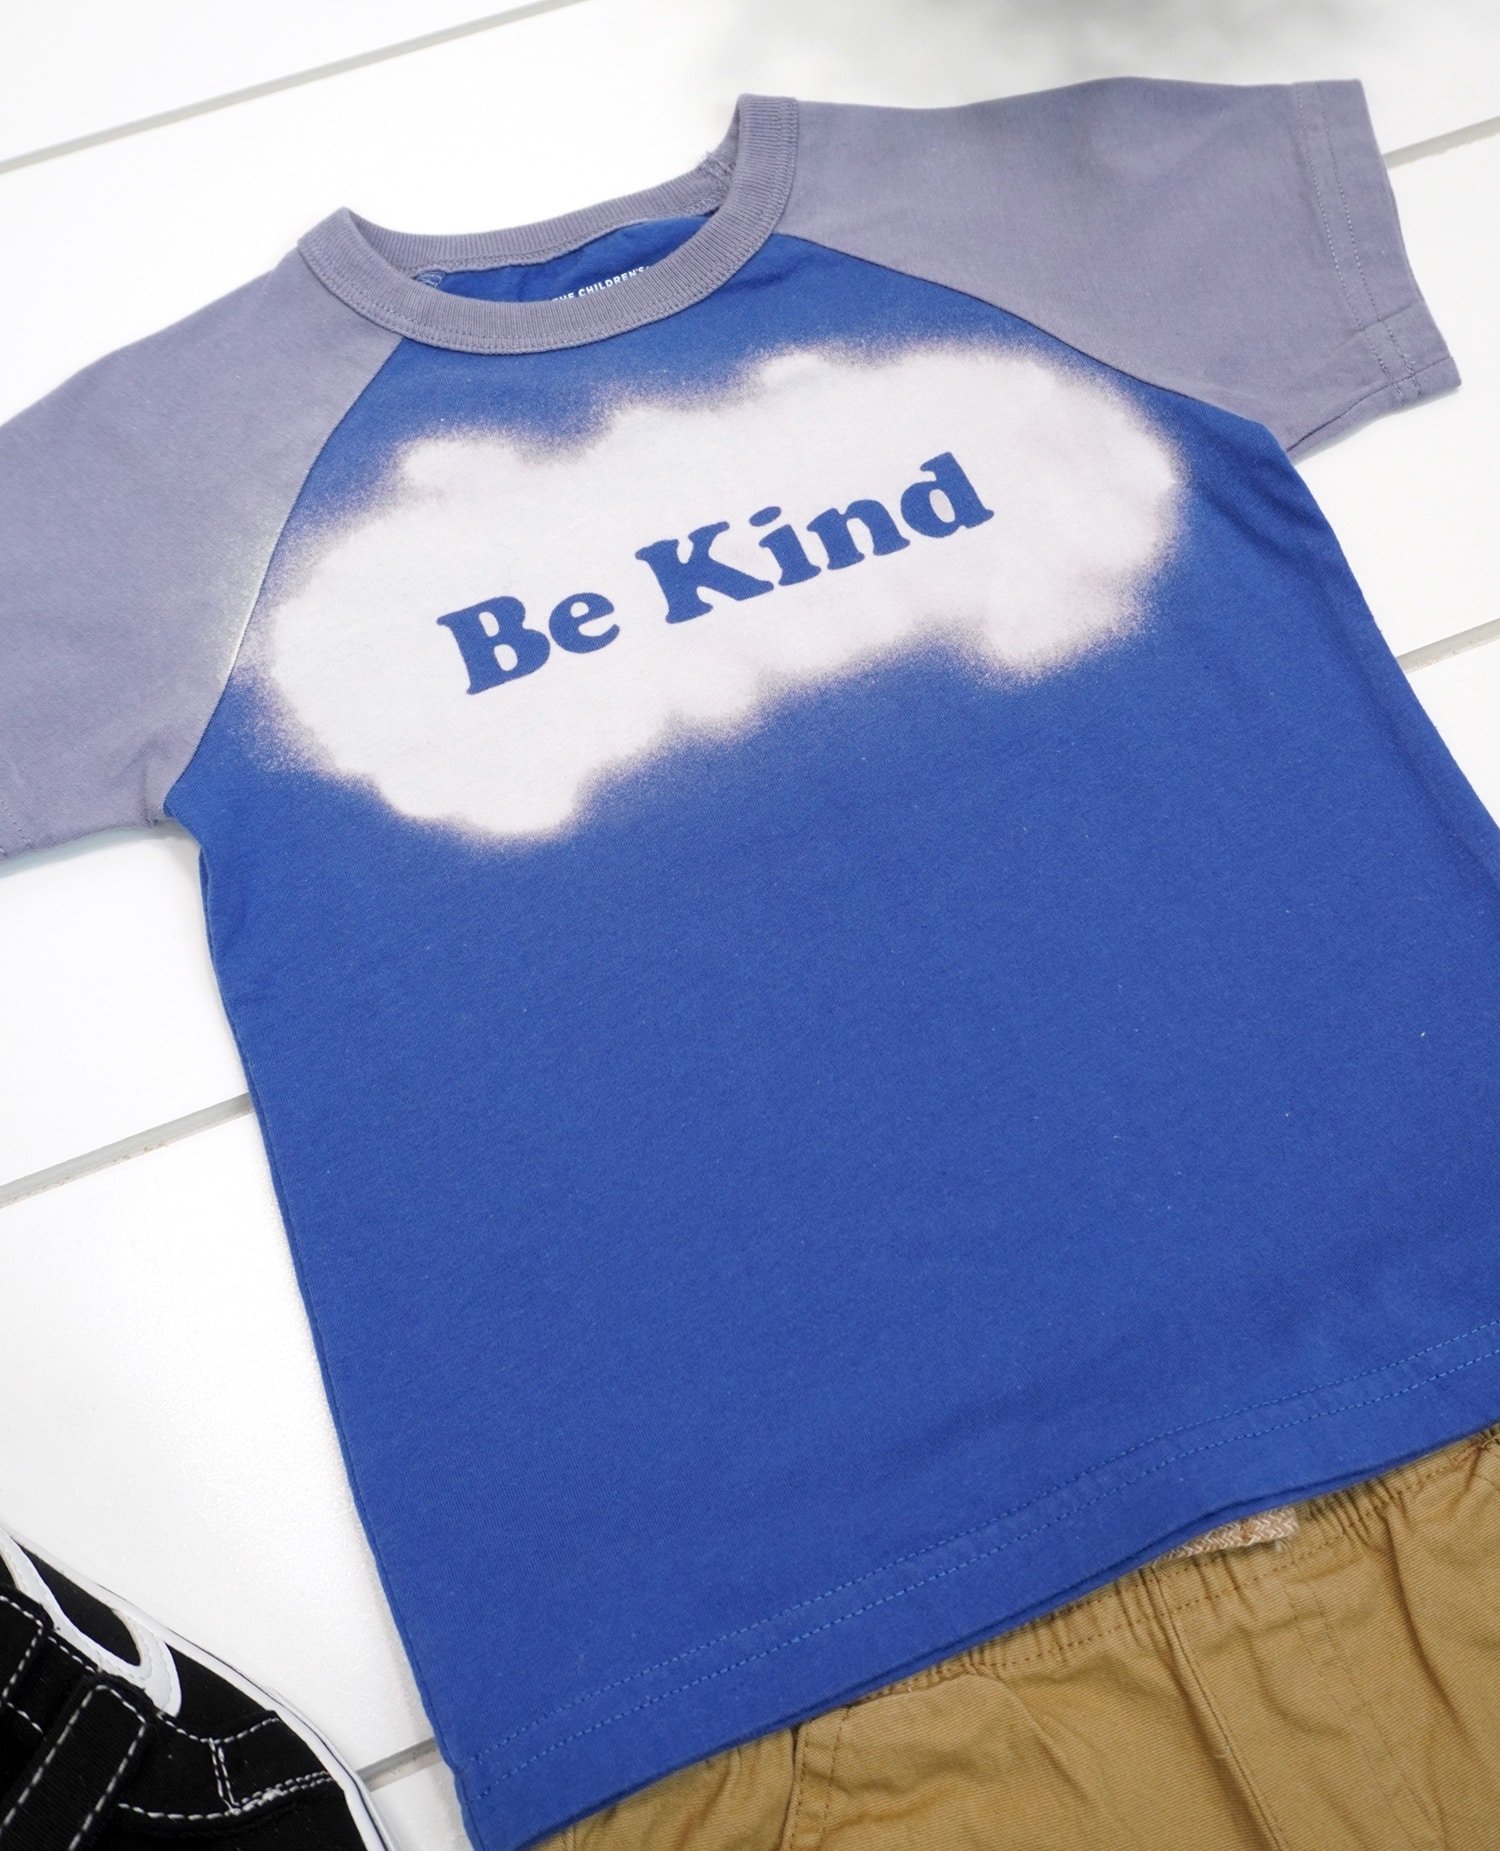
For our first shirt, we created a stencil and then bleached our design, which resulted in a lighter-colored design on the shirt. For our second technique, we’re going to switch things around and use vinyl to mask off our design and bleach everything around it – consider them “reverse stencils!” This means that instead of creating a lighter-colored design, the design on our second shirt will stay the same color as the original shirt (as shown in the example above).
For this demonstration, however, I’m also going to kick things up another notch and take it one step further by also “reverse tie-dyeing” the rest of the shirt around the image.
Create the Masking Design
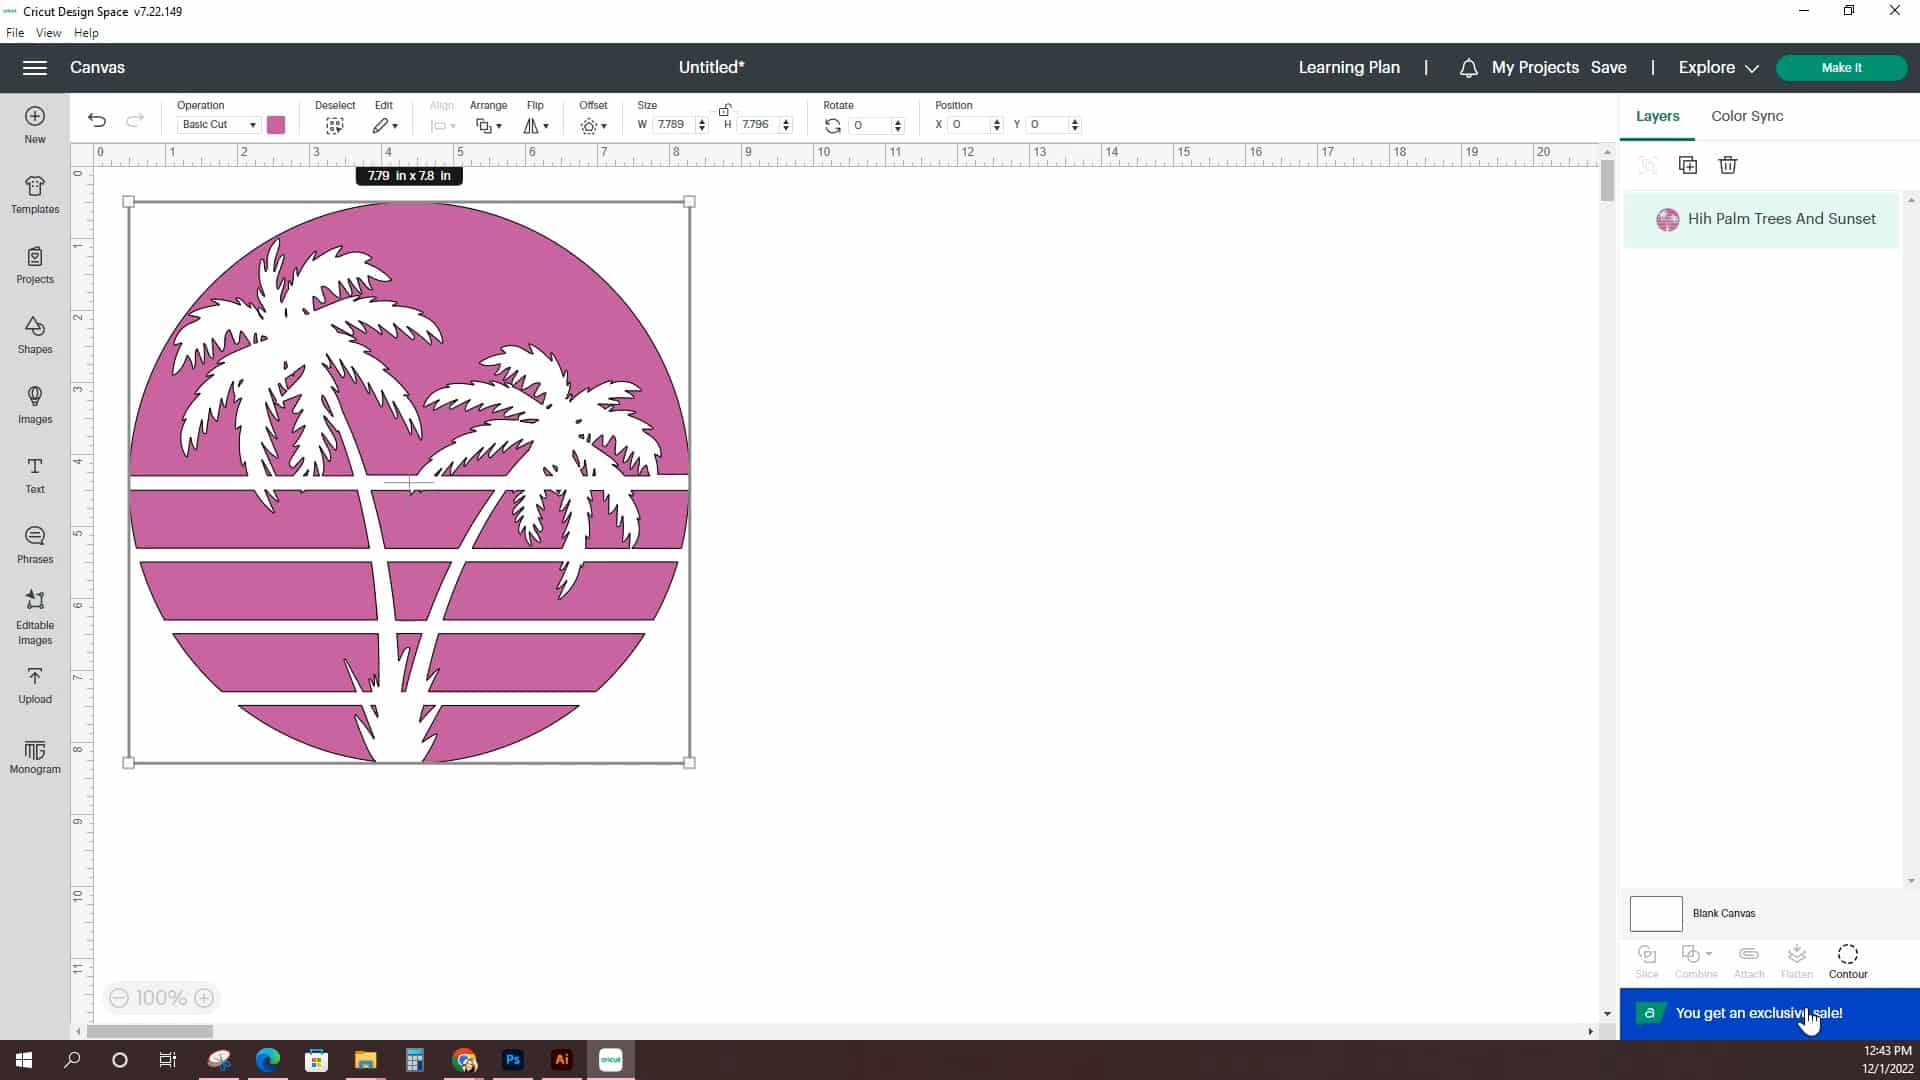
Open up a new canvas in Cricut Design Space and upload your design or select an image from the Design Space Image Library – I’m using our Palm Trees & Sunset SVG here. When it comes to selecting your masking designs, you’ll want to avoid graphics that have a lot of small, thin details for best results.
For example, if masking off a text design, you’ll want to choose a font with thicker, blockier letters instead of thin, whispy ones.
Cut the design from permanent adhesive vinyl using your Cricut machine. (Again, this is the best way to use up that one color of vinyl that you bought WAY too much of! 😉)
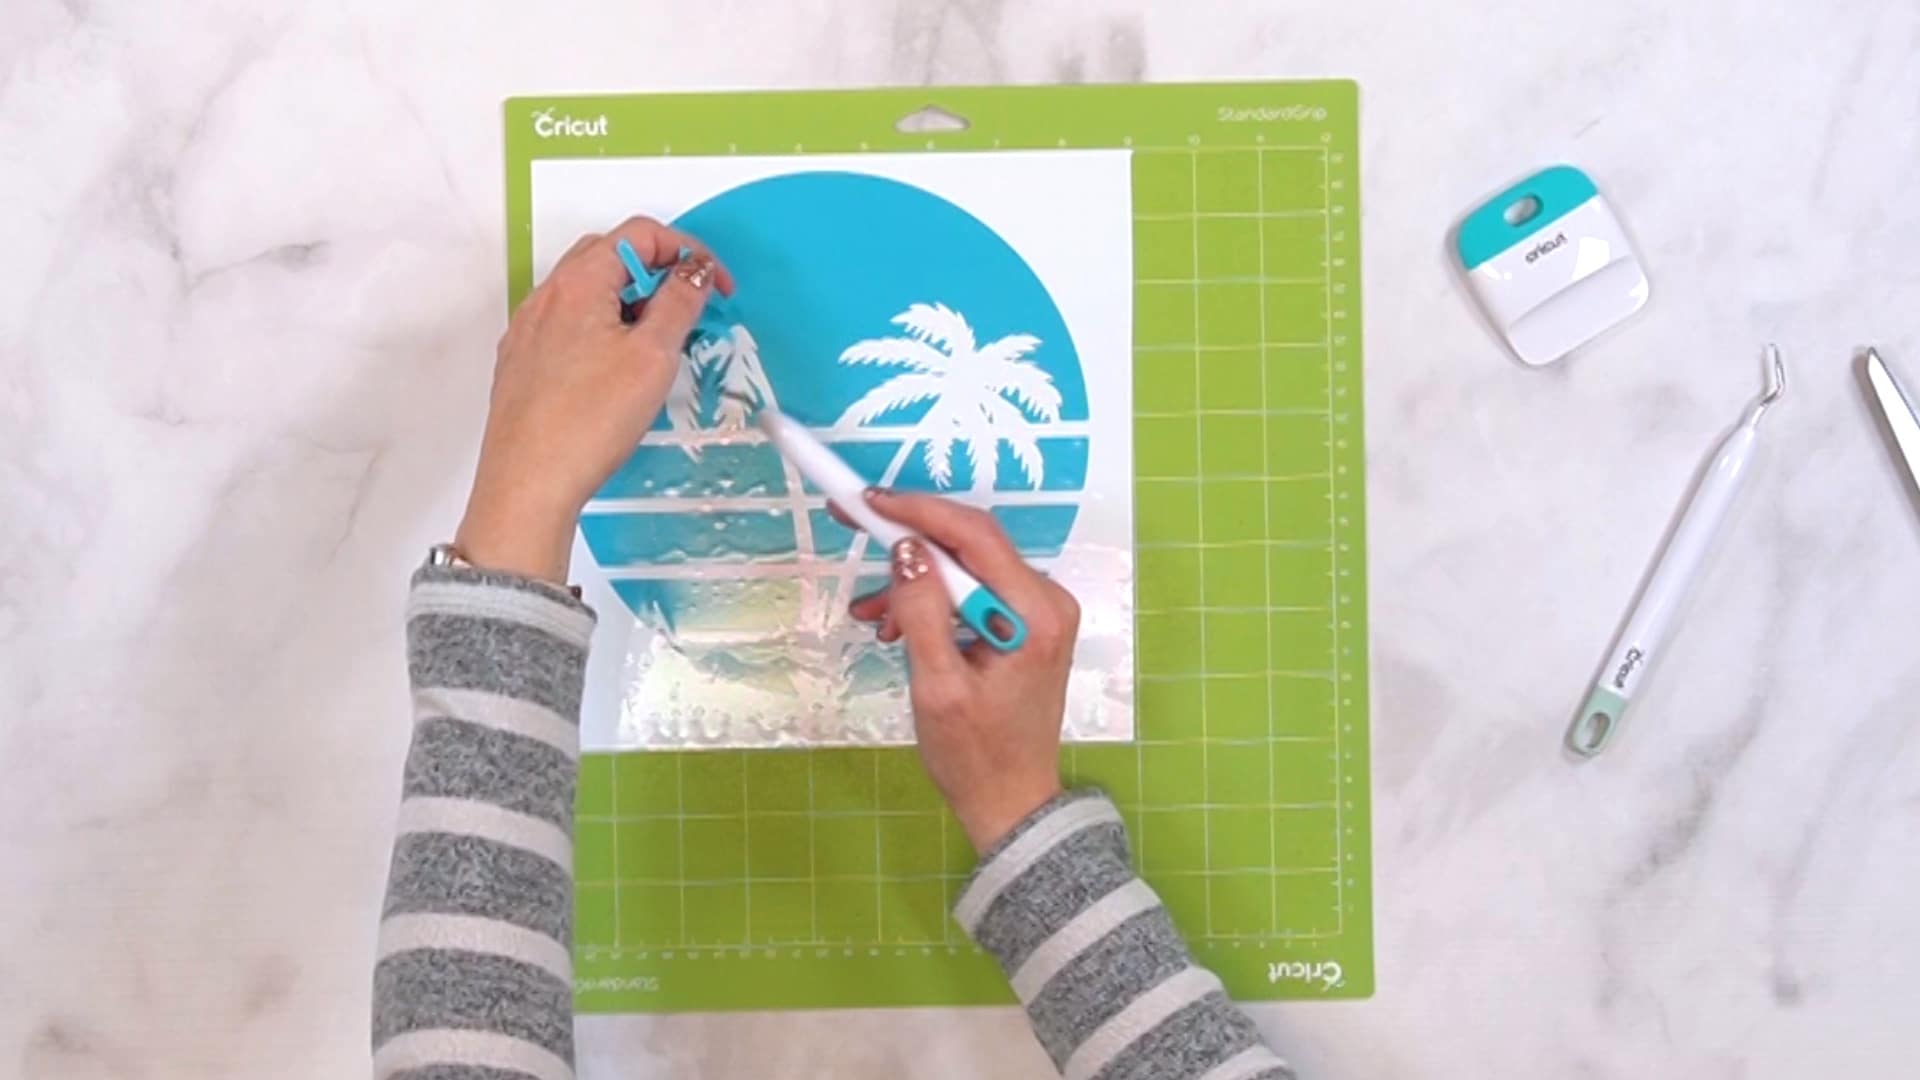
Use the weeding tools to weed the excess vinyl. For this shirt, I want to keep the sunset pieces on the backing and remove everything else.
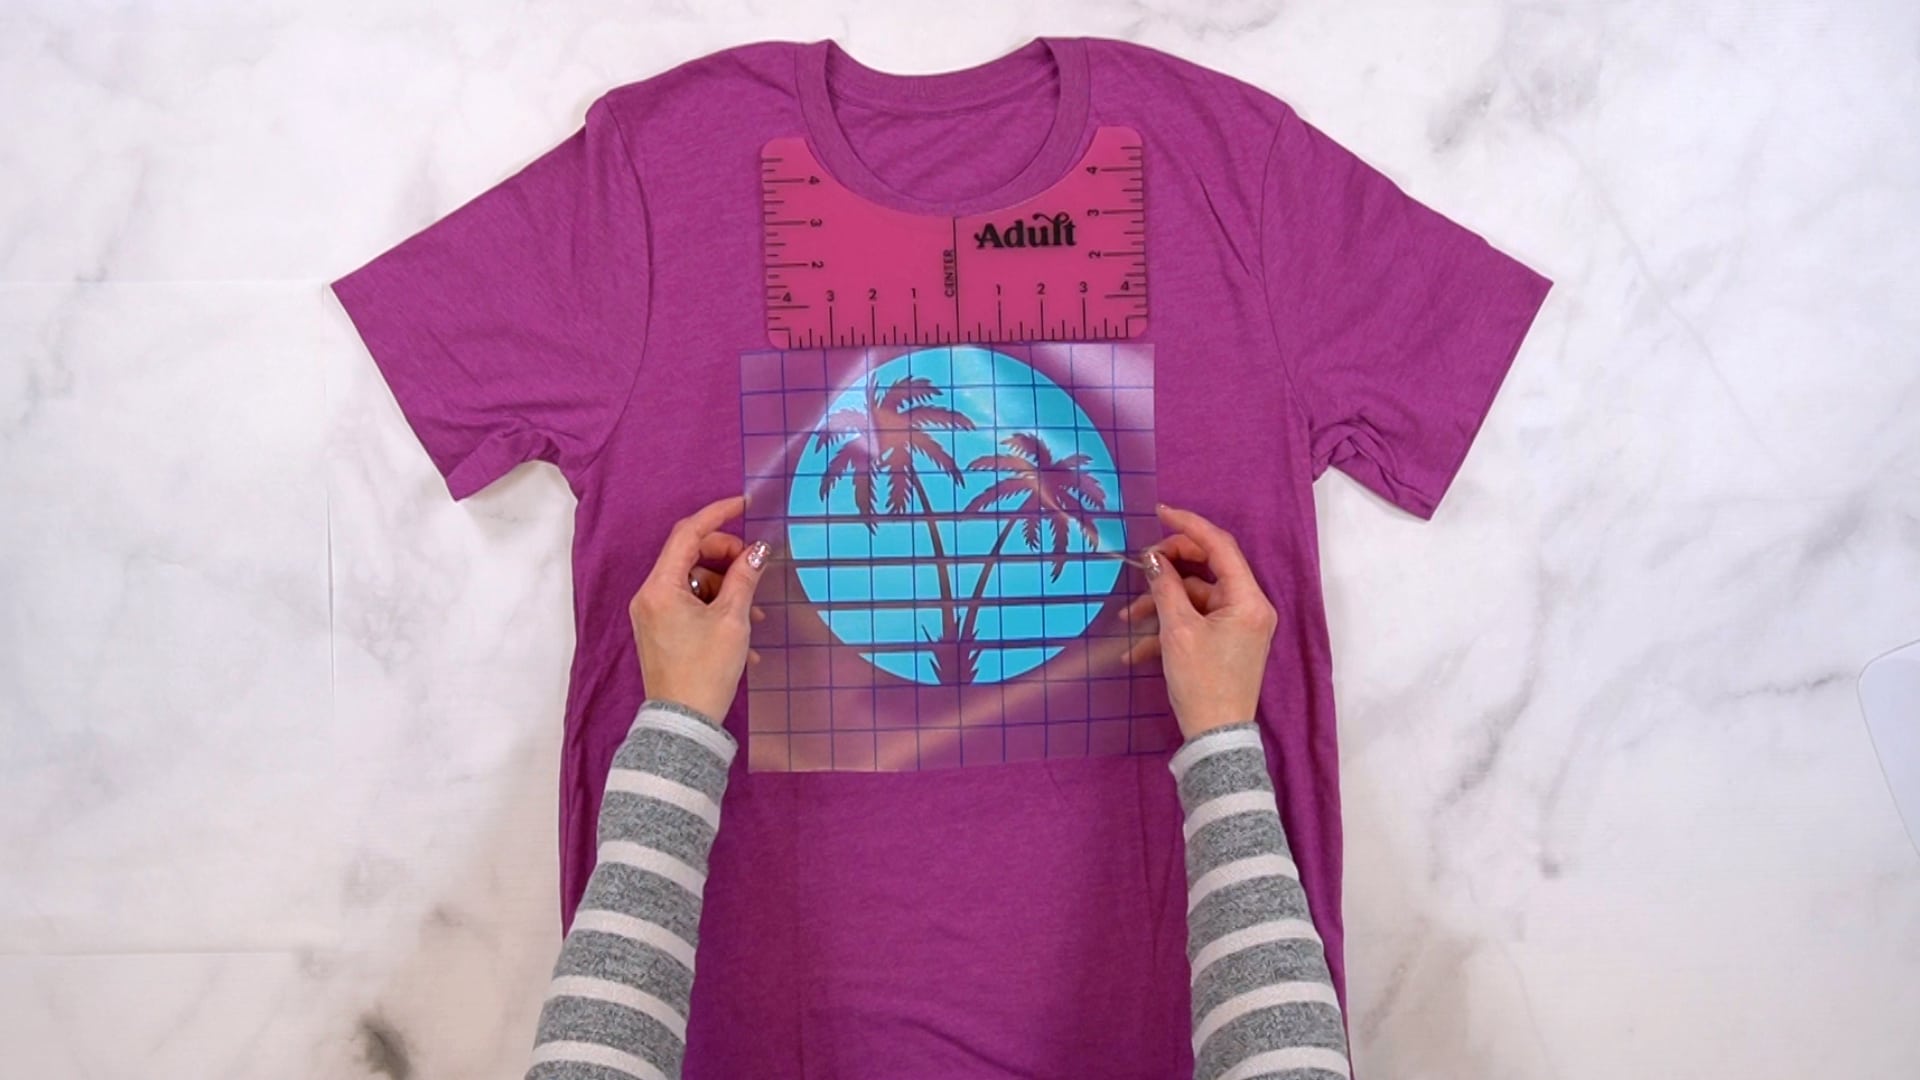
Apply the Mask
Use a sheet of transfer tape to transfter the design onto a clean, dry shirt. Since I’m going to be bleach dyeing this entire shirt, front and back, I’m going to skip putting any cardboard inside of the shirt for this technique.
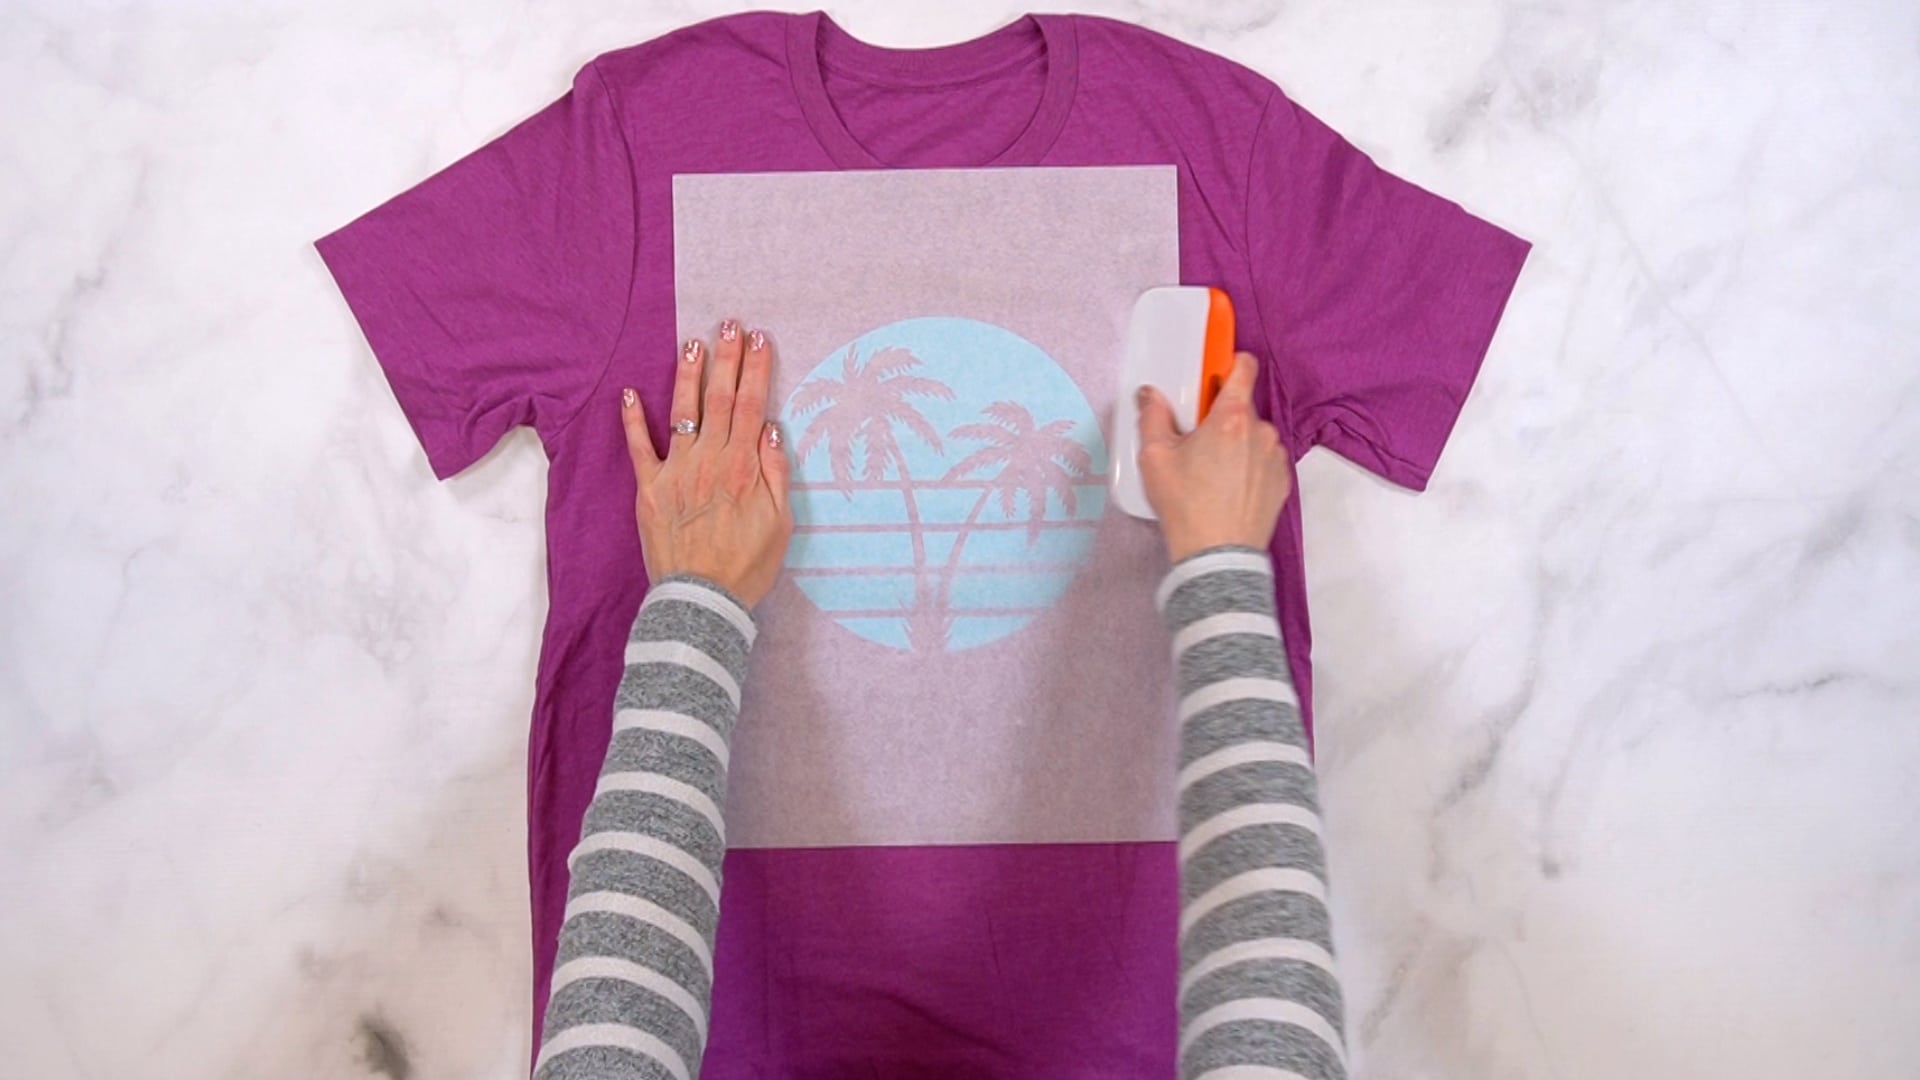
Remove the transfer tape, then cover everything with a piece of paper, and use your brayer to make sure that the vinyl is firmly adhered to the shirt.
Prep the Shirt
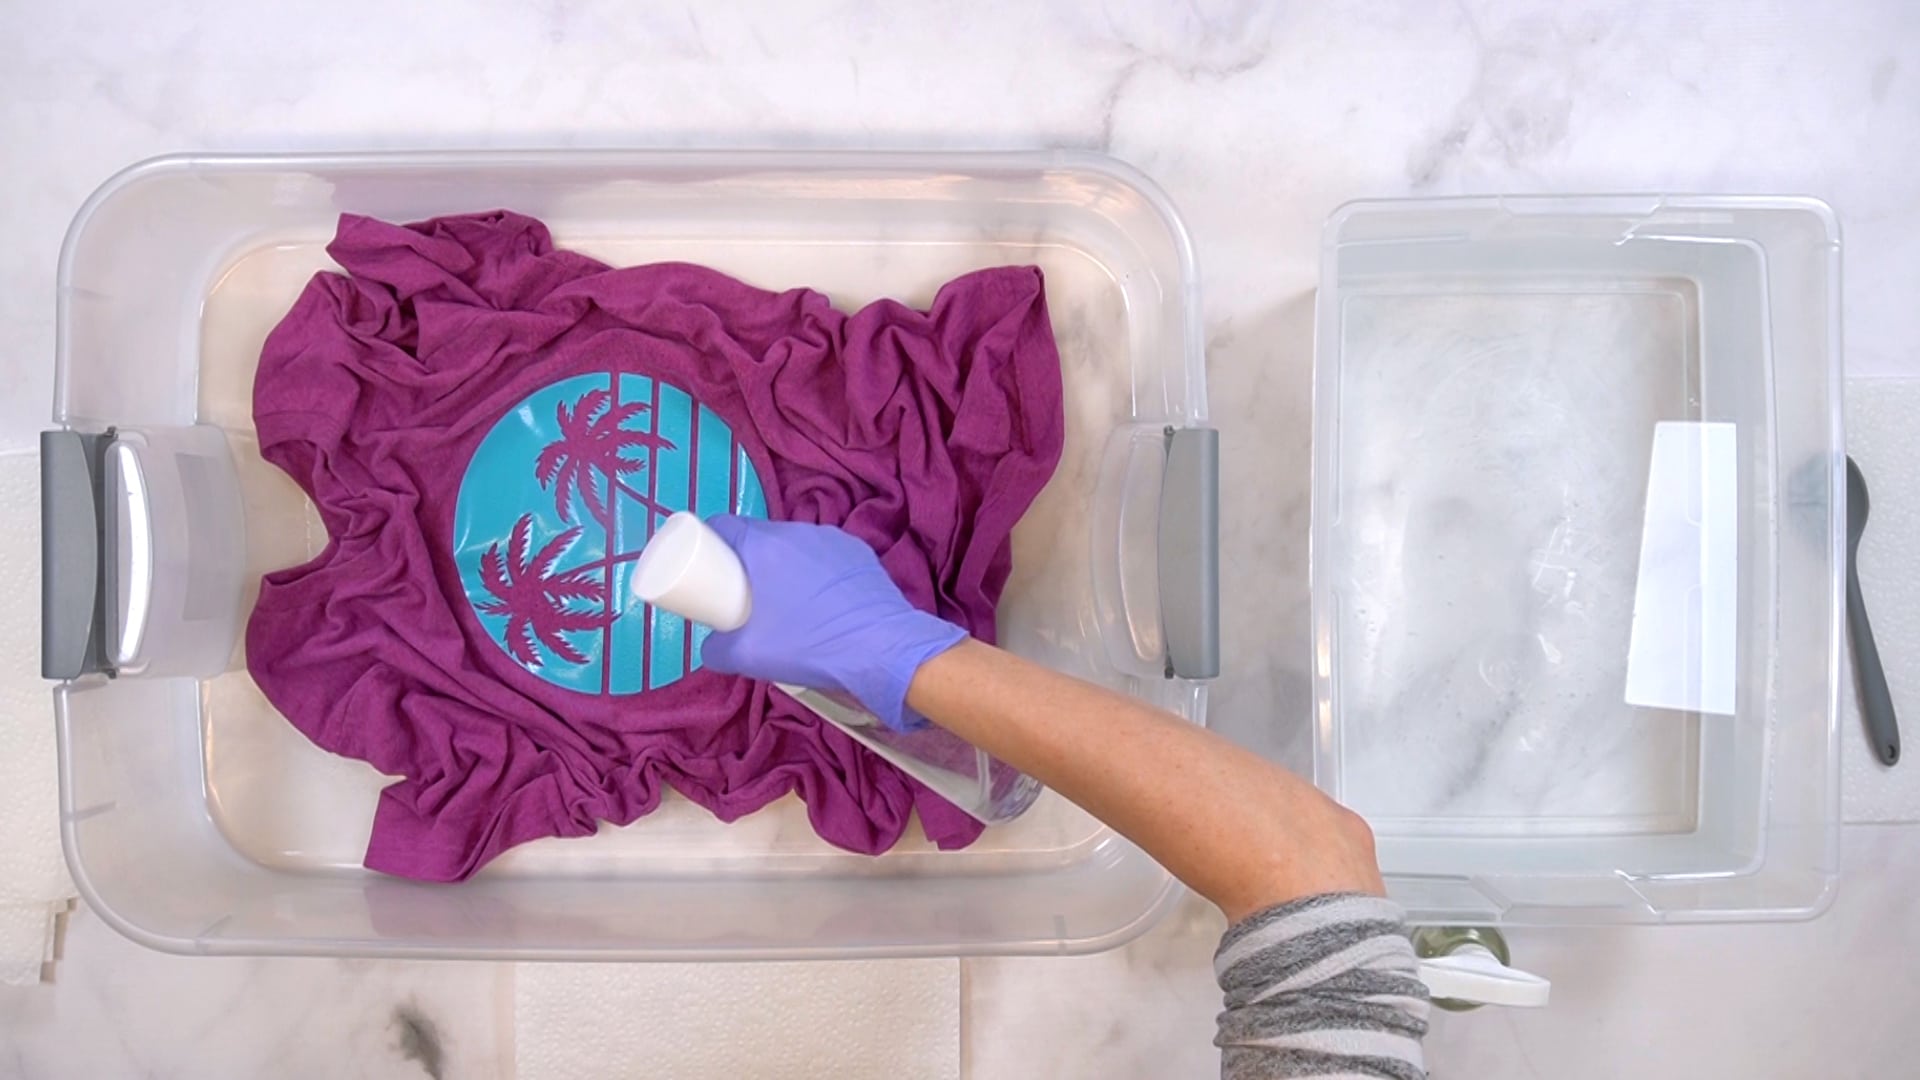
Place the shirt into your bleach tub, and gently scrunch up the exposed areas of the shirt, being VERY careful that you don’t disturb the vinyl design. If desired, you may use rubber bands to help hold the scrunched shirt in place.
Bleach & Neutralize
Using a fine-mist bottle, spray the entire font of the shirt, making sure that you completely cover the entire vinyl design. Use a paper towel if necessary to gently dab up any pooling on the vinyl.
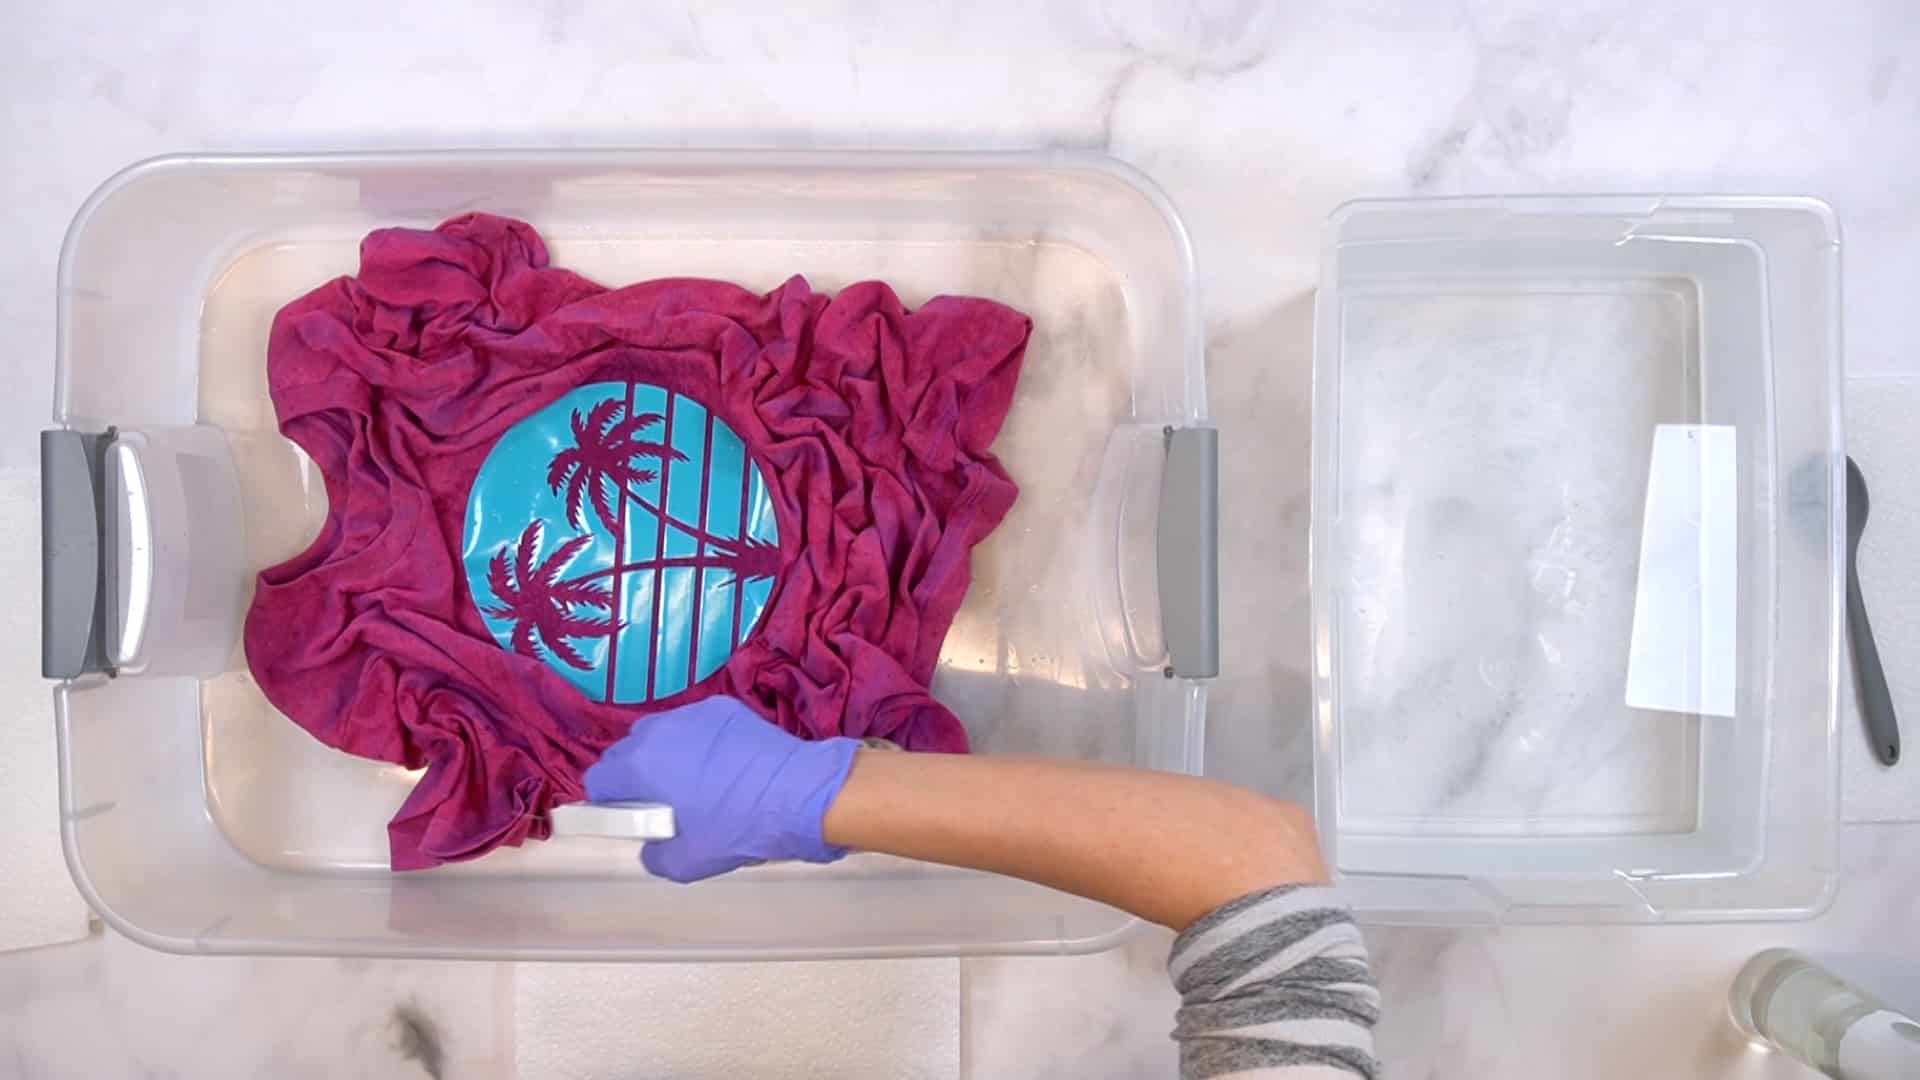
Next, use the streaming spray bottle or a squeeze bottle to add heavier areas of bleaching to the shirt.
VERY carefully flip the shirt over, and do the same on the back of your shirt. Be careful not to saturate the back of the shirt so that it bleeds through to the front! You don’t want the bleach from the back side to bleach that design that you masked on the front.
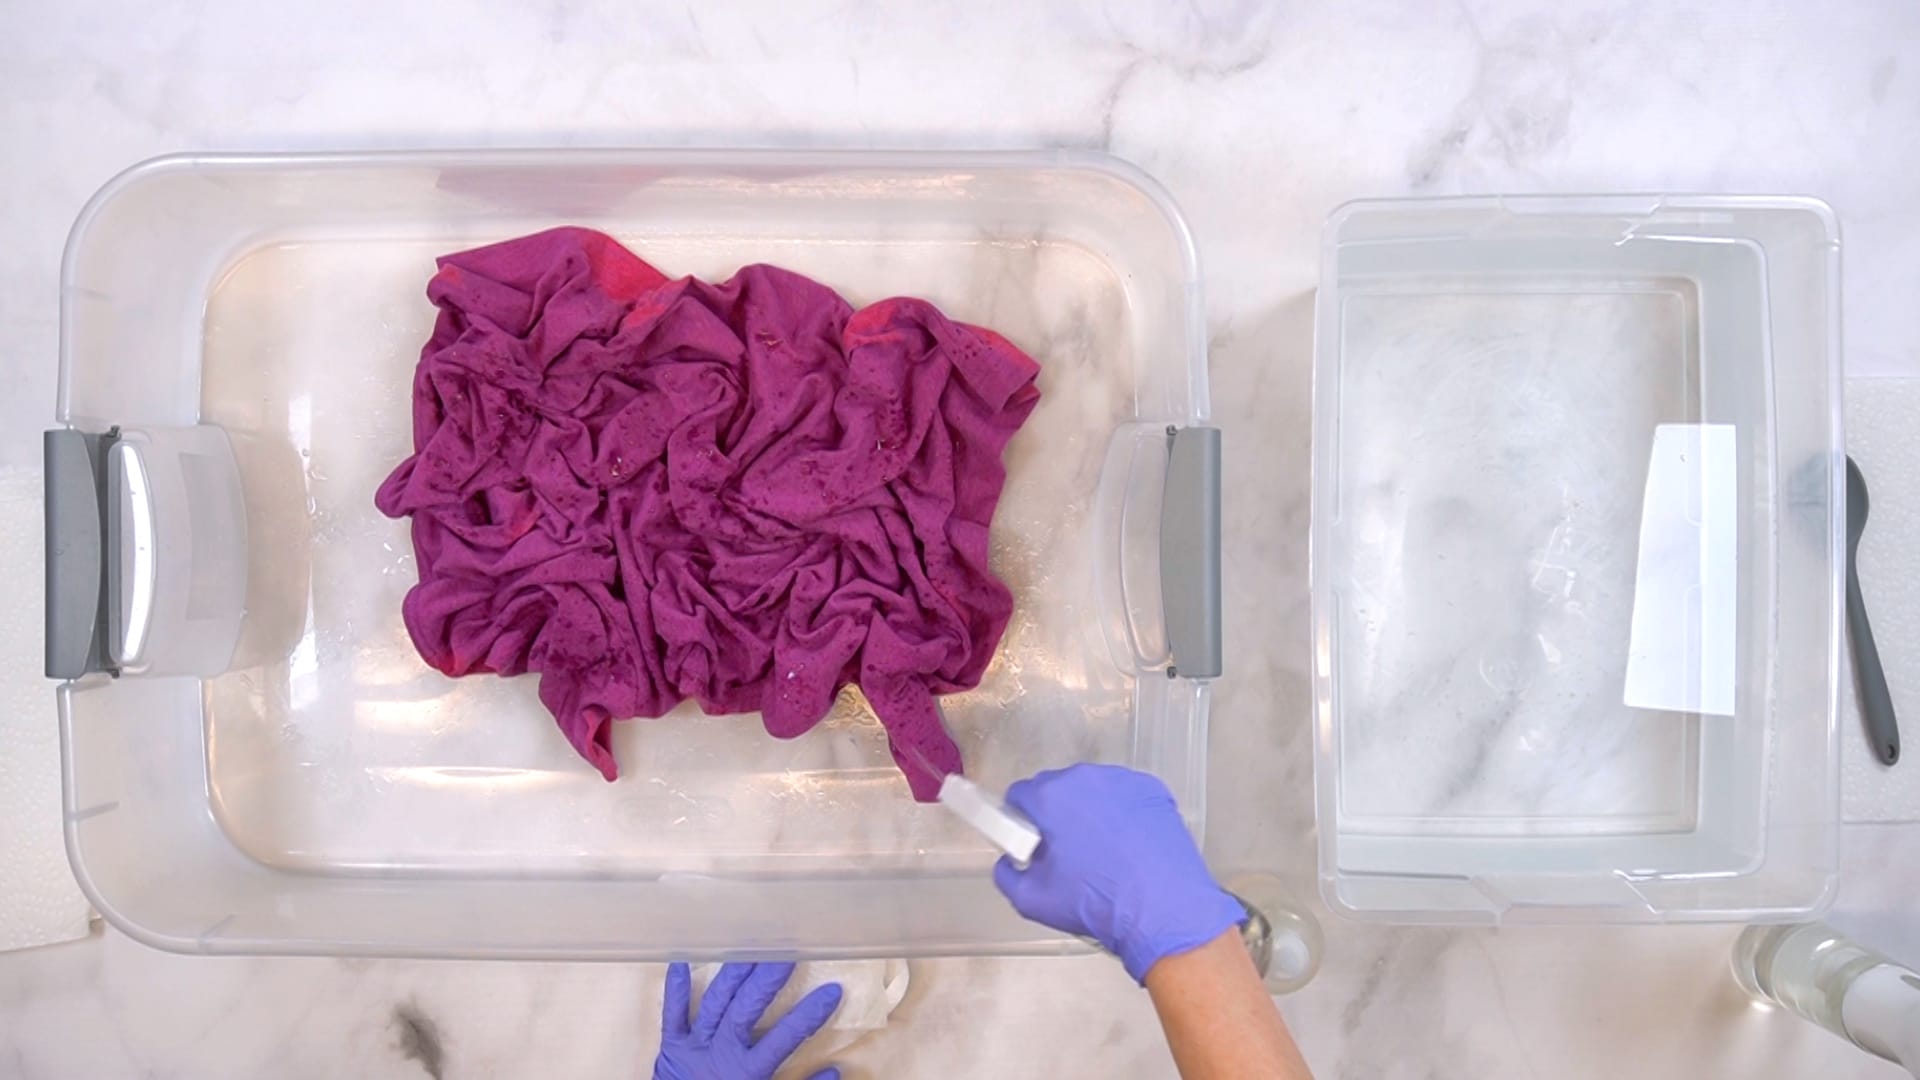
Allow the shirt to sit for up to 20 minutes until the bleach area reaches your desired color.
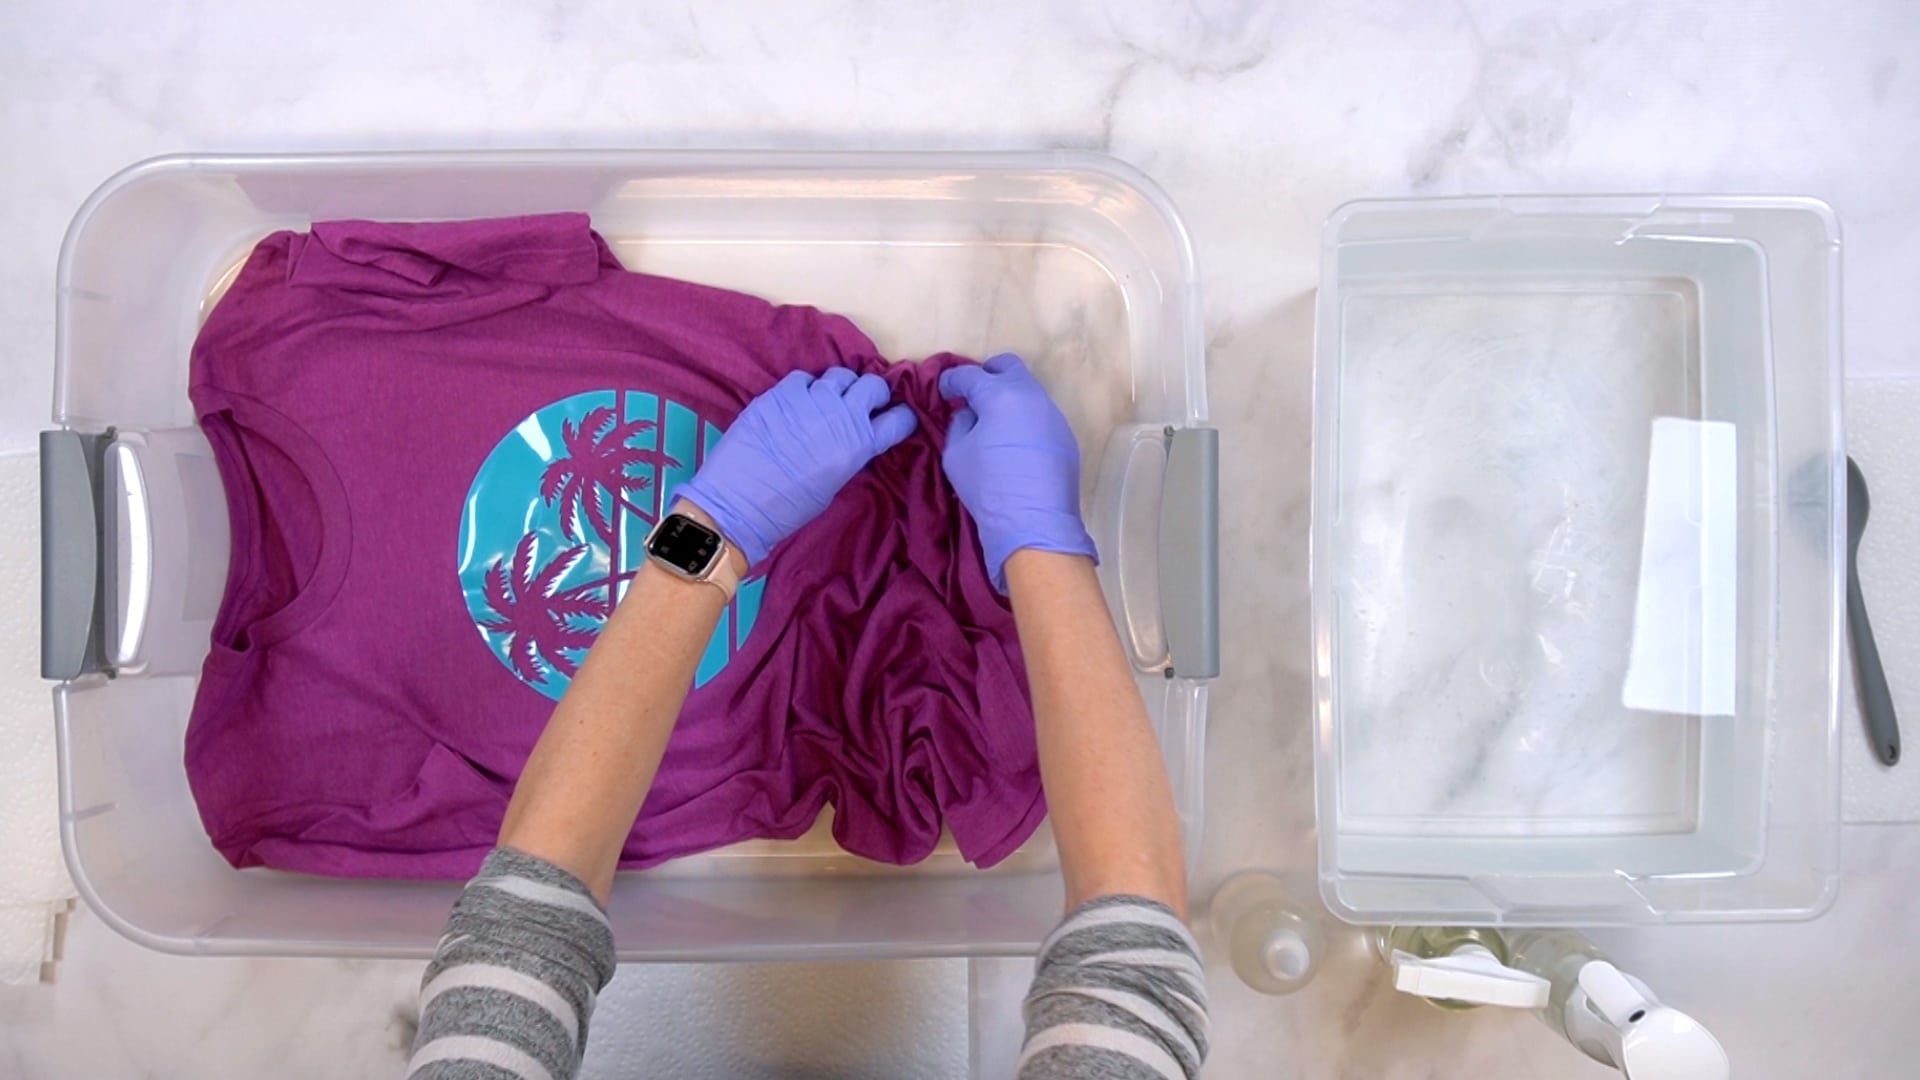
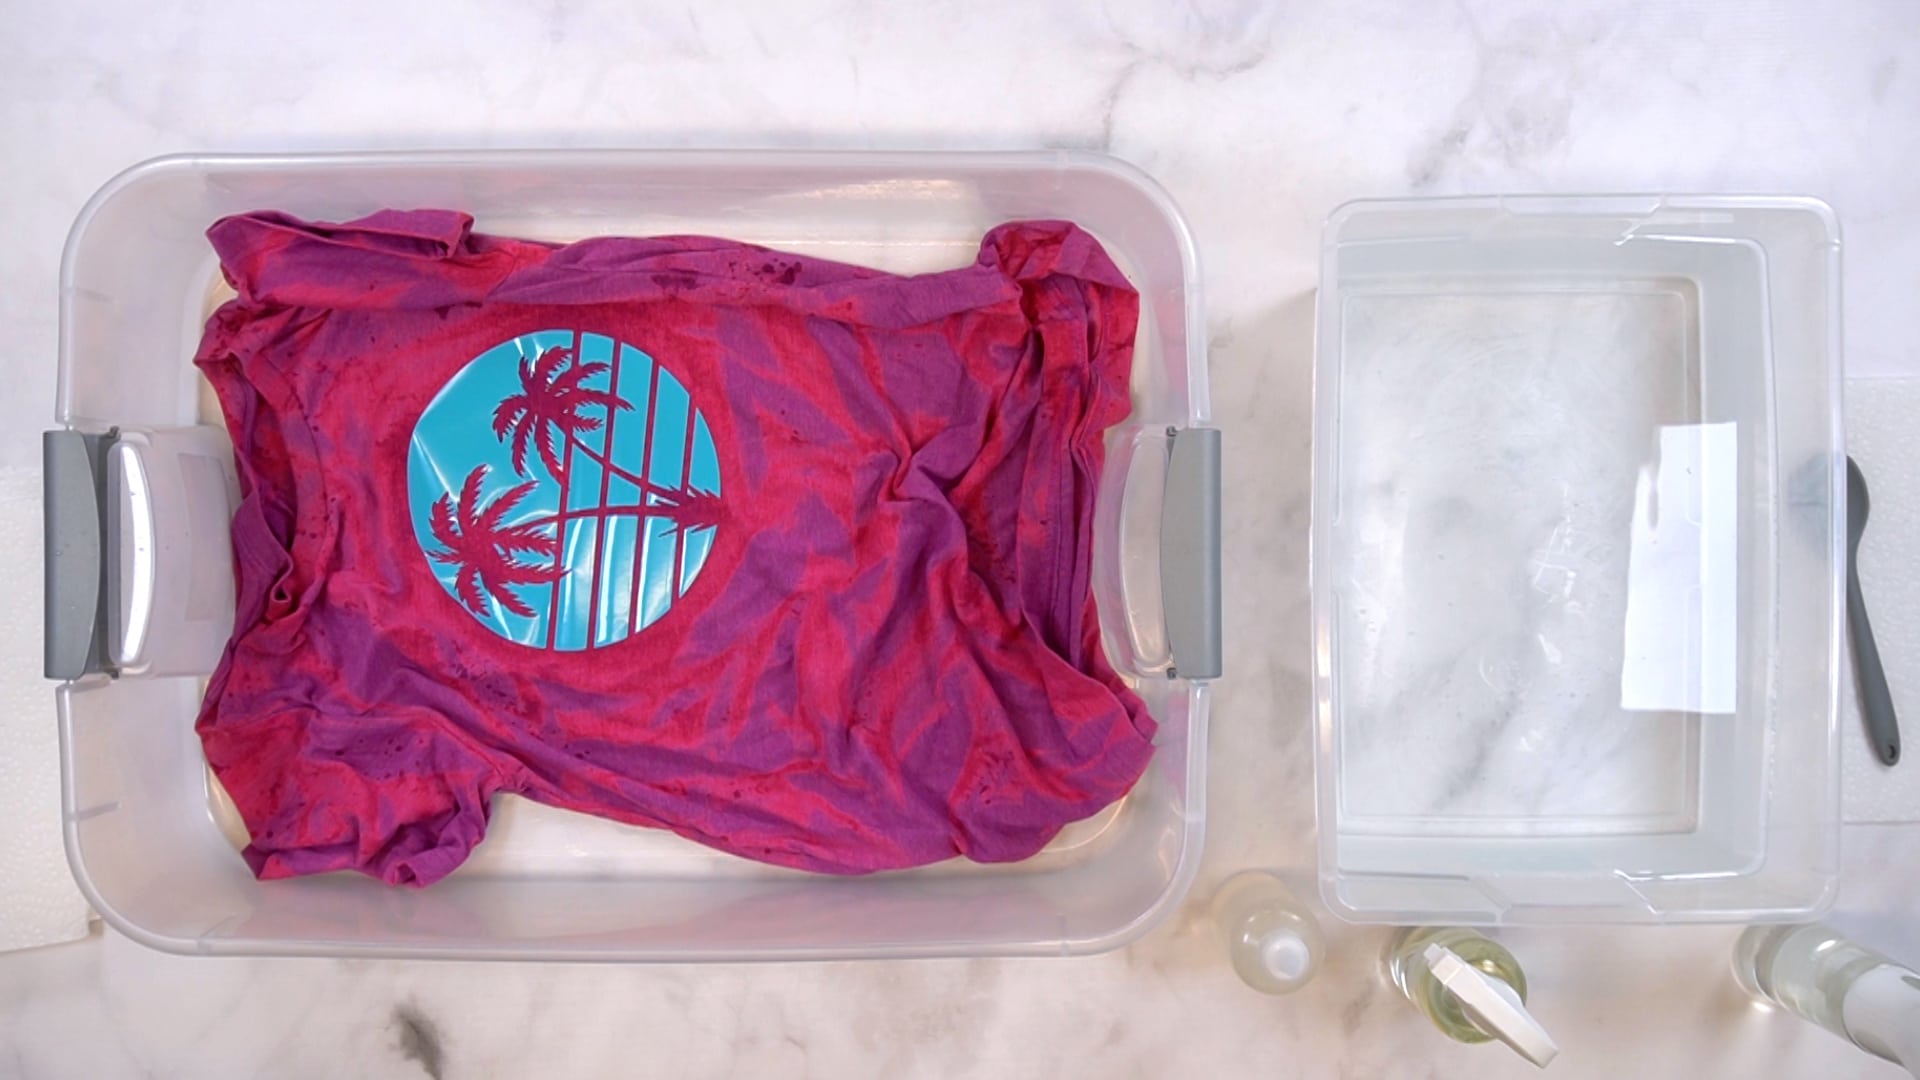
When the shirt has lightened, place the shirt into the bleach neutralizer, remove the vinyl, and allow it to soak for about 5 minutes before rinsing under hot running water. Then, allow the shirt to dry completely.
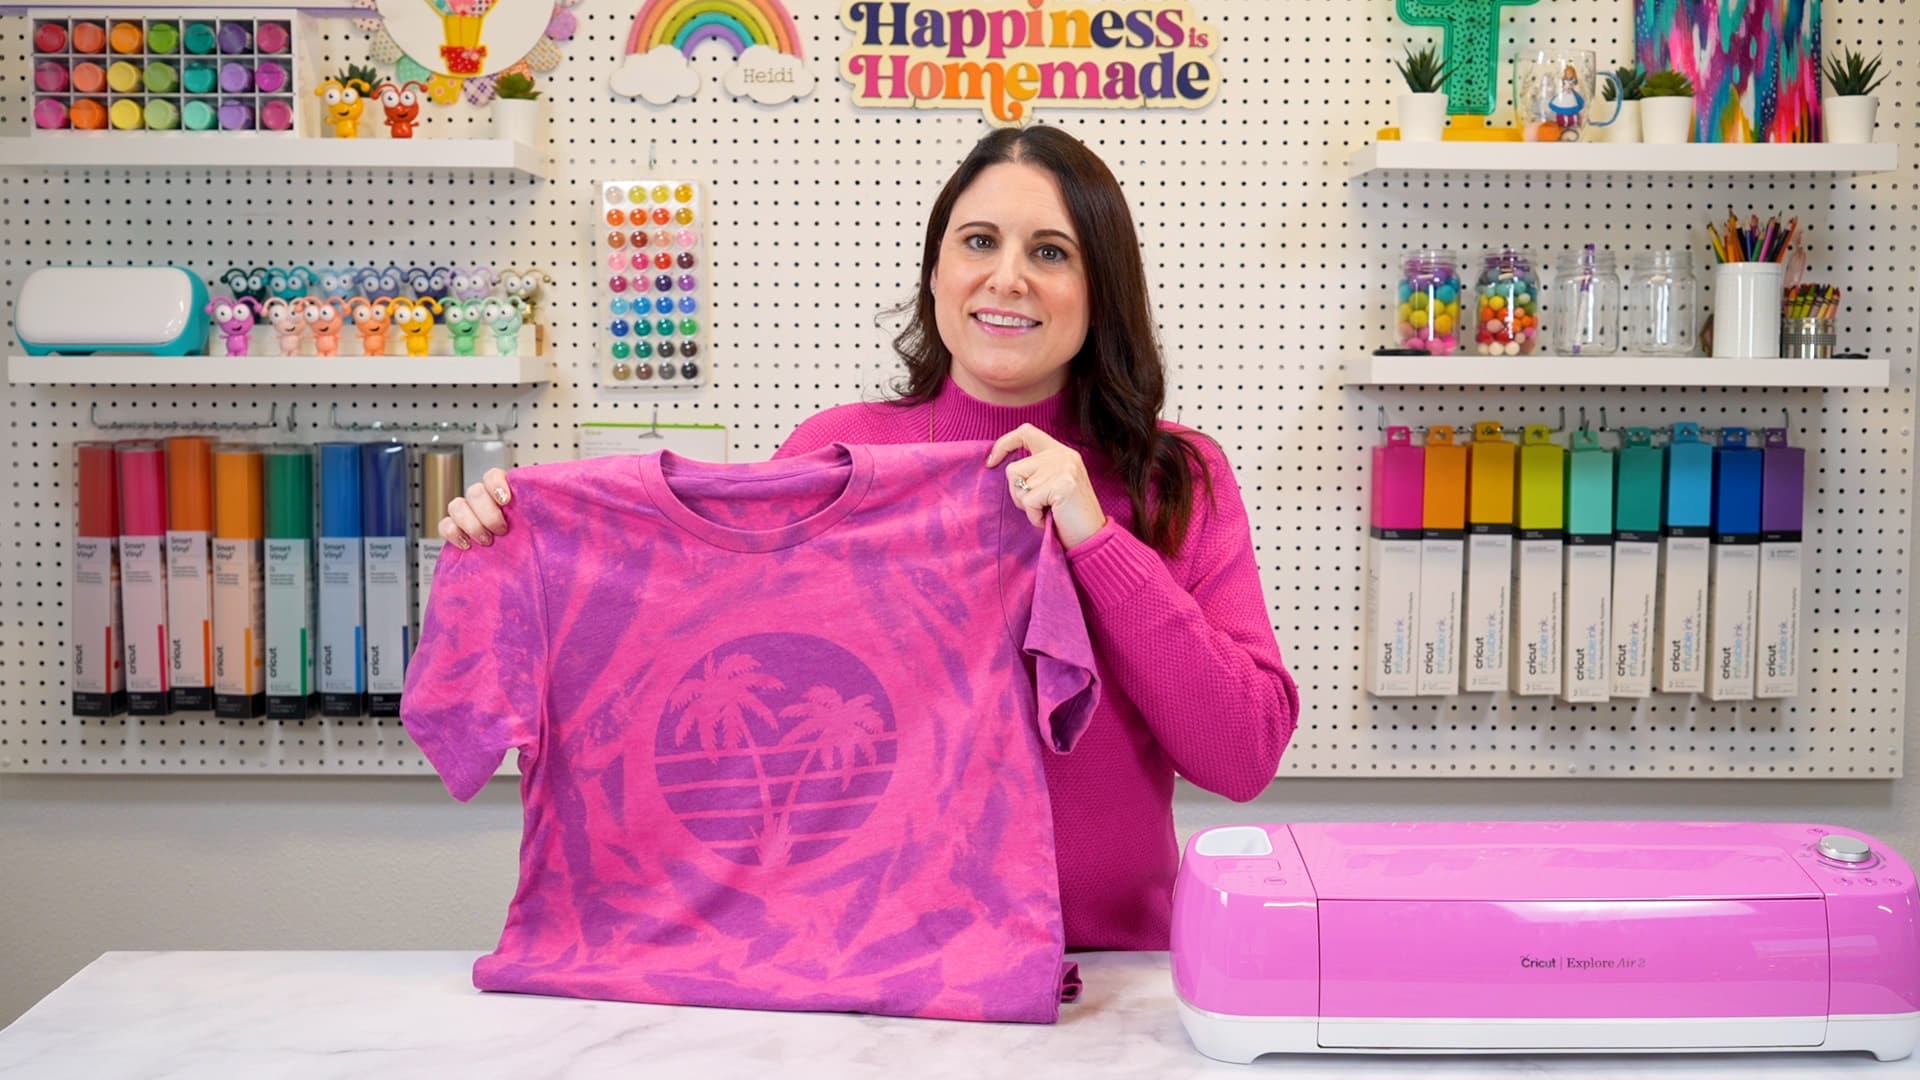
This is a SUPER cool custom shirt! This one-of-a-kind reverse tie dye design is sure to be a huge hit!
Bleach Shirt Design: Frequently Asked Questions
How Do I Wash My Bleached Shirts?
Wash the shirt separately in cold water with a small amount of mild detergent to remove any remaining bleach residue. You can either air-dry the shirt or tumble-dry it on low heat, but keep in mind that tumble-drying can cause the shirt to shrink slightly.
After its initial washing, your bleach-stenciled shirt can be washed with your other like-colored clothing.
I Don’t Have a Cricut? How Can I Make a Bleach Stencil?
If you don’t have an electronic cutting machine, you can use an X-Acto knife to create a stencil out of freezer paper like the one shown above. You can read more about how to use a Freezer Paper Stencil here – just swap the Cricut steps for a craft knife and the doormat for a shirt!
Additional Bleach Shirt Tips and Techniques
Now that you have a better understanding of the bleach stenciling process, here are some extra tips and techniques to help you create even more stunning designs.
- Experiment with different ways to apply the bleach spray. You can try using different spray patterns, concentrations of bleach, or even a paintbrush for a more controlled bleach painting effect.
- Traditional tie-dye techniques can be combined with bleach shirt designs for an even more personalized look. Try experimenting with different tie-dye patterns and colors alongside your bleach stencils for a truly one-of-a-kind shirt.
- Don’t forget to have fun! Bleach shirt projects are a great way to express your creativity and make a statement with your wardrobe. Invite some friends over for a bleach shirt party and enjoy the process of creating unique designs together.
Even More Bleach and Tie-Dye Fun
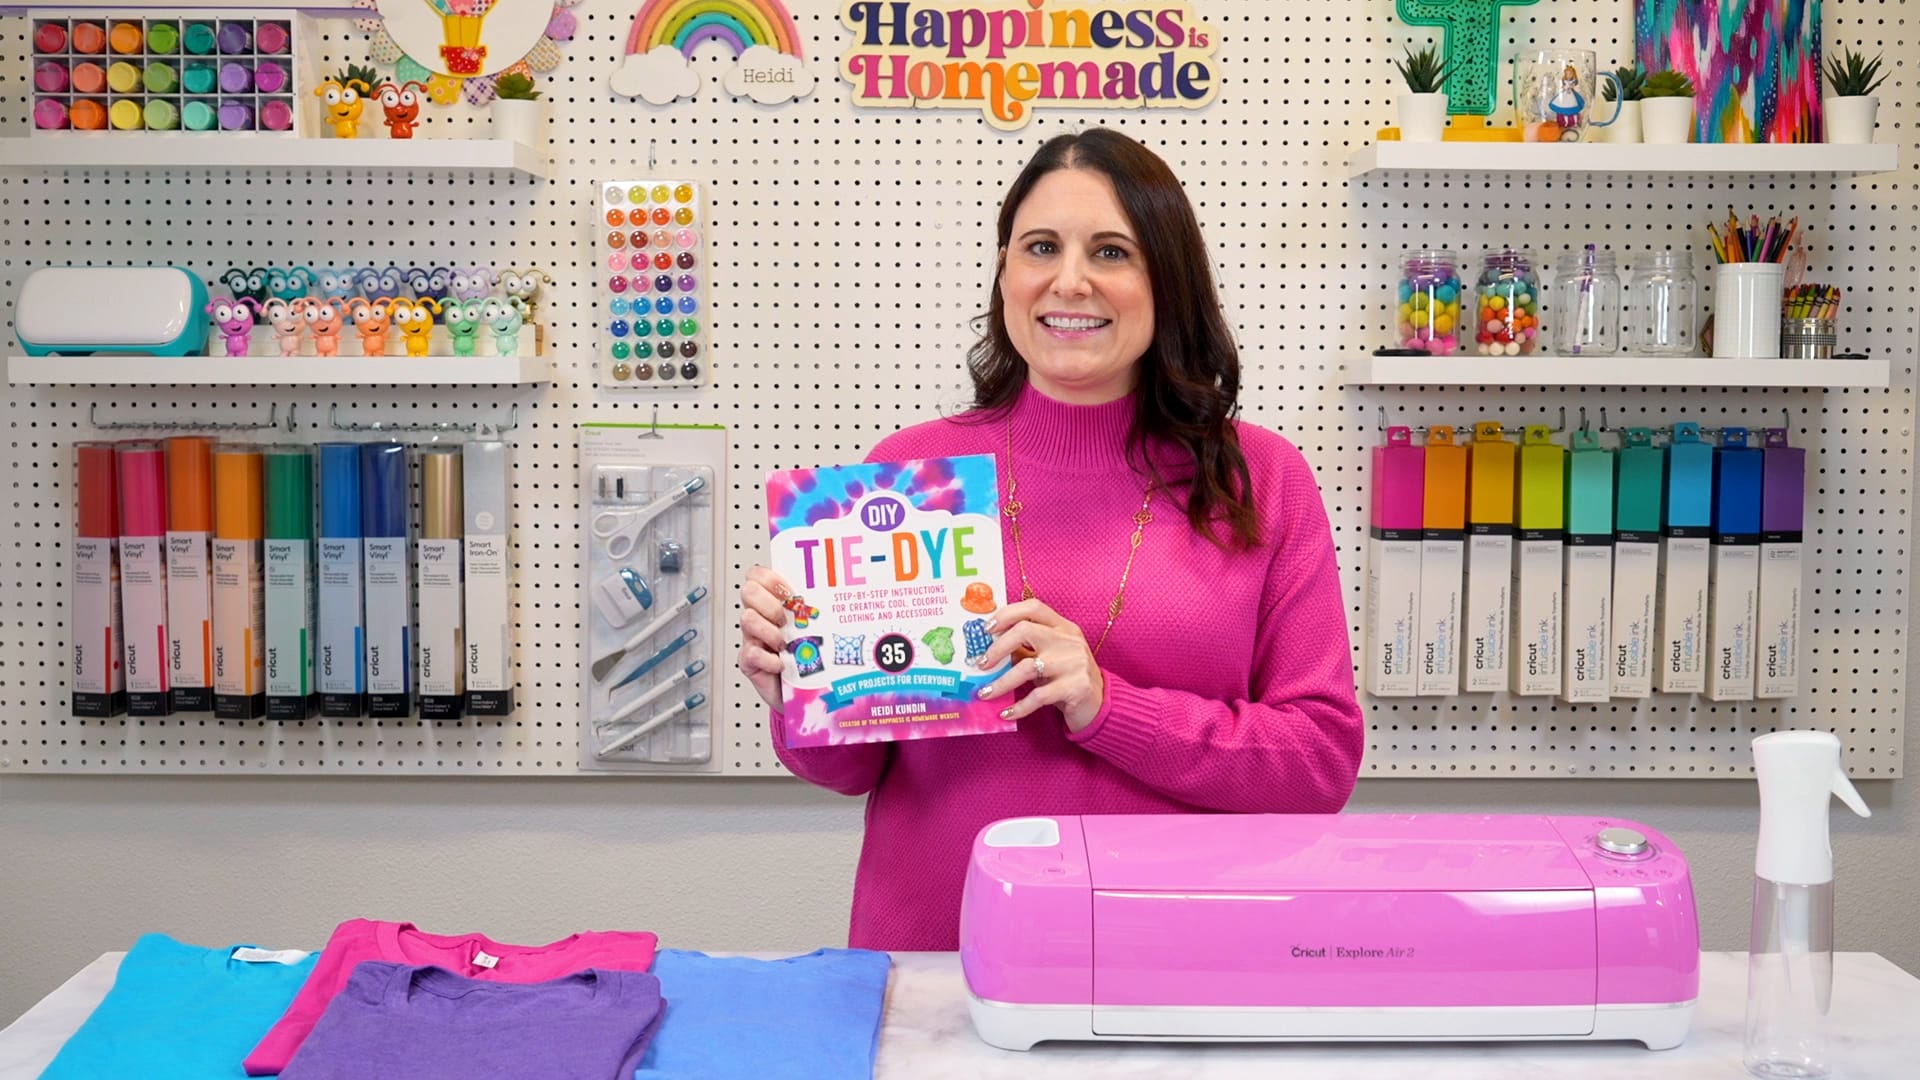
Grab your copy of my book, DIY Tie-Dye, for 35+ awesome tie-dye projects like the ones you see here! There’s something fun for everyone!
Creating bleach shirt designs is an easy way to personalize your wardrobe and express your individuality! With a few simple supplies, a little creativity, and some patience, you can transform ordinary poly cotton shirts into custom works of wearable art.
Don’t be afraid to experiment with different techniques, stencil designs, and other creative ways to incorporate bleach into your designs to create a truly one-of-a-kind shirt that represents your unique style. Making your own shirt is a super fun way to spend an hour of your time!

Check Out These Other Fun Craft Ideas!

Pin These Bleach Stenciled Shirt Designs for Later!

Heidi Kundin has captivated the hearts of millions with her colorful and inspiring approach to crafting, celebrations, and family fun. With over 15 years of experience, Happiness is Homemade has become a must-visit destination for those seeking quick and easy creative ideas and last-minute solutions. Heidi’s warm personality shines through her posts, inviting readers to join her on a creative journey that’s fun, rewarding, and achievable. Heidi is also the author of Homemade Bath Bombs & More and DIY Tie-Dye.