
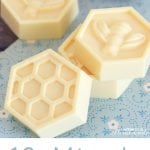
This easy DIY Milk and Honey soap can be made in just 10 minutes, and it boasts lots of great skin benefits from the goats milk and honey! A wonderful quick and easy homemade gift idea!

This post may contain affiliate links. I will receive a small commission from these sales at no additional cost to you!
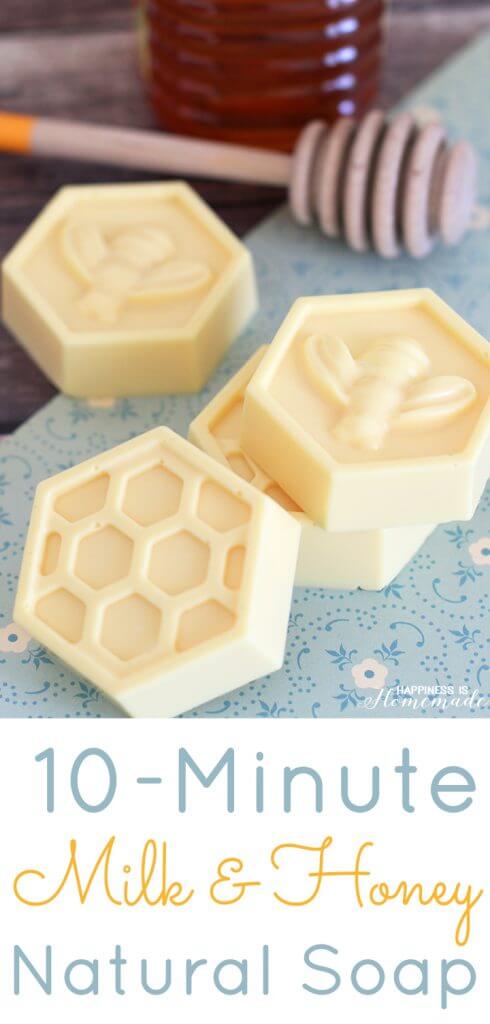
HOMEMADE MILK & HONEY SOAP
Homemade milk and honey soap have always been one of my favorites. It smells divine, and there are loads of skin benefits from the honey – it’s moisturizing, clarifying, soothing, and also naturally antibacterial. Because of these properties, honey is fantastic for the treatment of acne and aging and for general complexion brightening. C’mon now, we all could use a little bit of anti-aging and complexion brightening, right?
HOW TO MAKE MILK AND HONEY SOAP:
I love these natural soaps for their sweet delicate aroma and for the incredible skin benefits, but what I love even more is the fact that I can whip up an entire batch of these beauties in under 10 minutes! They’ll take a little longer to firm up, but the actual “work” part is done in less than 10 minutes.
SUPPLIES TO MAKE DIY MILK & HONEY SOAP:
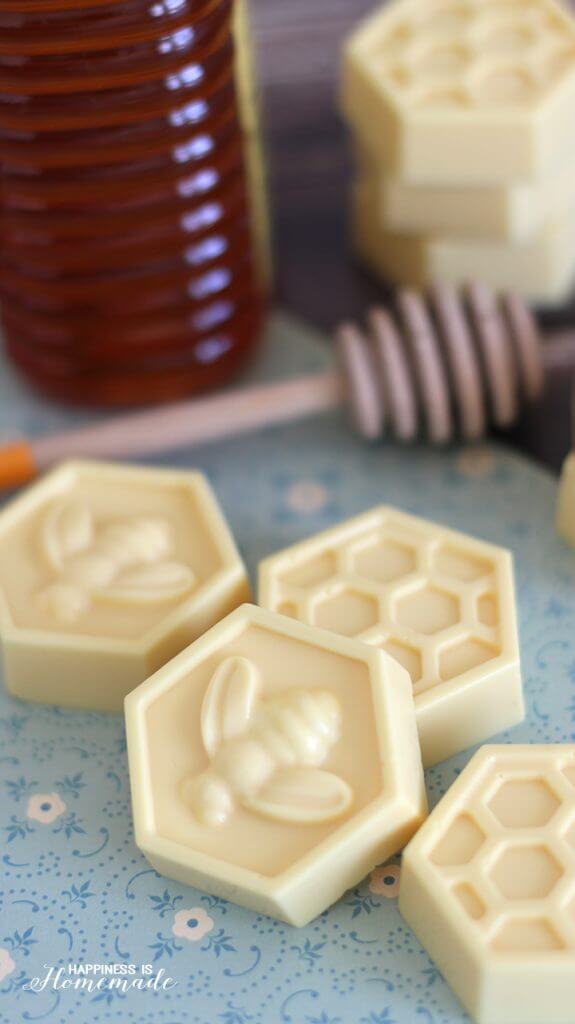
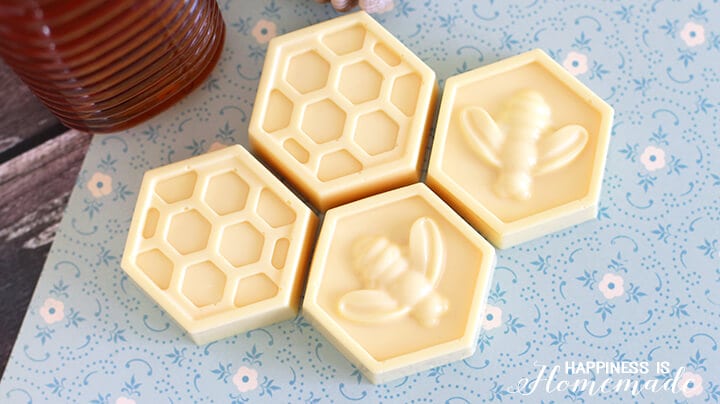
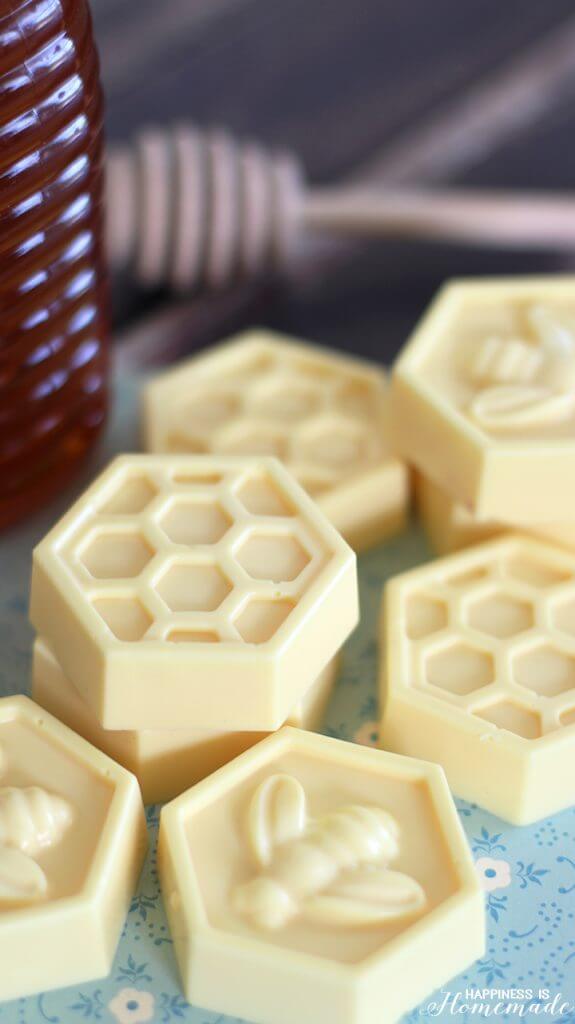
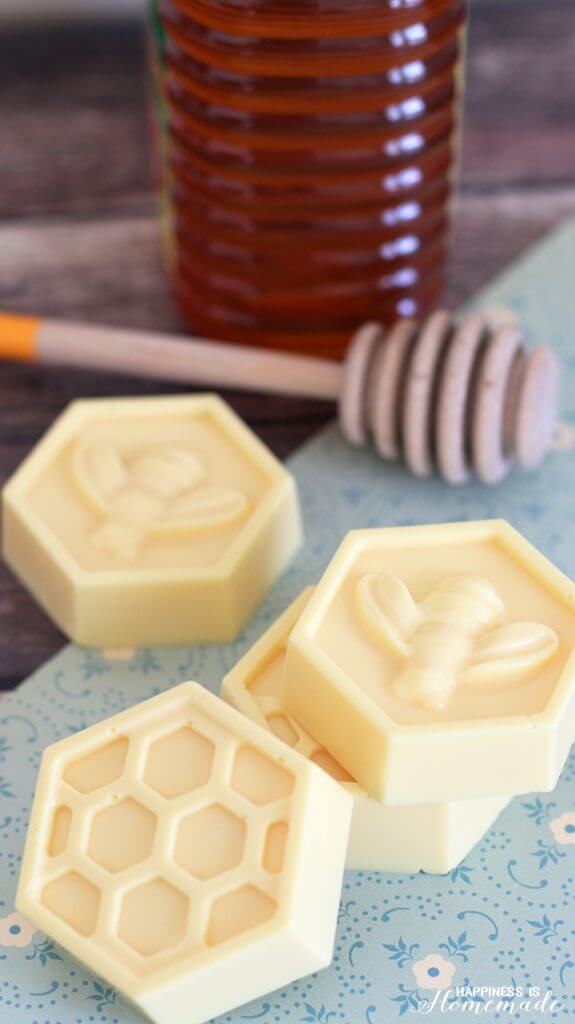
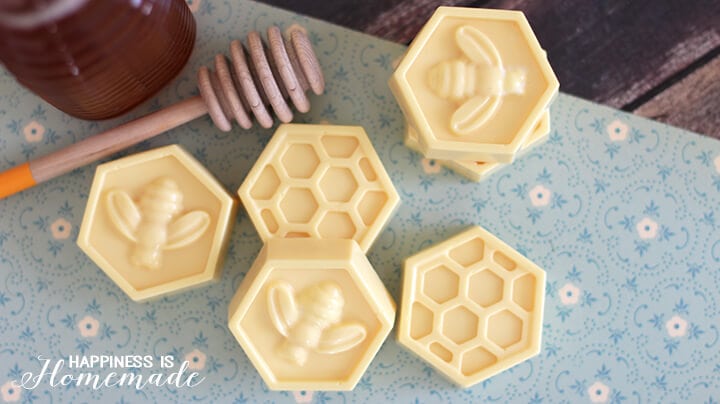
- Goat’s Milk Soap Base
- Silicone Honeycomb Mold
- Organic Raw Honey
- 4-Cup Pyrex Glass Measuring Cup (or similar)
- Yellow & Red Soap Colorant (optional)
I didn’t take any step-by-step photos of the process this time, but I did create a quick video that will show you just how easy it is to make these soaps!
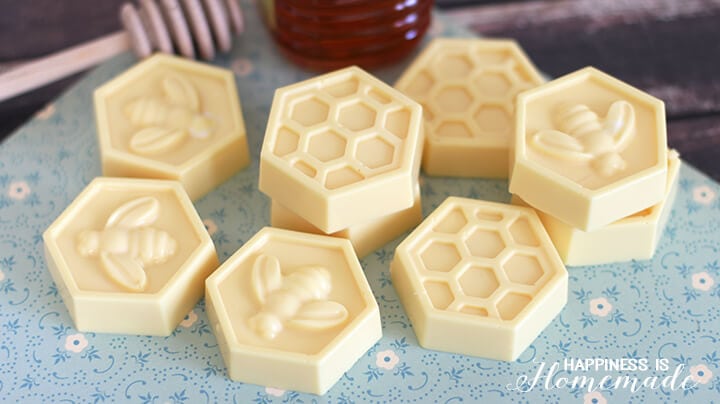
I generally use about 1 lb (or half of the block) of soap base at a time to make ten honeycomb soaps – if you want to fill the entire mold (19 soaps), use the full 2 lbs of soap base. Slice the block of goat’s milk soap base into cubes that are approximately ½” in size. The soap base is soft, and it cuts easily with a kitchen knife.
Place the cubes inside of a 4-cup Pyrex measuring cup, and melt in the microwave. Melt in 20-30 second increments, stirring well after each microwave session, to ensure that the soap is completely melted.
When the soap is completely melted, stir in 3 tablespoons of honey and a few drops of yellow soap colorant. I also added one drop of red colorant to give my soap more of a golden hue.
Pour the melted soap into the honeycomb mold, and allow to sit undisturbed until cool. The cooling process can take anywhere from 30 minutes to 2 hours depending on temperature and humidity levels.
When the soap is cool and firm, carefully remove them from the silicone mold.
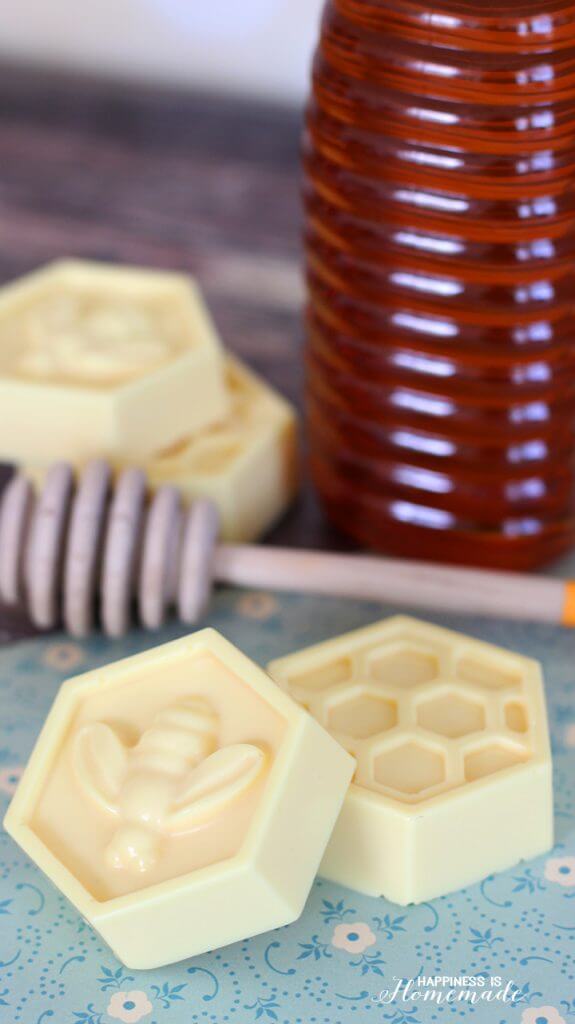
These DIY milk & honey soaps make a fantastic homemade gift – perfect for friends, family, teachers, coaches, and neighbors! They’re great for fundraisers and craft fairs, too!
—————————————————————————————
Frequently Asked Questions:
We get asked a LOT of questions about our melt and pour homemade soaps, so here are a few FAQs that you might find useful!
Do melt and pour soaps need to cure?
No! Unlike cold process soaps, your new melt and pour soaps will be ready to use just as soon as they have completely cooled and hardened.
How long does homemade soap last?
The shelf life for melt and pour soap base is around two years, but the shelf life of your finished soaps will depend upon what you have added to them. Soaps with simple color and fragrance additives should last at least the full two years. Soaps with added botanicals or fresh ingredients will have a shorter shelf life.
Many soaps will last well beyond the two year shelf life, however, you may find that the color or fragrance fades over time, and the soaps may begin to lose moisture and become dry.
For these milk and honey soaps, honey has an extremely long shelf life, so they will be good for at least two years if properly wrapped and stored!
How do you wrap/package/store homemade soap?
Melt and pour soaps should be wrapped and packaged soon after making. We recommend wrapping the soaps with plastic wrap or placing them in a plastic zipper bag and storing them in a cool and dry location. Soaps may also be shrink wrapped using shrink plastic and a heat gun, but be careful and work quickly so that you don’t accidentally melt the soap in the process!
Why does melt and pour soap sweat? And how can I prevent it?
Glycerin can be found in many different types of soap bases, and glycerin is known for its ability to attract moisture (which makes it great for hydrating skin!). Glycerin attracts moisture from the air which often will appear as small beads of “dew” or “sweat” on the surface of the soap. This is NOT moisture being released from the soap itself!
To prevent your melt and pour soaps from sweating, be sure to wrap them promptly and store them properly.
How do I get rid of bubbles in my soap?
Spritzing the surface of your freshly-poured soap with 91% Isopropyl Alcohol (or higher) will break the surface tension and help release trapped air bubbles.
Can I use a different type of soap base?
You bet! Well, most likely anyway. While changing the soap base may alter the benefits that are listed in our soap recipes, we have found that 98% of our recipes can be made with alternative melt and pour soap bases. Goat’s milk soap base, shea butter soap base, coconut milk soap base, glycerin soap base, and others are fairly interchangeable and will not likely alter the successful outcome of your finished soap.
What else can I add into my soap?
There are SO many different ways that you can customize your homemade soaps! Experiment with adding different essential oils, butters (shea butter and cocoa butter are fantastic options!), natural colors, botanicals, and more! You can add extra skin-nourishing benefits by including liquid oils such as coconut oil, sweet almond oil, or olive oil – use just a small amount to avoid making your bars of soap too soft!
For some ideas and inspiration, be sure to check out our entire collection of DIY bath and body products!

What You’ll Need:
- 2 lb Goat Milk Soap Base
- 5 tbsp Raw Honey
- Gold Soap Colorant
- 91% Isopropyl Alcohol, in a spray bottle
- Microwave-safe Measuring Cup
- 12” Silicone Honeycomb Mold
Instructions:
- Slice the goat’s milk soap base into small cubes and place into a microwave-safe measuring cup. Melt in the microwave in 30-second increments, stirring well after each session, to ensure that the soap is completely melted.
- Carefully stir in gold soap colorant and honey. Pour the melted soap into the mold and spritz with isopropyl alcohol to remove any air bubbles.
- Allow the soaps to sit undisturbed until completely firm (approximately 60-90 minutes depending on temperature and humidity) before unmolding.


Pin This Homemade Soap for Later!

Heidi Kundin has captivated the hearts of millions with her colorful and inspiring approach to crafting, celebrations, and family fun. With over 15 years of experience, Happiness is Homemade has become a must-visit destination for those seeking quick and easy creative ideas and last-minute solutions. Heidi’s warm personality shines through her posts, inviting readers to join her on a creative journey that’s fun, rewarding, and achievable. Heidi is also the author of Homemade Bath Bombs & More and DIY Tie-Dye.
I am hosting a Tea Party next month with a ‘bee’ theme (bee-attitudes!). I had already found the bee/honeycomb mold on eBay as I wanted to make up little gifts for my ladies to take home and enjoy. Found your soap recipe on pinterest and it was super quick and extremely easy! 1 lb of soap base made the entire 19 cavity mold. The soaps came out beautifully and I packaged them in small cellophane bags with black ribbons. Thank you so much for posting this recipe!
Love your recipe…..
Can you add oats to these without messing up the recipe and molding process?
Hi I made these last night, and I was going to give them as Christmas gifts what do you think the best way to wrap them is, and is it ok to add a few drops of some essential oils.
I usually wrap them in plastic wrap or plastic bags with a ribbon tie. You can add essential oils at the same time that you add the honey during the making process. 🙂
I am making these for the second time. I used them as holiday gifts last year and will again this year. They are great and everyone loves them. Thanks!
I really enjoyed these tips for making homemade soap. I was researching about doing and I came across your bolg. congratulations !
Hi there,
Would this recipe work if I replaced the goat milk soap base with Crystal African Black soap base?
Thank you!
Hi Rebecca, I have not tried this personally, so I can’t say if it would work or not. If you try it out, please come back and let us know how it worked out for you! 🙂
This was my first time making soap. I love yours, not mine. First the soap began to harden as I stirred the colors in, I did one drop red and five yellow and my color is dull. I will be trying this again……can you offer any advice??????
Hi Dianna,
If the soap begins to harden as you stir the colors in, simply pop it back in the microwave for an additional 20-30 seconds and stir again. If the color is dull, you can add more colorant until it reaches the desired shade. Different brands (and even different bottles of the same brand) seem to have different color intensity, so feel free to use more if needed. Good luck! 🙂
Thank you Heidi, I am going to make this again today…!!!! My family loves this soap. Can’t wait to see how it comes out!!!!! thank you Heidi..!!!! Have a blessed Thanksgiving.
Hello Heidi,
I am so glad I stopped by this site… this is so easy and good. Thanx for sharing. Had a query that how long the soap can be stores for. Please let me know.
I bet it smells divine.
How much honey did you use? 4oz 6oz ???
Found the amount, must have missed it the first time I read it! Thanks so much for recipe!
I love doing DIY and just learn more this time honey soap, how wonderful, next week will already start doing, I hope you get as good as yours. 🙂
Hi,
Doe the honey has to be organic? or it can be any honey?
Hi Chen, you can use any honey, but using a honey that is minimally processed will provide you with the best benefits.
I made these for the goody bags we gave away for my granddaughter’s first birthday party. It was a Bee themed party. They turned out perfect! Super easy and everyone loved them.
What a great idea! I’m so glad that you and your guests loved them! 🙂
Hi! These are adorable! Thank you for sharing. I’m excited to give these and the coffee ones a try. How long will they last – shelf life? I assume the scent and color slowly fades. I have school this Fall and was hoping to get a start on Christmas things. 🙂 Appologies if I missed someone asking the same question above.
Hi Laurel, the scent does fade just a bit over time, but I have soaps on my shelf that I made last year that smell ALMOST as strong as they originally did, and the color hasn’t faded at all. I actually just made a batch the other day that I’m saving for the holidays as well. The key to keeping the soaps nice for an extended period of time is storing them in plastic. Either wrap each soap individually in a layer of plastic wrap, and store in a large ziploc bag, or store each soap in their own small ziploc bag. Keep them someplace cool and away from direct sunlight. That should keep them fine from now until the holidays! 🙂
Thank you so much!
Hi Heidi. Loving your ideas and your beautiful way of explaining ways to do this. For the colorant, could I use yellow food coloring? I’m on a budget and new to soap making. I’m thinking about doing this with my girls’ program in the future. Thanks for your reply.
Thanks for the kind words, Becky Jane! Food coloring will work, however, the color does tend to fade quite a bit more than soap colorant will, and you run the risk of the food coloring transferring to skin if you use too much of it. The soap colorant is specially formulated to bond with the soap base so that the color does not transfer to skin, etc. 🙂
I made these with my Youth group at church. We made them as gifts for the Youth Pastor that was leaving. So easy to make. The kids did everything themselves. It takes a while to set. It smells and feels so good. I bought everything except the honey online (Amazon) thanks for the shopping link. And thanks for the idea. The kids LOVED making them.
These soaps look so cute, I love the bee theme. I agree that honey and milk is an excellent combination, especially in soap. I was worried that this would be hard to make, but I feel more confident that I can do this after I’ve read it. Thank you for this recipe!
Thank you for sharing great soap recipes here. I am o happy to have found your blog. Can you please make recipe for lavender goat milk soap? Thank you in advance.
Yummy and beautiful looking. Cannot wait to try making these. I am hoping to make and give as gifts. Thank you so much for sharing.